Cross-Arms Push-Up: Proper Form, Sets, Tips & FAQ
Learn the Cross-Arms Push-Up with proper form, setup, execution tips, sets by goal, common mistakes, FAQs, and recommended equipment to build triceps strength and upper-body control.
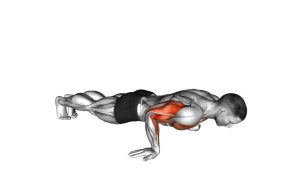
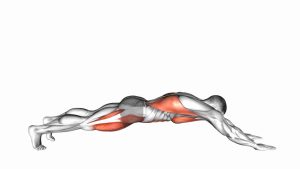
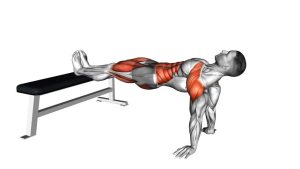
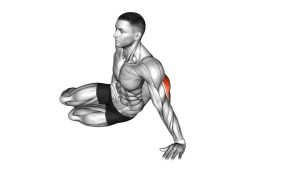
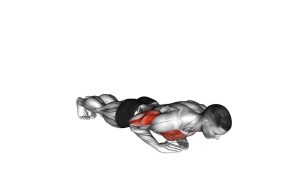
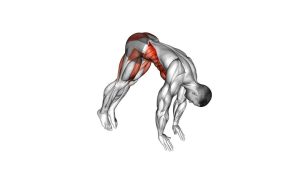
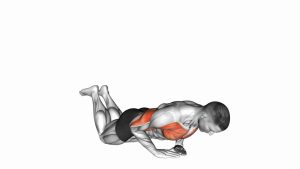
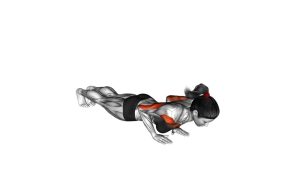
Cross-Arms Push-Up
This variation works best when performed with precision rather than speed. The movement should feel smooth and deliberate, with the chest, triceps, and core working together to raise and lower the body as one solid unit. Because the close hand position increases stress on the wrists and elbows, it is important to own a strong standard push-up before progressing to this version.
Quick Overview
| Body Part | Triceps |
|---|---|
| Primary Muscle | Triceps brachii |
| Secondary Muscle | Inner chest, anterior deltoids, core stabilizers |
| Equipment | Bodyweight only (optional: push-up bars, mat, wrist support) |
| Difficulty | Intermediate to Advanced |
Sets & Reps (By Goal)
- Strength: 3–5 sets × 4–8 reps, resting 90–150 seconds between sets
- Muscle growth: 3–4 sets × 8–12 reps, resting 60–90 seconds between sets
- Bodyweight control / skill: 2–4 sets × 5–8 clean reps with a slow tempo
- Endurance: 2–3 sets × 12–20 reps, only if form stays strict throughout
Progression rule: Add reps first, then slow the tempo, pause at the bottom, elevate the feet, or use a weighted vest once you can perform every rep with full-body alignment and tucked elbows.
Setup / Starting Position
- Start in a high plank: Place your hands close together under the center of your chest in the cross-arms or narrow pressing position shown in the movement.
- Brace the body: Tighten your abs, squeeze your glutes, and keep your head, torso, hips, and legs in one straight line.
- Set the shoulders: Pull the shoulders down and back slightly so they stay stable instead of shrugging toward the ears.
- Tuck the elbows: Aim to keep the elbows close to the ribs instead of flaring them wide.
- Establish a neutral neck: Look slightly ahead of your hands so the neck stays long and aligned.
Tip: If the floor position feels harsh on the wrists, use push-up handles or elevate the hands on sturdy blocks to make the setup more joint-friendly.
Execution (Step-by-Step)
- Begin the descent: Bend your elbows slowly and lower your chest toward the floor while keeping the elbows tucked close to your sides.
- Stay rigid: Keep the torso locked in place so the body lowers as one unit without sagging at the hips or lifting the glutes.
- Reach the bottom under control: Lower until your chest is just above the floor or as deep as you can go without losing shoulder position.
- Press hard through the hands: Drive the floor away and straighten your arms, focusing on triceps extension and chest engagement.
- Finish tall at the top: Return to the starting plank without snapping the elbows or letting the shoulders roll forward.
Pro Tips & Common Mistakes
- Keep the elbows tucked: This is what shifts more work to the triceps and protects shoulder positioning.
- Do not rush the eccentric: A slow lowering phase improves control, tension, and joint awareness.
- Stay in one line: Avoid sagging hips, piking, or craning the neck forward.
- Do not force depth: Only lower as far as you can while keeping the shoulders stable and the chest open.
- Avoid wrist overload: If wrist extension bothers you, use push-up bars or handles.
- Master the basics first: Strong standard push-ups and close-grip push-ups make this variation safer and more productive.
FAQ
What muscles does the Cross-Arms Push-Up work most?
The main target is the triceps. The exercise also trains the inner chest, front shoulders, and core stabilizers because the body must stay rigid throughout the rep.
Is this harder than a regular push-up?
Yes. The narrow pressing position usually makes the exercise more demanding on the triceps, wrists, and shoulder stabilizers than a standard push-up.
Can beginners do Cross-Arms Push-Ups?
Most beginners should first build strength with incline push-ups, knee push-ups, standard push-ups, and close-grip push-ups before attempting this variation.
How can I make this exercise easier?
Elevate your hands on a bench or box, shorten the range of motion slightly, or switch to a close-grip incline push-up until your strength improves.
How can I make this exercise harder?
Slow down the tempo, add a pause at the bottom, elevate the feet, or wear a weighted vest once you can perform clean reps consistently.
Recommended Equipment
- Push-Up Bars — help reduce wrist extension stress and can improve pressing comfort
- Exercise Mat — adds cushioning and grip for floor-based bodyweight training
- Wrist Wraps — useful for lifters who want extra wrist support during narrow push-up variations
- Resistance Bands — great for warm-ups, triceps activation, and upper-body accessory work
- Weighted Vest — an effective progression tool once bodyweight reps become too easy
Choose equipment that supports cleaner movement and better joint comfort, not just more difficulty.