Dumbbell Devil’s Press (Plyometrics): How to Do It, Muscles Worked, Sets & Tips
Master the Dumbbell Devil’s Press (plyometric variation) to build full-body power and conditioning. Learn proper setup, step-by-step form, sets & reps by goal, common mistakes, FAQs, and recommended gear.
Dumbbell Devil’s Press (Plyometric Variation)
This exercise rewards efficient mechanics: a tight plank, a clean hip hinge, and a stable overhead finish. You should feel the workload across the legs, glutes, core, shoulders, and grip—plus a major cardio hit. If reps get sloppy, reduce the load, slow the pace, or switch to a step-back / step-up version.
Quick Overview
| Body Part | Full Body (Plyometric / Conditioning) |
|---|---|
| Primary Muscle | Glutes + hamstrings (hip extension), shoulders (overhead lockout) |
| Secondary Muscle | Quads, core (anti-extension), upper back/lats (control), triceps, forearms/grip |
| Equipment | Two dumbbells (hex dumbbells preferred for stability on the floor) |
| Difficulty | Advanced (high coordination + high fatigue demand) |
Sets & Reps (By Goal)
- Conditioning / HIIT: 4–8 rounds × 6–12 reps (60–120 sec rest as needed)
- Metabolic finisher: 2–4 sets × 8–15 reps (45–90 sec rest)
- Power emphasis (clean reps): 4–6 sets × 3–6 reps (90–150 sec rest, heavier DBs)
- Time-based density: 10–15 minutes EMOM: 6–10 reps (adjust reps to keep form crisp)
Progression rule: First increase efficiency (same reps, less rest). Next add reps or rounds. Only increase load when your plank stays tight, your hinge stays neutral, and overhead lockout remains stable.
Setup / Starting Position
- Choose dumbbells you can control: Start lighter than you think—fatigue climbs quickly.
- Foot stance: Stand about hip-width with dumbbells at your sides, shoulders relaxed but “packed.”
- Brace: Exhale slightly, tighten your abs, and keep ribs down (avoid over-arching).
- Plan your floor position: When you place the dumbbells down, keep them under your shoulders (stable base).
- Space + safety: Clear room overhead and behind you; you’ll swing and press explosively.
Tip: Hex dumbbells reduce rolling on the floor and help keep your plank stable.
Execution (Step-by-Step)
- Hinge down: Push hips back, bend knees, and place dumbbells on the floor just outside your feet.
- Plyo kick-back to plank: Jump feet back to a strong plank (wrists under shoulders; body in one line).
- Chest-to-floor: Lower with control until chest and thighs lightly touch the ground (burpee-style).
- Push up + plyo jump forward: Press up, then jump feet forward outside the dumbbells into a strong hinge position.
- Load the hinge: Swing the dumbbells back between your legs with a flat back (like a double kettlebell swing).
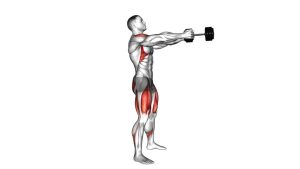
- Explode with the hips: Drive hips forward hard; dumbbells travel up from momentum—arms guide the path.
- Finish overhead: Transition into a strong overhead lockout (biceps near ears, core tight, glutes squeezed).
- Reset safely: Lower dumbbells under control to your sides, then repeat.
Pro Tips & Common Mistakes
Pro Tips
- Hips drive the rep: Think “jump with the hips,” not “curl the dumbbells.”
- Plank first: A tight plank saves your low back and keeps transitions clean.
- Use a smooth arc: Let the swing flow into the press/lockout—don’t pause and muscle it up.
- Stay stacked overhead: Dumbbells over shoulders, shoulders over hips (no rib flare).
- Scale smart: Step back/step forward, remove the chest-to-floor, or perform a swing-to-press without the burpee.
Common Mistakes
- Rounding the back: Usually from rushing the jump forward or hinging too deep.
- Pulling with arms early: Turns it into an awkward front raise and burns shoulders fast.
- Letting hips stay behind: Incomplete hip extension kills power and overloads the low back.
- Soft overhead lockout: Press to full control—don’t “catch” overhead with loose core.
- Too heavy too soon: Form collapse happens fast—earn load increases.
FAQ
Where should I feel the Devil’s Press?
Mostly a whole-body effort: legs and glutes drive the swing, core stabilizes through the burpee and overhead finish, and shoulders/triceps lock out overhead. If it feels like all shoulders and low back, lighten the load and clean up the hinge + brace.
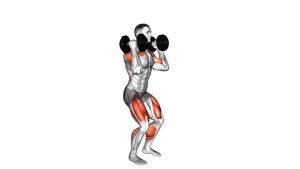
What’s the difference between Devil’s Press and a dumbbell thruster?
A thruster is a squat-to-press. The Devil’s Press combines a burpee with a swing-driven overhead finish. It’s typically more conditioning-heavy and hinge-dominant than a thruster.
How do I scale this for beginners?
Use a step-back plank instead of jumping, skip the chest-to-floor, or do a dumbbell swing to push press without the burpee. Keep reps low and form crisp.
Is the overhead portion a press or more of a “guide”?
Often it’s a hybrid. The hips generate the upward momentum and the arms finish the lockout. If you must strict press every rep, the dumbbells are likely too heavy or the hip drive is leaking.
How do I protect my wrists and shoulders?
Keep wrists stacked under shoulders in the plank, use stable dumbbells (hex), brace the core to avoid rib flare, and don’t slam into the bottom position. If wrists bother you, elevate hands on dumbbell handles or push-up handles.
Recommended Equipment (Optional)
- Hex Dumbbells (Pair) — stable on the floor; reduces rolling during the burpee portion
- Adjustable Dumbbells — quick load changes for intervals and progression
- Non-Slip Exercise Mat — improves traction and comfort on burpee transitions
- Wrist Wraps (Gym) — optional support if wrists fatigue during planks/push-ups
- Lifting Gloves / Grip Support — helps with sweat + grip endurance for longer sets
Tip: Choose a load you can control overhead every rep. When fatigue rises, scale with lighter dumbbells or slower transitions.