Front Lever Reps (Waist Height): Form, Muscles Worked, Sets, Tips & FAQ
Learn how to perform Front Lever Reps at waist height with strict form. Discover muscles worked, setup, execution steps, sets by goal, common mistakes, FAQs, and recommended equipment.
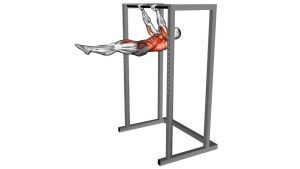
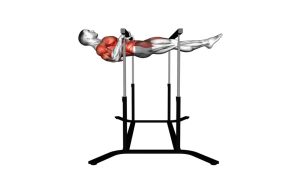
Front Lever Reps (Waist Height)
This exercise is best treated as a high-skill strength movement, not a casual rep exercise. Even a small range of motion creates major tension across the upper back, trunk, and shoulders. Clean reps require strict body alignment, active shoulder depression, strong abdominal bracing, and the ability to resist swinging. If your hips drop too far, your elbows bend, or momentum starts taking over, the exercise becomes less effective and much harder to control.
Quick Overview
| Body Part | Back |
|---|---|
| Primary Muscle | Latissimus dorsi |
| Secondary Muscle | Core, teres major, rear delts, lower traps, spinal stabilizers, forearms |
| Equipment | Parallel bars, dip station, or sturdy low bars |
| Difficulty | Advanced (high tension calisthenics skill) |
Sets & Reps (By Goal)
- Skill practice: 3–5 sets × 2–5 clean reps with full control, 90–150 sec rest
- Strength development: 4–6 sets × 2–4 reps, 2–3 min rest
- Front lever accessory work: 3–4 sets × 3–6 short-range reps after easier lever progressions
- Advanced isometric + rep combo: 2–4 sets of 5–10 sec hold followed by 2–3 reps
Progression rule: Increase quality before quantity. Add reps only when you can maintain a straight body line, locked elbows, and a smooth tempo without swinging.
Setup / Starting Position
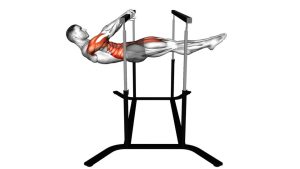
- Grip the bars firmly: Use a secure overhand grip on parallel bars or a dip station at about waist height.
- Set the shoulders: Press down through the bars and lock the elbows. Keep the shoulders active, not loose.
- Brace the trunk: Tighten the abs, glutes, and legs so your body acts like one rigid lever.
- Straighten the lower body: Keep the legs together and the knees fully extended unless using an easier progression.
- Lift into lever position: Bring the body close to horizontal with the chest open, ribs controlled, and neck neutral.
Tip: Think of pushing the bars down while pulling your torso long. That combination helps create the tension needed for a cleaner lever.
Execution (Step-by-Step)
- Establish the hold: Start in a strong front lever position with your body nearly parallel to the ground.
- Lower under control: Let the hips and legs dip slightly below horizontal without losing your straight body line.
- Keep the arms locked: Do not turn the movement into a row. The elbows stay straight throughout the rep.
- Drive back to horizontal: Use the lats, shoulders, and core to lift the body back to the top position.
- Pause briefly: Re-establish full tension at the top before beginning the next repetition.
- Repeat with precision: Stop the set as soon as body alignment, scapular control, or tempo breaks down.
Pro Tips & Common Mistakes
- Keep your body hollow and rigid: A loose midsection makes the rep collapse fast.
- Think straight-arm pull: The lats should drive the movement, not elbow flexion.
- Use a small range if needed: Short, perfect reps beat bigger sloppy reps every time.
- Depress the shoulders: Stay active through the scapulae instead of hanging passively.
- Do not rush the eccentric: The lowering phase is one of the best strength-builders in this exercise.
- Avoid excessive arching: Flaring the ribs and overextending the lower back weakens the line.
- End the set early: Once the body starts shaking apart, quality is gone.
FAQ
What muscles do front lever reps work the most?
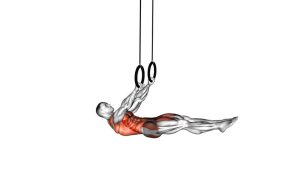
The movement mainly targets the lats, while also heavily involving the core, rear delts, teres major, scapular stabilizers, and spinal stabilizers. It is a full-body tension exercise with a strong back emphasis.
Are front lever reps harder than front lever holds?
For many athletes, yes. Reps require you to control both the lowering and lifting phases while maintaining alignment. That added movement makes them extremely demanding.
Can beginners do this exercise?
Usually not as a first front lever variation. Most people should build up with easier progressions like tuck front lever holds, advanced tuck holds, front lever negatives, and band-assisted lever work first.
Should I use momentum to get more reps?
No. Momentum reduces the training effect and usually hides weak positions. Keep the reps strict, controlled, and limited to the range you can actually own.
How often should I train front lever reps?
Most athletes do best with 1–3 sessions per week depending on total pulling volume, recovery, and skill level. Because the exercise is very taxing, quality matters more than frequency.
Recommended Equipment (Optional)
- Dip Station / Parallel Bars — the main setup for practicing waist-height front lever reps and other calisthenics skills
- Heavy-Duty Parallettes — useful for straight-arm support work, lever drills, and static holds
- Resistance Bands Set — great for assisted front lever progressions and extra lat activation work
- Gymnastics Grips / Training Hand Grips — can improve comfort and help manage friction during repeated bar work
- Ab Wheel — a strong accessory tool for building the core stiffness needed for advanced lever training
Tip: The best equipment for front lever progress is the equipment that lets you train consistently with strong form. Use assistance tools when needed so each rep stays controlled.