Lever Biceps Curl: Proper Form, Muscles Worked, Sets, Tips & FAQ
Learn how to perform the Lever Biceps Curl with proper form to build stronger, fuller biceps. Includes muscles worked, setup, step-by-step execution, sets by goal, common mistakes, FAQ, and recommended equipment.
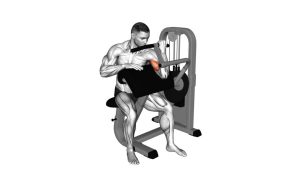
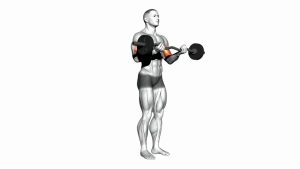
Lever Biceps Curl
This exercise is ideal for building the upper arms with a more stable setup than free-weight curls. The guided path makes it easier to reduce momentum, improve mind-muscle connection, and train the biceps through a full range of motion. You should feel the work mostly in the front of the upper arms, not in the shoulders, lower back, or wrists.
Quick Overview
| Body Part | Biceps |
|---|---|
| Primary Muscle | Biceps brachii |
| Secondary Muscle | Brachialis, brachioradialis, forearm flexors |
| Equipment | Lever biceps curl machine |
| Difficulty | Beginner to Intermediate |
Sets & Reps (By Goal)
- Muscle growth: 3–4 sets × 8–12 reps with 60–90 seconds rest
- Strength-focused arm work: 4–5 sets × 6–8 reps with 90–120 seconds rest
- Technique and control: 2–3 sets × 10–15 reps with light-to-moderate load and smooth tempo
- Finisher / pump work: 2–3 sets × 12–20 reps with short rest and strict form
Progression rule: Increase reps first while maintaining strict form, then add a small amount of weight. Prioritize full control on both the lifting and lowering phases.
Setup / Starting Position
- Adjust the machine: Set the seat so the handles line up comfortably with your arms and the movement feels natural at the elbow joint.
- Sit tall: Keep your chest up, spine neutral, and shoulders down and back against the pad if the machine has support.
- Grip the handles firmly: Use the machine’s designated grip, usually a supinated or underhand position.
- Set the arms: Start with the elbows near your sides or aligned with the machine arm path, depending on the design.
- Begin from the stretched position: Arms nearly straight, but avoid forcing a painful lockout.
Tip: Before your working sets, perform 1–2 light warm-up sets to check seat position, range of motion, and elbow comfort.
Execution (Step-by-Step)
- Brace and stay still: Tighten your midsection lightly and keep your torso steady against the seat.
- Curl the handles upward: Flex at the elbows and bring the handles through the machine’s arc without swinging your body.
- Keep elbows controlled: Let the biceps do the work instead of driving the movement with the shoulders.
- Squeeze at the top: Pause briefly when the biceps are fully shortened and the handles reach the top of the rep.
- Lower slowly: Return the handles under control until your arms are nearly straight again, keeping tension on the biceps.
- Repeat smoothly: Maintain the same path and tempo for every rep.
Pro Tips & Common Mistakes
- Use a full but comfortable range: Train through the machine’s path without bouncing off the bottom.
- Control the eccentric: The lowering phase is one of the best parts of the movement for biceps growth.
- Keep wrists neutral: Avoid excessive wrist curling, which shifts tension away from the biceps.
- Do not lean back: Using body momentum reduces isolation and makes the movement less effective.
- Don’t rush the top: A brief squeeze improves mind-muscle connection and helps finish the rep cleanly.
- Adjust before loading heavy: A poor seat setup can make a good machine feel awkward on the elbows.
FAQ
What muscles does the Lever Biceps Curl work?
The main target is the biceps brachii. It also involves the brachialis, brachioradialis, and other forearm flexors that assist elbow flexion.
Is the Lever Biceps Curl better than dumbbell curls?
It is not automatically better, but it is often easier for strict isolation because the machine provides stability and a guided path. Dumbbell curls require more coordination, while lever curls make it easier to reduce momentum.
Should I lock out my arms at the bottom?
You can lower close to full extension, but avoid snapping into lockout or letting the weight crash down. Keep the movement controlled and pain-free.
Can beginners use this machine?
Yes. The Lever Biceps Curl is very beginner-friendly because it simplifies setup and helps teach controlled elbow flexion. Start with a manageable weight and focus on consistent form.
Why do I feel this in my shoulders instead of my biceps?
That usually happens when the elbows drift, the torso leans, or the load is too heavy. Reduce the weight, adjust the seat, and keep your shoulders relaxed while curling.
Recommended Equipment
- Weightlifting Gloves — helps improve grip comfort on machine handles during higher-volume arm sessions
- Wrist Wraps — useful for lifters who want extra wrist support during curling movements
- Resistance Bands Set — great for biceps warm-ups, burnout sets, or training when you are away from the machine
- Foam Roller — useful for general upper-body recovery and soft-tissue work after arm training
- Gym Log Book — helps track loads, reps, and progression for long-term biceps growth
Tip: The machine itself is the main tool here, so extra equipment should support comfort, recovery, and progression rather than replace strict form.