Lever Seated Dip: Proper Form, Sets, Muscles Worked & FAQ
Learn how to do the Lever Seated Dip with proper form to target the triceps safely and effectively. Includes setup, step-by-step execution, sets and reps by goal, mistakes to avoid, FAQs, and recommended equipment.
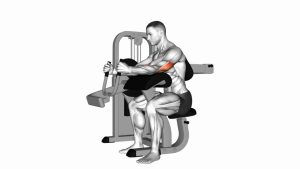
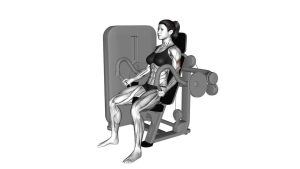
Lever Seated Dip
This exercise is especially useful for lifters who want a more controlled alternative to parallel-bar dips. Because the machine guides the path, it can be easier to learn, easier to load progressively, and easier to keep tension on the triceps from start to finish. Done well, the movement should feel smooth and strong, with minimal swinging, no aggressive shoulder shrugging, and no bouncing out of the bottom.
Quick Overview
| Body Part | Triceps |
|---|---|
| Primary Muscle | Triceps brachii |
| Secondary Muscle | Anterior deltoids and lower chest (light assistance depending on torso angle) |
| Equipment | Lever seated dip machine |
| Difficulty | Beginner to Intermediate |
Sets & Reps (By Goal)
- Muscle growth: 3–4 sets × 8–15 reps, 60–90 sec rest
- Strength focus: 4–5 sets × 5–8 reps, 90–150 sec rest
- Technique practice: 2–3 sets × 10–12 reps, light load, slow tempo
- Finisher / pump work: 2–3 sets × 12–20 reps, short rest, controlled burn
Progression rule: Add reps before adding load. Once you can complete all working sets with clean lockout, stable shoulders, and no bouncing, increase the resistance slightly.
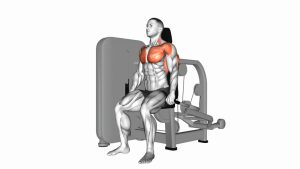
Setup / Starting Position
- Adjust the machine: Set the seat so the handles are comfortable to grip beside your torso and your pressing path feels natural.
- Sit tall: Place your back against the pad, chest up, and feet firmly on the floor for stability.
- Grip the handles: Use a secure, neutral grip and keep your wrists straight.
- Set the shoulders: Pull the shoulders down and back slightly without over-arching your lower back.
- Start with bent elbows: Begin in the loaded position with tension already on the machine and your elbows close to your sides.
Tip: A more upright torso usually keeps the emphasis more on the triceps, while leaning too far forward can shift more work toward the chest and shoulders.
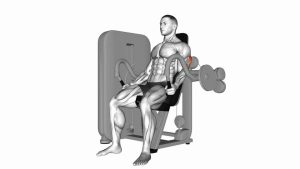
Execution (Step-by-Step)
- Brace and stay tall: Keep your torso steady against the pad and your core lightly engaged.
- Press the handles down: Extend your elbows smoothly while keeping them tucked close to the body.
- Drive through the triceps: Focus on straightening the arms with control rather than jerking the weight.
- Reach near lockout: Finish the rep with strong triceps contraction, but avoid slamming into hyperextension.
- Lower under control: Slowly return to the starting position by bending the elbows and resisting the weight on the way back up.
- Repeat with rhythm: Maintain the same posture and elbow path on every rep.
Pro Tips & Common Mistakes
- Keep elbows close: Tucked elbows usually create a cleaner triceps-focused path.
- Don’t rush the eccentric: Lowering slowly helps keep tension on the triceps and improves control.
- Avoid shoulder shrugging: Keep the neck relaxed and shoulders stable instead of letting the traps take over.
- Don’t bounce out of the bottom: Use muscular control, not momentum.
- Use a full pain-free range: Go deep enough to challenge the triceps, but not so deep that the shoulders become irritated.
- Keep wrists neutral: Excess wrist bending can make the movement less comfortable and less stable.
- Match the load to the goal: Heavy sets are fine for strength, but moderate loads often feel better for hypertrophy and joint comfort.
FAQ
What muscles does the Lever Seated Dip work?
It mainly works the triceps. Depending on how the machine is built and how much you lean forward, the front delts and lower chest may help a little, but the main driver should still be elbow extension.
Is the Lever Seated Dip better than bodyweight dips?
It is not always better, but it is often easier to learn and easier to control. The machine provides a guided path, which can help beginners and also makes it useful for focused triceps hypertrophy work.
How low should I go on each rep?
Lower until you get a strong stretch and can still keep your shoulders comfortable, your elbows controlled, and your torso stable. Do not force an exaggerated bottom position.
Should I lock out at the top?
You can reach a strong near-lockout and squeeze the triceps, but avoid snapping the elbows hard into full lockout. Keep the top controlled.
Can beginners use this exercise?
Yes. This is one of the more beginner-friendly dip variations because the machine stabilizes the movement and lets you focus on posture, elbow tracking, and controlled reps.
Recommended Equipment (Optional)
- Elbow Sleeves for Weightlifting — useful for extra warmth and support during pressing and dip-focused training
- Resistance Bands Set with Handles — great for triceps warm-ups, pressdowns, and extra accessory volume
- Dip Belt — useful if you also perform weighted bodyweight dips outside the machine
- Elbow Wraps — an optional support tool for heavier upper-body pressing sessions
- Memory Foam Seat Cushion — can improve comfort on machine work for longer sessions or sensitive hips
Tip: Accessories should improve comfort and consistency, not replace good technique. Prioritize smooth reps, appropriate loading, and shoulder-friendly range of motion first.