Posterior Shoulder Roll (Lying on Floor): Form, Benefits, Sets & FAQ
Learn how to perform the Posterior Shoulder Roll (Lying on Floor) to release rear shoulder tightness, improve mobility, and support healthier shoulder function. Includes setup, execution, tips, FAQs, and recommended equipment.
Posterior Shoulder Roll (Lying on Floor)
This drill works best when you use small movements and a tolerable amount of pressure. You should feel focused contact over the back of the shoulder, not sharp joint pain, pinching in the front of the shoulder, or numbness down the arm. Think of it as a controlled recovery and mobility tool rather than a hard massage.
Quick Overview
| Body Part | Rear Shoulders |
|---|---|
| Primary Muscle | Posterior deltoid |
| Secondary Muscle | Infraspinatus, teres minor, posterior shoulder fascia |
| Equipment | Foam roller (optional: massage ball, exercise mat) |
| Difficulty | Beginner |
Sets & Reps (By Goal)
- Warm-up / mobility prep: 1–2 rounds per side for 20–40 seconds
- Recovery / post-workout release: 2–3 rounds per side for 30–60 seconds
- Tight posterior shoulder focus: 2–4 rounds per side with 3–5 slow passes plus brief pauses on tender spots
- Daily desk-posture reset: 1–2 short rounds per side with light pressure only
Progression rule: Increase time under control before increasing pressure. Better results usually come from slower rolls and better positioning, not more pain.
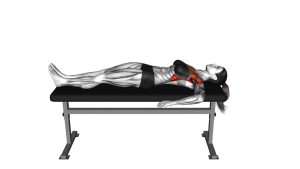
Setup / Starting Position
- Place the foam roller on the floor: Position it so it can contact the back of one shoulder when you lie down.
- Lie on your side with a slight backward lean: Rotate the torso just enough to expose the posterior shoulder to the roller.
- Support your head: Use your lower arm or hand to keep the neck comfortable and relaxed.
- Set the legs for balance: Keep the bottom leg longer and place the top leg in front for stability.
- Find the target spot: Rest the rear shoulder onto the roller, avoiding direct pressure on the neck, spine, or front of the shoulder joint.
Tip: A soft mat under the body can make the position more comfortable and help you stay relaxed while keeping pressure focused on the rear delt area.
Execution (Step-by-Step)
- Settle onto the roller: Let your body weight rest gently on the posterior shoulder.
- Make small controlled rolls: Shift the body a few centimeters forward and backward so the roller glides across the rear shoulder tissue.
- Keep the movement precise: Stay on the muscular area rather than drifting onto the shoulder joint or upper back.
- Pause on tight spots: If you find a tender point, hold there for 10–20 seconds while breathing steadily.
- Stay relaxed: Keep the jaw, neck, and upper traps from tensing up as you roll.
- Repeat on the other side: Perform the same controlled passes for balanced shoulder care.
Pro Tips & Common Mistakes
- Use slow passes: Fast rolling usually reduces precision and makes it harder to relax into the tissue.
- Do not chase pain: Mild-to-moderate pressure works better than aggressive pressure that makes the shoulder guard up.
- Avoid the front of the shoulder joint: Keep the roller on the rear delt and nearby muscular tissue.
- Keep the neck neutral: Support the head so the neck does not strain during the drill.
- Breathe normally: Calm breathing helps the shoulder relax and improves the release effect.
- Use after pressing or desk work: This drill fits well after benching, shoulder sessions, or long hours of rounded-shoulder posture.
- Pair it with mobility work: Follow with gentle shoulder range-of-motion or band work for best results.
FAQ
Where should I feel this exercise?
You should feel the pressure mainly in the back of the shoulder, especially the rear delt region. Some nearby rotator cuff tissue may also be involved, but it should not feel like sharp pressure inside the joint.
Is this a strength exercise?
No. This is a mobility and recovery drill used to improve tissue quality and reduce tightness. It is best paired with strength work rather than used as a main muscle-building exercise.
How long should I roll each side?
Most people do well with 20 to 60 seconds per side. Start short and increase time only if the pressure stays manageable and the shoulder feels better afterward.
Can this help shoulder mobility?
It can help the shoulder feel less restricted, especially if tight posterior tissues are limiting motion. It works even better when combined with active mobility drills and proper upper-body training.
Who should be cautious with this drill?
Anyone with an acute shoulder injury, recent surgery, severe inflammation, or nerve-related symptoms should avoid aggressive self-release and get professional guidance before using it.
Recommended Equipment (Optional)
- TriggerPoint Grid Foam Roller — a popular multi-density roller for controlled muscle recovery and mobility work
- RAD Original Peanut Massage Ball — useful for more focused pressure when a full-size roller feels too broad
- Gaiam Yoga Mat — adds comfort and grip for floor-based mobility and recovery sessions
- Fit Simplify Resistance Loop Bands — good for pairing with shoulder activation and light post-release mobility drills
- Massage Ball Set — offers multiple pressure options for rear shoulder, upper back, and surrounding trigger points
Tip: Start with the least aggressive tool that still gives you clear feedback. Consistent, moderate pressure usually works better than very hard rolling.