Side-Lying Single-Arm Triceps Push-Up: Form, Sets, Tips & FAQ
Learn how to do the Side-Lying Single-Arm Triceps Push-Up with proper form. Discover setup, execution steps, sets by goal, common mistakes, FAQs, and recommended equipment for stronger triceps.
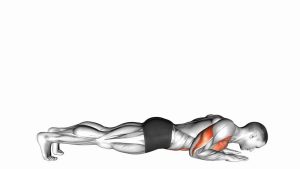
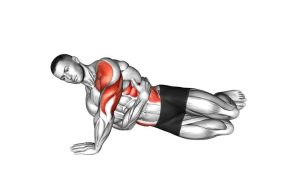
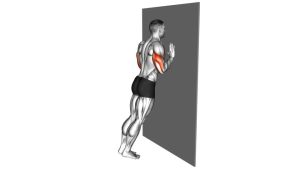
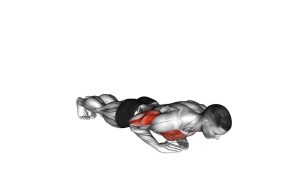
Side-Lying Single-Arm Triceps Push-Up
This exercise works best when you keep the movement strict and controlled. Because only one arm is driving the rep, even a short range of motion can create a strong triceps stimulus. Focus on keeping the elbow tucked, the wrist stacked comfortably, and the torso stable from start to finish.
Quick Overview
| Body Part | Triceps |
|---|---|
| Primary Muscle | Triceps brachii |
| Secondary Muscle | Anterior deltoid, chest, core stabilizers |
| Equipment | Bodyweight only (optional exercise mat) |
| Difficulty | Intermediate |
Sets & Reps (By Goal)
- Strength focus: 3-5 sets × 4-8 reps per side, 75-120 sec rest
- Muscle building: 3-4 sets × 8-12 reps per side, 60-90 sec rest
- Control and technique: 2-4 sets × 5-8 slow reps per side, 45-75 sec rest
- Bodyweight accessory work: 2-3 sets × 10-15 reps per side, controlled tempo
Progression rule: First improve control, then add reps, then slow the eccentric. Once you can perform clean reps without torso rotation or elbow flare, you can increase the challenge by pausing at the top or using a slower lowering phase.
Setup / Starting Position
- Lie on your side: Position yourself on the floor with the working arm on top and your body aligned from head to hips.
- Place the working hand: Put the palm on the floor in front of the chest, with the elbow bent and tucked close to the body.
- Set the non-working arm: Keep the bottom arm relaxed or lightly positioned for balance without pushing.
- Brace your torso: Tighten the core gently so the upper body does not twist during the press.
- Find a stable base: Stack or slightly stagger the legs for better balance and control.
Tip: Keep the hand close enough to the torso that the triceps can drive the movement, but not so tight that the wrist feels jammed.
Execution (Step-by-Step)
- Start low and controlled: Begin with the chest close to the floor and the elbow bent.
- Press through the palm: Extend the elbow and lift the torso away from the floor in one smooth motion.
- Keep the elbow tucked: Avoid flaring it out too wide, which shifts tension away from the triceps.
- Stabilize the body: Keep the torso firm and resist rotating backward or forward.
- Reach the top carefully: Press until the elbow is nearly straight without aggressively snapping into lockout.
- Lower with control: Bend the elbow slowly and return to the starting position without collapsing.
- Repeat evenly: Complete all reps on one side, then switch arms.
Pro Tips & Common Mistakes
- Keep the elbow close: A tucked arm creates better triceps emphasis and cleaner pressing mechanics.
- Do not rush the eccentric: The lowering phase builds control and keeps tension on the working arm.
- Avoid shoulder shrugging: Keep the shoulder packed and away from the ear.
- Do not twist the torso: Rotation reduces isolation and makes the rep less effective.
- Use a manageable range: A shorter clean rep is better than a bigger rep with compensations.
- Watch wrist comfort: Adjust palm angle slightly if the wrist feels overly compressed.
- Train both sides evenly: Match reps and quality from side to side to avoid imbalances.
FAQ
What muscles does the Side-Lying Single-Arm Triceps Push-Up work most?
The main target is the triceps brachii. The shoulder, chest, and core assist by stabilizing the pressing motion and helping keep the body aligned.
Is this exercise better for strength or hypertrophy?
It can work for both. Lower reps with longer rest periods suit strength, while moderate reps with controlled tempo work well for hypertrophy.
Why does this exercise feel harder than it looks?
Because one arm is doing most of the work while the torso has to stay stable. Even a short range of motion can feel intense when the triceps are isolated properly.
What if I cannot do full reps yet?
Reduce the range of motion, slow the reps down, and focus on partial reps with perfect control. You can also build strength first with close-grip push-ups, bench dips, or triceps extensions.
Should I fully lock out every rep?
You can reach near full elbow extension, but avoid snapping into lockout. A smooth, controlled top position usually works best for joint comfort and continuous tension.
Recommended Equipment
- Exercise Mat — adds comfort for side-lying setup and protects the elbow, hip, and shoulder on hard floors
- Push-Up Handles — helpful if you want a more neutral wrist angle during bodyweight pressing variations
- Resistance Bands Set — useful for triceps accessory work, warm-ups, and regression or progression drills
- Foam Balance Pad — can provide a softer contact surface and slight elevation for setup adjustments
- Wrist Wraps for Training — extra support for lifters who feel wrist discomfort during repeated pressing work
Tip: Accessories should improve comfort and consistency, not replace proper technique. If a setup causes pain, adjust the angle, reduce the range of motion, or choose an easier triceps variation first.