Wall Pulse: Proper Form, Muscles Worked, Sets, Tips & FAQ
Learn how to do the Wall Pulse with proper form to improve shoulder mobility, upper-arm control, posture, and scapular stability. Includes setup, step-by-step execution, sets by goal, common mistakes, FAQs, and recommended equipment.
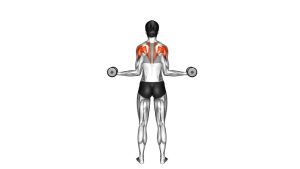
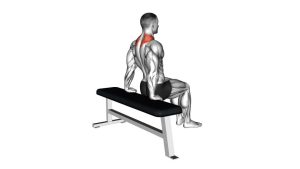
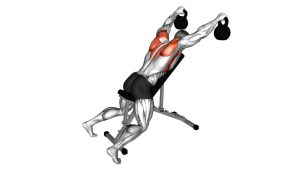
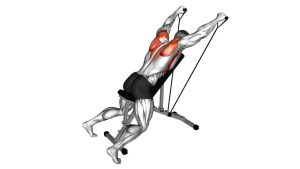
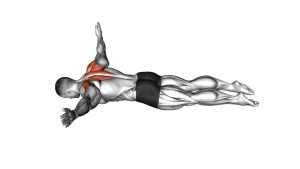
Wall Pulse
This exercise works best when you focus on precision, posture, and steady tempo. You should feel the shoulders, upper back, and muscles around the shoulder blades working together to guide the arms. The Wall Pulse is useful as a warm-up, posture drill, movement prep exercise, or low-intensity corrective option for people who spend long hours sitting or training pressing movements.
Quick Overview
| Body Part | Shoulders |
|---|---|
| Primary Muscle | Deltoids (especially anterior deltoids) and scapular stabilizers |
| Secondary Muscle | Serratus anterior, lower traps, middle traps, rotator cuff, upper arms |
| Equipment | Wall only |
| Difficulty | Beginner (excellent for mobility, posture, and shoulder control) |
Sets & Reps (By Goal)
- Mobility warm-up: 2–3 sets × 8–12 reps
- Posture / movement control: 2–4 sets × 10–15 reps
- Corrective shoulder work: 2–3 sets × 8–10 slow reps with 1–2 second pause near the top
- Desk-break reset: 1–2 sets × 6–10 easy reps
Progression rule: First improve quality of movement and wall contact, then increase reps. Do not add speed if you lose posture or shoulder control.
Setup / Starting Position
- Stand against a wall: Place your head, upper back, and hips lightly against the wall.
- Set your stance: Keep feet a comfortable distance from the wall so you can maintain balance without arching the lower back.
- Brace lightly: Keep ribs down, core engaged, and neck relaxed.
- Raise the arms: Bring your arms up into a bent “goalpost” or wall-slide position with elbows roughly around shoulder height.
- Start with control: Keep wrists, forearms, and elbows as close to the wall as your mobility allows without pain.
Tip: If you feel your lower back arching, step your feet slightly forward and tighten your core a little more.
Execution (Step-by-Step)
- Lock in posture: Keep the head tall, ribs down, and shoulders relaxed away from the ears.
- Pulse the arms upward: Slowly slide or pulse the arms upward along the wall, reaching toward an overhead position.
- Stay connected: Keep as much contact with the wall as possible through the wrists, forearms, and elbows.
- Pause briefly: At the top, hold for a moment without shrugging or flaring the ribs.
- Return with control: Lower the arms back to the starting position slowly and smoothly.
- Repeat evenly: Continue for the target reps while maintaining posture and consistent tempo.
Pro Tips & Common Mistakes
- Keep the ribs down: Avoid turning the movement into a back arch just to get the arms higher.
- Don’t shrug: Let the shoulder blades rotate naturally, but do not lift the shoulders toward the ears.
- Use a slow tempo: Controlled reps build better mobility and shoulder awareness than fast pulses.
- Stay in a pain-free range: A smaller clean range is better than forcing full overhead motion.
- Keep the neck neutral: Do not poke the chin forward during the raise.
- Focus on symmetry: Try to keep both arms moving evenly instead of letting one side dominate.
FAQ
What does the Wall Pulse work?
The Wall Pulse mainly trains the shoulders, scapular stabilizers, and muscles that help control overhead arm movement. It is especially useful for posture, mobility, and shoulder mechanics.
Is the Wall Pulse a strength exercise or a mobility drill?
It is primarily a mobility and control drill. While the shoulders and upper back do work, the main goal is cleaner movement, better posture, and improved wall-assisted arm motion.
Should my arms stay fully against the wall the entire time?
Ideally, you keep as much contact as possible, but not everyone has the mobility to maintain perfect contact. Work within your current range and aim to improve gradually without pain.
Can I use Wall Pulses before upper-body workouts?
Yes. Wall Pulses are excellent before shoulder, chest, and upper-back sessions because they help prepare the shoulders, improve positioning, and reinforce better posture.
Why do I feel my lower back arching during the movement?
That usually means you are trying to reach higher than your current shoulder mobility allows. Reduce the range, keep the ribs down, and focus on smoother shoulder movement instead of chasing height.
Recommended Equipment (Optional)
- Resistance Bands Set — useful for pairing Wall Pulses with band pull-aparts, external rotations, and posture drills
- Yoga Mat — adds comfort for warm-ups, mobility sessions, and bodyweight corrective work
- Foam Roller — helpful for upper-back mobility work that complements shoulder wall drills
- Posture Corrector Brace — can serve as a light awareness tool, but should not replace active posture training
- Massage / Lacrosse Ball — useful for soft-tissue work around the chest, shoulders, and upper back before mobility sessions
Tip: Wall Pulses pair especially well with thoracic mobility work, light band exercises, and posture-focused upper-back training.