Dumbbell Incline Squeeze Press: Proper Form, Benefits, Sets & FAQ
Learn how to perform the Dumbbell Incline Squeeze Press with proper form to target the upper chest, inner chest tension, and triceps. Includes setup, execution, sets by goal, mistakes, FAQs, and recommended equipment.
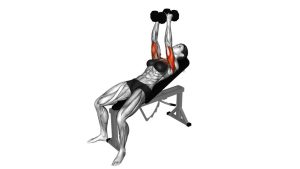
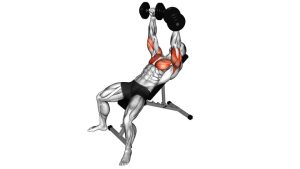
Dumbbell Incline Squeeze Press
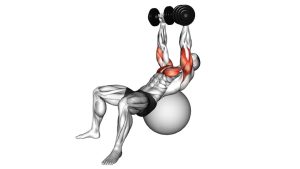
This exercise works best when you use a controlled tempo, a moderate load, and a strong mind-muscle connection. The squeeze changes the feel of the press: rather than simply moving dumbbells from bottom to top, you maintain constant inward tension to make the chest work harder through the full range. Keep your shoulder blades set, wrists neutral, and elbows under control so the chest stays loaded without turning the movement into a loose shoulder press.
Quick Overview
| Body Part | Chest |
|---|---|
| Primary Muscle | Upper chest (clavicular head of the pectoralis major) |
| Secondary Muscle | Triceps, anterior deltoids, inner chest tension through adduction |
| Equipment | Dumbbells and an incline bench |
| Difficulty | Beginner to Intermediate |
Sets & Reps (By Goal)
- Muscle growth: 3–4 sets × 8–12 reps with controlled tempo and constant squeeze
- Upper chest emphasis: 3–5 sets × 10–15 reps using moderate weight and strong pec contraction
- Strength-focused accessory work: 3–4 sets × 6–8 reps after your main pressing movement
- Chest finisher / pump work: 2–3 sets × 12–20 reps with lighter weight and shorter rest
Progression rule: Increase reps first while maintaining the inward squeeze and clean bench control. Only add weight when you can keep the dumbbells touching and the chest doing the work throughout the full rep.
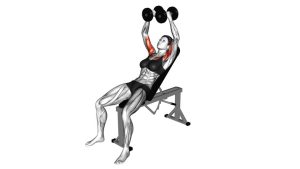
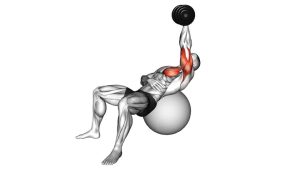
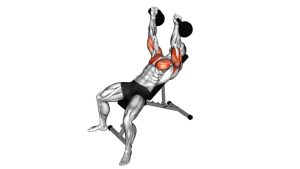
Setup / Starting Position
- Set the bench angle: Use a low-to-moderate incline, usually around 30–45 degrees, to emphasize the upper chest without overloading the shoulders.
- Grab the dumbbells: Sit back on the bench with a dumbbell in each hand and bring them to chest level safely.
- Position your body: Keep your feet planted firmly on the floor, chest lifted, and shoulder blades pulled back and down into the bench.
- Bring the dumbbells together: Hold them close over the upper chest with the inner heads touching.
- Set your wrists and elbows: Keep wrists neutral and elbows slightly tucked—not flared straight out—to create a strong pressing path.
Tip: Think “proud chest, packed shoulders, squeeze the dumbbells together” before the first rep starts.
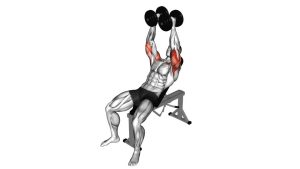
Execution (Step-by-Step)
- Start at the top: Press the dumbbells above your upper chest with the weights touching and your arms nearly straight.
- Maintain inward pressure: Actively squeeze the dumbbells into each other before and during every rep.
- Lower under control: Bend your elbows and bring the dumbbells down slowly toward the upper chest while keeping them connected.
- Pause briefly at the bottom: Stop when you feel a solid chest stretch and your shoulders still feel stable—do not relax the squeeze.
- Press upward: Drive the dumbbells back up in a smooth line while continuing to crush them together.
- Finish with chest tension: Reach the top without slamming into lockout, then hold the contraction briefly before the next rep.
Pro Tips & Common Mistakes
- Press and squeeze at the same time: The squeeze is the identity of the movement—don’t let the dumbbells separate.
- Use a moderate load: Going too heavy usually makes lifters lose the chest tension and turn it into a standard incline press.
- Keep the incline moderate: Too steep and the front delts take over more than the upper chest.
- Control the eccentric: Lowering too fast reduces the benefit of the constant-tension style.
- Don’t overflare the elbows: A natural pressing angle is usually safer and stronger.
- Avoid bouncing off the bottom: Pause briefly and stay tight instead of dropping into the shoulder joint.
- Keep your shoulders pinned: Letting them roll forward makes the rep less stable and less chest-dominant.
FAQ
What does the dumbbell incline squeeze press target most?
It mainly targets the upper chest, especially the clavicular fibers of the pec major. The triceps and front delts assist, but the inward squeezing action helps keep more tension on the chest.
Is this better than a normal incline dumbbell press?
It is not always better, but it is different. The squeeze press usually uses less weight and creates more constant chest tension. A standard incline press may be better for heavier loading, while the squeeze press is excellent for hypertrophy and chest feel.
Should the dumbbells touch the whole time?
Yes—ideally the inner heads of the dumbbells stay in contact throughout the rep. That constant contact helps maintain the squeeze and makes the movement unique.
How heavy should I go?
Use a weight that lets you keep the dumbbells together, control the bottom, and feel the chest working. If the dumbbells drift apart or your shoulders take over, the load is probably too heavy.
Can beginners use this exercise?
Yes. Beginners can benefit from it if they start light and focus on control. It is a useful way to learn chest engagement, but proper bench setup and shoulder position still matter.
Recommended Equipment
- Adjustable Weight Bench — essential for setting the correct incline angle for upper-chest pressing
- Adjustable Dumbbells — convenient for progressing load while keeping your setup compact
- Rubber Hex Dumbbells — stable and easy to control during squeeze-based pressing movements
- Wrist Wraps — useful if you need extra wrist support during pressing exercises
- Exercise Mat — helpful for comfort and floor protection in your training area
Tip: This exercise usually responds better to quality equipment and controlled loading than to maximum weight. Choose dumbbells you can squeeze hard without losing form.