Ring Dip: Proper Form, Muscles Worked, Sets, Tips & FAQ
Learn how to perform the Ring Dip with proper form to build chest, triceps, and shoulder strength. Includes setup, execution, sets by goal, common mistakes, FAQs, and recommended equipment.
Ring Dip
This exercise is best suited for lifters who already have solid control in standard dips, support holds, and ring stability drills. A good Ring Dip should feel powerful through the chest and triceps, but never sloppy or unstable. You want a controlled descent, a stable shoulder position, and a smooth press back to the top without excessive swinging, flaring, or collapsing.
Quick Overview
| Body Part | Chest |
|---|---|
| Primary Muscle | Pectoralis major |
| Secondary Muscle | Triceps brachii, anterior deltoids, scapular stabilizers, core |
| Equipment | Gymnastic rings / suspension rings |
| Difficulty | Advanced |
Sets & Reps (By Goal)
- Strength: 3–5 sets × 3–6 reps, 2–3 minutes rest
- Muscle growth: 3–4 sets × 6–10 reps, 90–120 seconds rest
- Skill & control: 3–5 sets × 3–5 slow reps, focusing on tempo and stability
- Weighted progression: 4–5 sets × 3–5 reps once bodyweight reps are fully controlled
Progression rule: Build clean bodyweight reps first. Add depth, tempo control, pauses, or external load only when you can keep the rings close, shoulders stable, and the rep path smooth from top to bottom.
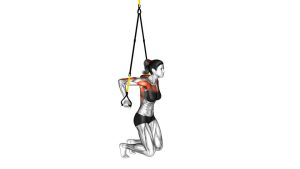
Setup / Starting Position
- Set the rings: Adjust the rings high enough so you can start in a full support position with your feet off the floor.
- Grip firmly: Hold the rings with a neutral grip and keep them close to your hips.
- Establish support: Lock the elbows, depress the shoulders, and brace your core before starting the rep.
- Lean slightly forward: A small torso lean helps shift more of the work toward the chest rather than making the movement purely triceps-dominant.
- Stay tight: Keep the ribs down, glutes lightly engaged, and legs quiet to reduce swinging.
Tip: Before full Ring Dips, most lifters benefit from mastering ring support holds and slow eccentric ring dips.
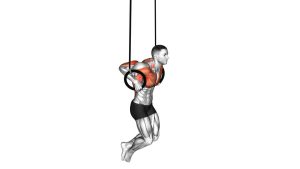
Execution (Step-by-Step)
- Start tall at the top: Support your body on the rings with locked elbows, shoulders down, and rings held close to your sides.
- Begin the descent: Bend the elbows slowly while allowing a controlled forward lean of the torso.
- Keep the rings close: Do not let them drift too far outward. Control the instability instead of fighting it with jerky movements.
- Reach the bottom position: Lower until your shoulders are slightly below the elbows, or as deep as you can safely control without shoulder collapse.
- Press hard through the rings: Drive yourself back upward by extending the elbows and squeezing through the chest and triceps.
- Return to lockout: Finish in a stable top support with the elbows straight and rings quiet.
Pro Tips & Common Mistakes
- Own the support hold first: If you cannot stabilize at the top, you are not ready for full reps.
- Use a controlled eccentric: Lowering too fast makes the rings unstable and puts unnecessary stress on the shoulders.
- Do not flare the rings too wide: Keeping them relatively close improves leverage and shoulder control.
- Avoid shoulder collapse: Do not sink into the bottom with the chest caving and shoulders rolling forward aggressively.
- Do not chase depth at all costs: Go only as low as you can maintain strong mechanics.
- Keep the core engaged: A loose midsection increases swinging and makes each rep harder to stabilize.
- Progress logically: Ring support holds, negative ring dips, band-assisted ring dips, and then full ring dips is a smart path.
FAQ
What muscles do Ring Dips work the most?
Ring Dips primarily target the chest, especially the lower and mid pec fibers, while also heavily training the triceps and front delts. Because the rings move freely, the stabilizers of the shoulders, scapulae, forearms, and core also work much harder than in fixed-bar dips.
Are Ring Dips harder than regular dips?
Yes. Ring Dips are significantly harder because the rings are unstable, which increases the demand on balance, shoulder control, grip, and coordination. Even strong lifters often need time to adapt to the instability.
Should beginners do Ring Dips?
Most beginners should start with standard dips, ring support holds, and assisted ring dip progressions first. Full Ring Dips are usually too demanding for new trainees who have not yet built enough pushing strength and shoulder stability.
How deep should I go on Ring Dips?
Lower as deep as you can while keeping the shoulders stable, the chest open, and the rings under control. For many lifters, that means getting the shoulders slightly below the elbows, but the correct depth depends on mobility, strength, and control.
Can I add weight to Ring Dips?
Yes, but only after you have mastered strict bodyweight reps. Weighted Ring Dips are extremely demanding, so build a solid base first before using a dip belt or external loading.
Recommended Equipment
- Wooden Gymnastic Rings — the essential tool for Ring Dips, ring push-ups, support holds, and advanced calisthenics work
- Dip Belt — useful once bodyweight Ring Dips become easy and you want progressive overload
- Pull-Up Assist / Resistance Bands — excellent for assisted Ring Dip progressions and extra control during skill practice
- Wrist Wraps — can provide extra wrist support for lifters who feel discomfort in deep support positions
- Gym Chalk — helps improve grip security on the rings, especially during harder or higher-rep sets
Tip: For most athletes, the best investment is a high-quality pair of wooden rings and a set of resistance bands. Those two items cover both the exercise itself and the most practical progression options.