Chair Chest Dip: Proper Form, Sets, Tips & FAQ
Learn the Chair Chest Dip with proper form, setup, sets by goal, common mistakes, FAQs, and recommended equipment. A simple bodyweight chair dip variation to train the chest, triceps, and shoulders at home.
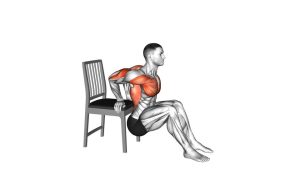
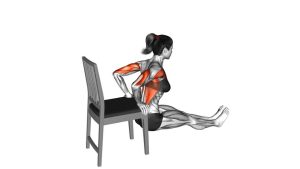
Chair Chest Dip
This exercise is useful when you want an at-home pressing movement without machines or free weights. It can fit chest workouts, triceps finishers, or upper-body bodyweight circuits. Because the shoulders move into extension at the bottom, control matters more than range. Lower only as far as you can while keeping the shoulders stable, the chest open, and the movement smooth.
Quick Overview
| Body Part | Chest |
|---|---|
| Primary Muscle | Pectoralis major |
| Secondary Muscle | Triceps brachii, anterior deltoids |
| Equipment | Sturdy chair, bodyweight, optional exercise mat |
| Difficulty | Beginner to Intermediate |
Sets & Reps (By Goal)
- Muscle gain: 3–4 sets × 8–15 reps, 60–90 sec rest
- General strength: 3–5 sets × 6–10 reps, 90–120 sec rest
- Endurance / home circuits: 2–4 sets × 12–20 reps, 30–60 sec rest
- Beginner practice: 2–3 sets × 6–10 controlled reps with partial range if needed
Progression rule: First increase control and clean reps, then increase total reps. To make the movement harder, reduce leg assistance, slow the eccentric, or pause briefly at the bottom without collapsing into the shoulders.
Setup / Starting Position
- Place the chair securely: Use a stable chair on a non-slip surface. Position it so it cannot slide backward.
- Sit in front of the edge: Place your palms on the chair edge beside your hips with fingers pointing forward.
- Extend your legs: Keep your legs out in front on the floor. You can bend the knees slightly to make the exercise easier.
- Lift your hips off the floor: Support your weight through your arms while keeping your chest lifted.
- Set the shoulders: Keep them down and slightly back instead of shrugging up toward your ears.
Tip: A slight forward torso angle can help emphasize the chest more, but the chair still needs to stay stable and the motion should stay controlled.
Execution (Step-by-Step)
- Start tall: Brace lightly through your core and keep your chest open.
- Lower with control: Bend your elbows and lower your body toward the floor in a smooth, steady descent.
- Keep tension on the chest and triceps: Let the elbows move backward while avoiding excessive shoulder roll-forward.
- Stop at a safe depth: Lower until you feel a strong stretch and muscular load, but not shoulder pain or joint pinching.
- Press back up: Drive through your palms and extend the elbows to return to the start position.
- Repeat smoothly: Maintain the same body path and avoid bouncing at the bottom.
Pro Tips & Common Mistakes
- Use a sturdy chair only: A weak or slippery chair can make the exercise unsafe.
- Do not drop too deep: Extra depth does not always mean better results and may stress the front of the shoulder.
- Keep shoulders down: Avoid shrugging at the top or during the descent.
- Control the negative: A 2–3 second lowering phase increases tension and improves form.
- Adjust leg assistance: Bent knees make it easier; straighter legs make it harder.
- Don’t rush lockout: Finish each rep under control instead of snapping the elbows straight.
- Chest focus cue: Keep the chest open and lean slightly forward instead of staying overly upright.
FAQ
What muscles does the Chair Chest Dip work?
The movement mainly trains the chest, triceps, and front shoulders. The triceps usually do a large share of the work, while a slight forward lean can help increase chest involvement.
Is this exercise good for beginners?
Yes, if you use a controlled range of motion and a stable chair. Beginners can bend the knees more and avoid going too deep until shoulder control improves.
How low should I go?
Lower only until you feel strong muscular tension without pain in the shoulders. A moderate range with good control is usually better than forcing extra depth.
How can I make it harder?
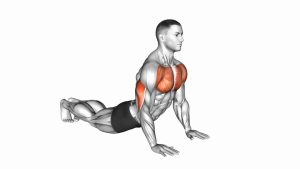
Straighten the legs more, slow the lowering phase, add a pause near the bottom, or move to parallel-bar dip progressions when ready.
What if I feel shoulder discomfort?
Reduce range of motion, check shoulder position, and avoid dropping too low. If discomfort continues, swap to a safer pressing movement such as push-ups, incline push-ups, or machine-assisted dip progressions.
Recommended Equipment
- Dip Station — a more stable upgrade if you want to progress from chair dips to full bodyweight dip training
- Push-Up Bars — useful for additional chest and triceps pressing work with better wrist positioning
- Wrist Wraps — helpful if long sets or repeated pressing movements irritate your wrists
- Resistance Band Set — useful for warm-ups, chest activation, and adding extra upper-body assistance work
- Wooden Push-Up Bars / Parallettes — great for progressing into stronger bodyweight chest, triceps, and shoulder training patterns
Tip: If a chair feels unstable, replace it with a bench, dip stand, or parallel bars before increasing volume or intensity.