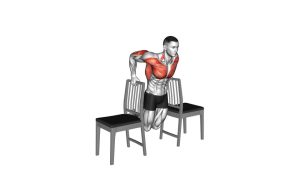
Dip Bent Knees with Chair: Proper Form, Sets, Tips & FAQ
Learn how to do the Dip Bent Knees with Chair to strengthen your triceps, shoulders, and upper arms with safe step-by-step form, sets, tips, mistakes, FAQs, and equipment recommendations.
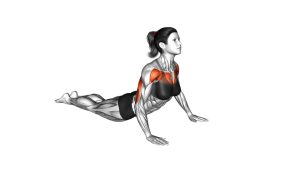
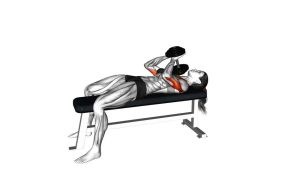
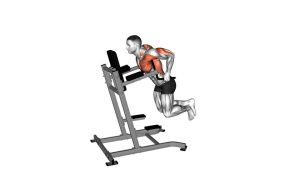
Dip Bent Knees with Chair
This movement is excellent for building upper-arm strength at home because it requires only a stable chair, bench, or elevated surface. The bent-knee position reduces bodyweight load, making the exercise more accessible for beginners while still creating strong triceps tension. For best results, keep your hips close to the chair, elbows pointing mostly backward, chest lifted, and movement slow from top to bottom.
Think of this exercise as a controlled elbow-extension drill, not a fast up-and-down body drop. The triceps should do most of the work as you press yourself upward. Your legs provide balance and light assistance, but they should not turn the movement into a leg-driven squat.
Quick Overview
| Body Part | Triceps |
|---|---|
| Primary Muscle | Triceps brachii |
| Secondary Muscle | Anterior deltoids, chest, forearms, core stabilizers |
| Equipment | Stable chair, bench, or box |
| Difficulty | Beginner to intermediate |
Sets & Reps (By Goal)
- Beginner strength: 2–3 sets × 6–10 reps with slow control and full rest.
- Muscle growth: 3–4 sets × 8–15 reps, keeping constant triceps tension.
- Endurance / home workout finisher: 2–4 sets × 12–20 reps with clean form.
- Technique practice: 2 sets × 5–8 reps using a shorter range of motion.
- Progression goal: Gradually move the feet farther away or progress to straight-leg chair dips.
Rest time: Use 45–90 seconds between sets. Rest longer if your shoulders or wrists begin to lose position.
Progression rule: First improve control and depth. Then add reps. Only after that should you make the exercise harder by placing the feet farther forward or elevating the feet.
Setup / Starting Position
- Choose a stable chair: Place the chair on a non-slip surface. The chair should not roll, tilt, or move.
- Sit on the edge: Position yourself at the front edge of the chair with your hands beside your hips.
- Grip the edge: Place your palms on the chair with fingers pointing forward or slightly outward.
- Walk the feet forward: Slide your hips just off the chair while keeping your knees bent and feet flat.
- Set the shoulders: Keep shoulders down and back slightly. Avoid shrugging toward your ears.
- Brace lightly: Tighten your core enough to keep the torso stable and hips close to the chair.
- Start tall: Arms should be extended, chest lifted, elbows soft, and eyes looking forward.
Execution (Step-by-Step)
- Begin at the top: Support your body with straight arms, bent knees, and feet planted firmly on the floor.
- Lower slowly: Bend your elbows and let your body descend in a controlled vertical path.
- Keep elbows back: Allow the elbows to travel mostly behind you instead of flaring wide to the sides.
- Stay close to the chair: Keep your hips near the chair edge to reduce unnecessary shoulder strain.
- Stop at a safe depth: Lower until your elbows are around 90 degrees, or stop earlier if your shoulders feel uncomfortable.
- Press through the palms: Push into the chair and extend your elbows to lift your body back up.
- Squeeze the triceps: At the top, finish with strong arm extension without aggressively locking the elbows.
- Repeat with control: Continue each rep smoothly, avoiding bouncing at the bottom or rushing the press.
Pro Tips & Common Mistakes
Pro Tips
- Use your legs only for support: Your feet help balance the body, but the arms should perform the main push.
- Keep the chest open: A lifted chest helps prevent the shoulders from rounding forward.
- Control the bottom position: Do not drop into the deepest range if your shoulders are not ready.
- Keep wrists stacked: Press evenly through the palms and avoid collapsing into the wrists.
- Exhale as you press up: This helps you stay braced and controlled during the hardest part of the rep.
Common Mistakes
- Going too deep: Excessive depth can irritate the front of the shoulders.
- Letting hips drift forward: This increases shoulder extension and reduces control.
- Flaring elbows wide: Wide elbows shift stress away from the triceps and may bother the shoulders.
- Shrugging the shoulders: Keep shoulders away from the ears throughout the movement.
- Bouncing at the bottom: Momentum reduces muscle tension and increases joint stress.
- Using an unstable chair: A moving chair can make the exercise unsafe.
FAQ
What muscles does the Dip Bent Knees with Chair work?
It mainly works the triceps brachii, especially during the pressing phase. The front shoulders, chest, forearms, and core also assist with stability and control.
Is this exercise good for beginners?
Yes. The bent-knee version is one of the easiest chair dip variations because the feet stay close and help reduce the amount of bodyweight your arms must lift.
How low should I go?
Lower until your elbows are around 90 degrees, or stop sooner if your shoulders feel tight or uncomfortable. Do not force a deep range just to make the exercise harder.
Why do I feel it in my shoulders more than my triceps?
You may be going too deep, letting your hips drift too far forward, or allowing your shoulders to round. Keep your hips close to the chair, chest lifted, and elbows pointing backward.
How can I make chair dips harder?
Move your feet farther away, slow down the lowering phase, increase reps, or progress to straight-leg chair dips. Only progress when your shoulder position stays stable.
Can I do this exercise at home?
Yes. This is a great home triceps exercise because it only requires a strong chair, bench, or box. Make sure the surface is stable before starting.
Recommended Equipment
- Adjustable Workout Bench — more stable than a chair and useful for dips, presses, rows, and home strength training.
- Non-Slip Exercise Mat — helps keep your feet stable and reduces slipping during bodyweight exercises.
- Parallettes Bars — useful for progressing into dip variations, push-ups, L-sits, and calisthenics training.
- Resistance Bands Set — helpful for assisted dips, warm-ups, triceps extensions, and upper-body activation.
- Workout Wrist Wraps — optional wrist support if pressing movements create wrist fatigue.
Tip: A stable bench is usually safer than a lightweight chair. If you use a chair, place it against a wall or on a non-slip surface before performing dips.