Standing Palm Slices: Form, Benefits, Sets, Tips & FAQ
Learn how to do Standing Palm Slices with proper form. Improve upper-arm control, shoulder stability, posture, and arm endurance with step-by-step cues, sets, mistakes, FAQs, and equipment.
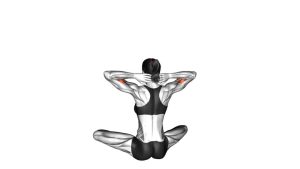
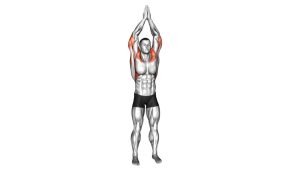
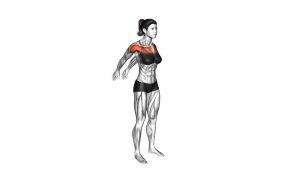
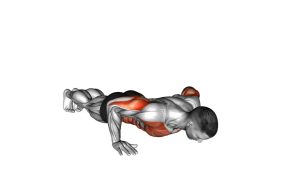
Standing Palm Slices
Standing Palm Slices are useful for beginners, warm-ups, mobility sessions, posture routines, and light arm endurance work. The exercise teaches you how to control the arms away from the body while keeping the torso still. Because there is no external load, it is also a good choice for people who want a gentle movement to improve awareness around the shoulders, upper arms, and upper back.
During the exercise, the arms usually move forward, outward, or slightly across the body while the palms create a slicing action through the air. The motion should feel smooth rather than aggressive. You should feel light work through the shoulders and upper arms, but not sharp pain, neck tension, or heavy pressure in the joints.
Quick Overview
| Body Part | Arms |
|---|---|
| Primary Muscle | Deltoids, especially front and side shoulder fibers |
| Secondary Muscle | Upper arms, rotator cuff stabilizers, upper back, chest stabilizers, core |
| Equipment | No equipment required |
| Difficulty | Beginner |
Sets & Reps (By Goal)
- Warm-up: 1–2 sets × 10–15 reps with a slow, easy tempo.
- Arm endurance: 2–4 sets × 15–25 reps with constant control and relaxed shoulders.
- Posture and mobility: 2–3 sets × 8–12 slow reps, focusing on smooth arm path and stable ribs.
- Beginner control practice: 1–3 sets × 8–10 reps, using a smaller range of motion.
- Workout finisher: 2–3 rounds of 30–45 seconds with light tension through the hands and arms.
Progression rule: Improve control before increasing volume. Add more reps, longer time under tension, or a slower tempo only when you can keep the shoulders down, elbows soft, and torso steady.
Setup / Starting Position
- Stand tall: Place your feet about hip-width apart with your weight balanced evenly through both feet.
- Set the ribs and pelvis: Keep the ribs stacked over the hips. Avoid arching the lower back or leaning forward.
- Relax the shoulders: Let the shoulders sit down and away from the ears before raising the arms.
- Raise the arms: Bring your arms in front of the body around chest or shoulder height, depending on comfort.
- Keep the elbows soft: Do not lock the elbows. A slight bend helps reduce joint stress and keeps tension in the muscles.
- Set the palms: Keep the palms active and flat, as if the hands are gently slicing through the air.
- Brace lightly: Engage the core just enough to prevent the body from rocking or twisting.
The starting position should feel upright, light, and controlled. If the neck tightens before the first rep, lower the arms slightly and reset your posture.
Execution (Step-by-Step)
- Start in a tall standing position: Keep your eyes forward, neck long, and shoulders relaxed. The body should remain still before the arms begin moving.
- Lift the arms into position: Bring both arms forward with the elbows slightly bent. Keep the palms open and active.
- Begin the slicing motion: Move the hands and arms through the air in a smooth slicing path. Depending on the version, the arms may travel outward, slightly inward, or forward with a controlled palm-led motion.
- Control the shoulder blades: Allow the shoulder blades to move naturally, but avoid excessive shrugging, pinching, or rounding.
- Keep tension light: Do not force the movement. The goal is clean control, not maximum speed or maximum range.
- Reach the end position: Stop when the arms reach a comfortable range. The hands should still feel active, and the elbows should remain soft.
- Return with control: Bring the arms back along the same path without dropping them or letting momentum take over.
- Repeat smoothly: Continue each repetition with steady breathing and consistent posture.
Pro Tips & Common Mistakes
Pro Tips
- Lead with the palms: Think about slicing the air with the hands instead of throwing the arms around.
- Use a slow tempo: A controlled 2-second movement out and 2-second return works better than fast swinging.
- Keep the shoulders low: Relax the traps and avoid pulling the shoulders toward the ears.
- Stay tall through the spine: A stacked posture helps the arms move cleanly without compensation.
- Use smaller reps first: Short, clean reps are better than large, sloppy reps.
- Breathe normally: Avoid holding your breath during the slicing motion.
Common Mistakes
- Swinging the arms: Momentum removes tension from the target muscles and reduces control.
- Shrugging the shoulders: This shifts effort into the neck and upper traps instead of the upper arms and deltoids.
- Locking the elbows: Hard elbow lockout can make the movement feel stiff and uncomfortable.
- Arching the lower back: Keep the ribs down so the body does not lean backward to help the arms move.
- Going too high: If shoulder pinching appears, lower the arm angle and stay within a pain-free range.
- Losing palm tension: Lazy hands reduce the quality of the drill. Keep the palms active but not rigid.
FAQ
What muscles do Standing Palm Slices work?
Standing Palm Slices mainly work the deltoids, especially the front and side shoulder fibers. They also involve the upper arms, rotator cuff stabilizers, upper back, chest stabilizers, and core because the body must stay upright while the arms move.
Are Standing Palm Slices good for beginners?
Yes. This is a beginner-friendly exercise because it uses body weight only and does not require equipment. Beginners should start with a small range of motion, slow tempo, and relaxed shoulders.
Should I feel this exercise in my neck?
No. You may feel light upper-trap activity, but the neck should not dominate the movement. If the neck tightens, lower the arms, soften the elbows, and reduce the range.
Can I use light weights for Standing Palm Slices?
You can progress with very light hand weights, but only after mastering the bodyweight version. The movement should remain smooth, controlled, and pain-free.
How often can I do this exercise?
Because the exercise is low-impact, many people can perform it several times per week. It works well in warm-ups, posture routines, mobility sessions, or light home workouts.
What is the biggest mistake with Standing Palm Slices?
The biggest mistake is moving too fast. The exercise should feel controlled and intentional. Fast swinging usually causes shoulder shrugging, poor posture, and less useful muscle activation.
Recommended Equipment
- Light Dumbbells Set — useful for progressing the movement after mastering the bodyweight version.
- Adjustable Wrist Weights — adds gentle resistance while keeping the hands free during arm-control drills.
- Resistance Bands Set — helpful for pairing this exercise with rows, pull-aparts, and shoulder stability work.
- Exercise Mat — provides a comfortable space for warm-ups, mobility work, and home training routines.
- Posture Corrector Brace — can be used as a light awareness tool to remind you to keep the shoulders open and relaxed.
Tip: Equipment is optional. Standing Palm Slices should first be learned without load so you can focus on clean arm path, shoulder control, and posture.