Narrow-Leg Bench Bridge: Proper Form, Benefits, Sets, Tips & FAQ
Learn how to do the Narrow-Leg Bench Bridge with proper form. Build stronger glutes and hamstrings using a feet-elevated bridge setup, with step-by-step cues, sets, mistakes, FAQs, and equipment.
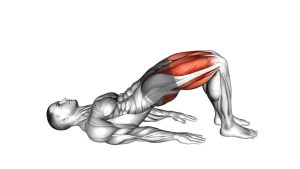
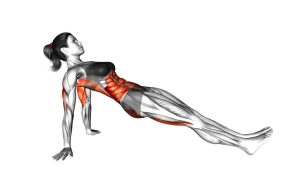
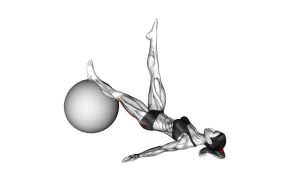
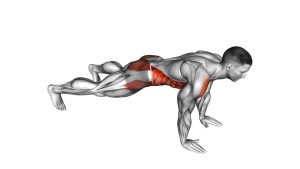
Narrow-Leg Bench Bridge
This exercise is useful when you want a bodyweight glute movement that feels more challenging than a regular floor bridge. The narrow leg position keeps the feet close together, which increases the need for clean hip control and steady knee alignment. During each repetition, the hips rise from the floor until the body forms a strong line from shoulders to knees.
The movement should feel controlled from the first rep to the last rep. You should feel the glutes working hard at the top, while the hamstrings help stabilize the legs on the bench. Your core should stay lightly braced so the ribs do not flare and the lower back does not take over.
Quick Overview
| Body Part | Glutes, Hamstrings |
|---|---|
| Primary Muscle | Gluteus maximus |
| Secondary Muscle | Hamstrings, adductors, core stabilizers, lower back stabilizers |
| Equipment | Flat bench, exercise mat, bodyweight |
| Difficulty | Beginner to Intermediate |
Sets & Reps (By Goal)
- Glute activation: 2–3 sets × 12–15 reps with a 1–2 second squeeze at the top.
- Muscle growth: 3–4 sets × 10–15 reps using slow, controlled lowering.
- Strength endurance: 3–5 sets × 15–25 reps with steady rhythm and full hip extension.
- Warm-up work: 1–2 sets × 10–12 reps before squats, deadlifts, lunges, or hip thrusts.
- Beginner control: 2 sets × 8–10 reps with a shorter range of motion if needed.
Progression rule: Start with perfect control. Add reps first, then increase the pause at the top. After that, progress to a resistance band, single-leg variation, or weighted bridge.
Setup / Starting Position
- Lie on your back: Position yourself on the floor with your upper back, shoulders, and head supported by the ground.
- Place your heels on a bench: Set both heels on the edge or top surface of a flat bench. Keep your feet close together to create the narrow-leg position.
- Bend your knees slightly: Keep a comfortable knee angle so you can drive through the heels without sliding.
- Keep your arms stable: Place your arms on the floor beside your body or bend your elbows lightly for support.
- Brace your core: Pull the ribs down slightly and keep the pelvis controlled before lifting.
- Set your gaze: Look upward and keep the neck neutral. Avoid tucking the chin hard or turning the head during the movement.
The bench should feel stable and should not slide. If the surface is too high, the hamstrings may cramp or the lower back may arch. Choose a height that allows smooth hip extension.
Execution (Step-by-Step)
- Begin from the bottom position: Keep your hips close to the floor while maintaining light tension through the glutes and core.
- Press through your heels: Push your heels into the bench without letting the feet separate or roll outward.
- Lift your hips upward: Drive the hips toward the ceiling by squeezing the glutes. Do not swing or bounce into the lift.
- Reach full hip extension: Stop when your shoulders, hips, and knees form a strong straight line.
- Squeeze at the top: Hold briefly and contract the glutes without over-arching the lower back.
- Lower with control: Bring the hips back down slowly while keeping tension in the glutes and hamstrings.
- Reset and repeat: Touch down lightly or stop just above the floor, then begin the next repetition with the same controlled tempo.
Pro Tips & Common Mistakes
Pro Tips
- Drive through the heels: This helps shift tension toward the glutes and hamstrings.
- Pause at the top: A short hold improves glute contraction and reduces rushed reps.
- Keep your feet close: The narrow stance is the key feature of this variation.
- Use a slow eccentric: Lowering slowly increases time under tension and improves control.
- Keep your ribs down: This prevents the lower back from replacing hip extension.
Common Mistakes
- Arching the lower back: Do not lift higher by flaring the ribs or extending the spine.
- Letting the feet slide: Make sure the bench surface and shoe contact are stable.
- Opening the knees too much: Keep the narrow-leg position consistent throughout the set.
- Dropping the hips quickly: Control the lowering phase instead of collapsing to the floor.
- Using too high of a bench: Excessive elevation may shift stress into the hamstrings or lower back.
FAQ
What muscles does the Narrow-Leg Bench Bridge work?
The main muscle worked is the gluteus maximus. The hamstrings assist strongly because the feet are elevated on a bench. The core, adductors, and lower back stabilizers also help maintain alignment.
Is the Narrow-Leg Bench Bridge good for glute growth?
Yes. It can support glute growth when performed with controlled reps, a strong top squeeze, and enough weekly volume. For more overload, you can add a resistance band, dumbbell, or barbell once bodyweight reps become easy.
Why use a narrow stance?
The narrow stance changes the stability demand and keeps the legs close together. This can increase control requirements through the hips and inner thighs while still targeting the glutes and hamstrings.
Should I feel this more in my hamstrings or glutes?
You may feel both. However, the glutes should be the main target at the top of the movement. If the hamstrings cramp, lower the bench height, move slightly closer to the bench, or reduce the range of motion.
Can beginners do this exercise?
Yes, but beginners should start with a low bench and controlled reps. If the elevated setup feels too difficult, use a standard floor glute bridge first.
How can I make the Narrow-Leg Bench Bridge harder?
You can slow the lowering phase, pause longer at the top, add a resistance band around the thighs, hold a dumbbell over the hips, or progress to a single-leg elevated bridge.
Recommended Equipment
- Flat Weight Bench — provides a stable elevated surface for bench bridges and hip thrust variations.
- Exercise Mat — adds comfort for your upper back, shoulders, and elbows during floor-based bridge work.
- Glute Resistance Bands — useful for adding hip stability work and extra glute activation.
- Adjustable Dumbbell — can be placed across the hips to increase loading once bodyweight reps become easy.
- Hip Thrust Pad — helps reduce pressure when adding external weight over the hips.
Choose equipment that improves stability and comfort. The bench should not slide, and the surface should allow firm heel contact throughout the full set.