Butt Bridge Exercise: Proper Form, Benefits, Sets, Tips & FAQ
Learn how to do the Butt Bridge exercise with proper glute-focused form. Includes setup, step-by-step execution, sets and reps by goal, mistakes, FAQs, and recommended equipment.
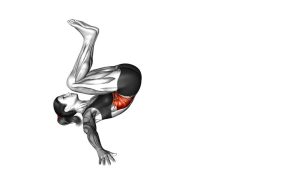
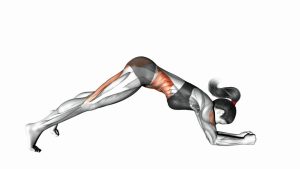
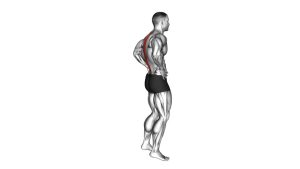
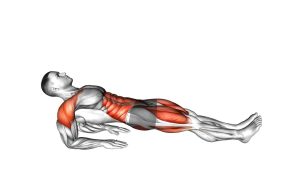
Butt Bridge
The Butt Bridge is one of the best foundational exercises for building stronger glutes because it teaches the body how to extend the hips while keeping the spine stable. It is commonly used in warm-ups, home workouts, beginner lower-body routines, posture programs, and glute activation sessions before squats, lunges, deadlifts, or hip thrusts.
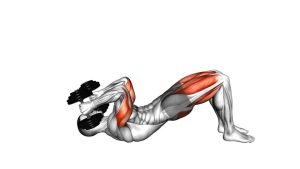
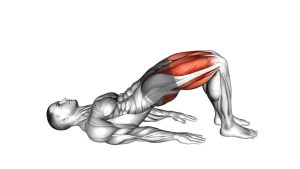
In the video, the movement starts from a lying position with the knees bent and the feet flat on the floor. The hips lift smoothly upward, the glutes squeeze at the top, and the body stays controlled during the descent. The most important detail is that the motion comes from hip extension, not from pushing the stomach upward or overextending the lower back.
Quick Overview
| Body Part | Glutes Butt |
|---|---|
| Primary Muscle | Gluteus Maximus |
| Secondary Muscle | Hamstrings, gluteus medius, core stabilizers, lower back stabilizers |
| Equipment | None; optional exercise mat, resistance band, or hip thrust pad for progressions |
| Difficulty | Beginner |
Sets & Reps (By Goal)
- Glute activation / warm-up: 2–3 sets × 12–15 reps with a 1–2 second squeeze at the top.
- Beginner strength: 3 sets × 10–15 controlled reps with 45–60 seconds rest.
- Muscle endurance: 3–4 sets × 15–25 reps using a smooth tempo and short rest.
- Glute hypertrophy: 3–5 sets × 10–20 reps, adding a resistance band or weight when bodyweight becomes easy.
- Rehab-style control: 2–3 sets × 8–12 slow reps, focusing on symmetry and pain-free range.
Progression rule: First improve control, range, and top-position glute squeeze. Then add a longer hold, resistance band, dumbbell, plate, or move toward single-leg bridge variations.
Setup / Starting Position
- Lie on your back: Place your upper back, shoulders, and head comfortably on the floor.
- Bend your knees: Keep your knees bent with your feet flat on the ground.
- Set your feet hip-width apart: Your toes should point mostly forward, and your feet should stay stable throughout the movement.
- Position your heels close enough: Your heels should be near your glutes, but not so close that your knees feel jammed.
- Relax your arms: Place your arms along your sides with palms facing down for balance.
- Prepare the pelvis: Lightly tuck the pelvis by drawing the lower ribs down and gently flattening the lower back.
- Brace lightly: Engage your core enough to prevent the lower back from taking over.
A good starting position should feel stable, relaxed, and balanced. Before lifting, you should already feel that your feet, hips, ribs, and shoulders are organized.
Execution (Step-by-Step)
- Set your posture: Keep your head down, shoulders relaxed, arms on the floor, and feet firmly planted.
- Press through your feet: Drive mainly through your heels and mid-foot without letting your toes lift excessively.
- Lift the hips: Squeeze your glutes and raise your hips upward in a smooth motion.
- Keep the ribs controlled: Do not flare your ribs or arch your lower back as you lift.
- Reach the top position: Stop when your shoulders, hips, and knees form a straight line.
- Squeeze the glutes: Hold the top for 1–2 seconds while keeping your core engaged.
- Lower slowly: Bring your hips back down under control instead of dropping quickly.
- Reset and repeat: Touch the floor lightly, then begin the next rep with the same controlled pattern.
Pro Tips & Common Mistakes
Pro Tips
- Think “hips up,” not “back arch”: The bridge should come from hip extension, not lumbar extension.
- Use a strong top squeeze: Pause briefly at the top to maximize glute activation.
- Keep your knees steady: Your knees should track in line with your feet instead of collapsing inward.
- Control the descent: Lowering slowly keeps tension on the glutes and improves body awareness.
- Use a band for feedback: A mini band around the thighs can help activate the outer glutes and improve knee alignment.
Common Mistakes
- Overarching the lower back: Lifting too high can shift stress away from the glutes and into the lumbar spine.
- Feet too far away: This often turns the bridge into more of a hamstring exercise.
- Feet too close: This can make the movement feel cramped and reduce smooth hip extension.
- Knees collapsing inward: This reduces hip stability and may indicate weak glute medius control.
- Rushing the reps: Fast bouncing reps reduce tension and make the exercise less effective.
- Pushing through the toes only: This may shift emphasis away from the posterior chain. Keep the whole foot grounded.
FAQ
What muscles does the Butt Bridge work?
The Butt Bridge mainly works the gluteus maximus. It also involves the hamstrings, gluteus medius, core stabilizers, and lower-back stabilizers. When performed correctly, the glutes should be the main muscle group you feel.
Is the Butt Bridge good for beginners?
Yes. The Butt Bridge is one of the best beginner glute exercises because it is low-impact, requires no equipment, and teaches proper hip extension mechanics. It is also easy to modify by changing tempo, hold time, or resistance.
Why do I feel Butt Bridges in my lower back?
You may be lifting too high, arching your lower back, or not engaging your glutes before raising your hips. Try tucking your pelvis slightly, keeping your ribs down, and stopping when your body forms a straight line from shoulders to knees.
Should I squeeze my glutes at the top?
Yes. A controlled squeeze at the top helps reinforce glute activation and improves the effectiveness of the exercise. However, do not squeeze by arching the lower back. The contraction should come from the hips and glutes.
How can I make the Butt Bridge harder?
You can make it harder by adding a mini band around your thighs, holding a dumbbell or weight plate over your hips, increasing the top hold, slowing the tempo, or progressing to a single-leg bridge.
Can I do Butt Bridges every day?
Light glute activation bridges can be done frequently, especially as part of a warm-up. For harder weighted or high-volume bridge training, allow recovery like you would for other strength exercises.
Recommended Equipment (Optional)
- Exercise Mat — provides comfort and support for floor-based bridge training.
- Mini Resistance Bands — useful for improving glute medius activation and keeping the knees aligned.
- Hip Thrust Pad — helpful when progressing to weighted glute bridges or barbell hip thrusts.
- Adjustable Dumbbells — can be placed carefully over the hips to add resistance.
- Ankle Weights — useful for glute bridge variations, leg lifts, and lower-body accessory work.
Tip: Start with bodyweight until your technique is clean. Add equipment only when you can lift, hold, and lower without lower-back compensation.