Side Slide Exercise: Form, Benefits, Sets, Tips & FAQ
Learn the Side Slide exercise for inner thigh, glute, and leg control. Improve lateral strength, balance, mobility, and coordination with safe form.
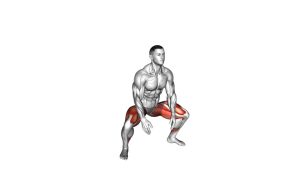
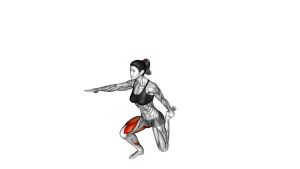
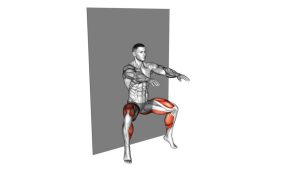
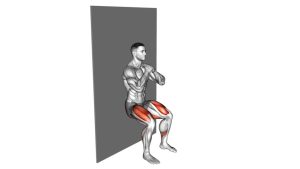
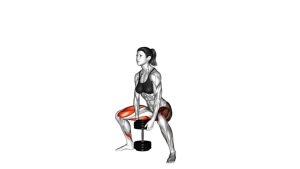
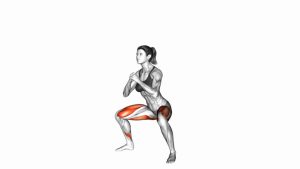
Side Slide
This exercise is best performed with a slow and controlled rhythm. The goal is not to drop into a deep side lunge. Instead, you should shift your weight carefully, keep the torso tall, and allow the sliding leg to move outward with light contact on the floor. As a result, the Side Slide can help improve adductor control, glute stability, and smooth side-to-side movement.
Quick Overview
| Body Part | Legs |
|---|---|
| Primary Muscle | Adductors / Inner Thighs |
| Secondary Muscle | Glutes, Quadriceps, Hamstrings, Hip Stabilizers, Core |
| Equipment | Bodyweight only; optional exercise slider, towel, or smooth floor surface |
| Difficulty | Beginner to Intermediate |
Sets & Reps (By Goal)
- Beginner control: 2–3 sets × 8–10 reps per side with slow, clean movement.
- Hip mobility warm-up: 1–2 sets × 8–12 reps per side using a short slide range.
- Leg strength endurance: 3–4 sets × 10–15 reps per side with steady tempo.
- Balance and coordination: 2–3 sets × 6–10 reps per side with a 1–2 second pause at the outer position.
Progression rule: First improve control and balance. Then increase the slide distance, add a pause, or slow the return phase before adding resistance.
Setup / Starting Position
- Stand tall: Begin with your feet about hip-width apart and your spine upright.
- Brace lightly: Keep your ribs stacked over your pelvis and tighten your core gently.
- Relax the shoulders: Let your arms stay natural, or use them slightly for balance.
- Set the sliding foot: Place one foot so it can glide sideways across the floor.
- Prepare the support leg: Keep the opposite foot planted and ready to bend as your weight shifts.
If the floor has too much friction, place a small towel or exercise slider under the sliding foot. However, only use a surface that allows you to control the movement safely.
Execution (Step-by-Step)
- Start from center: Stand upright with both feet under your hips and your weight balanced.
- Shift your weight: Move your body weight toward one leg while that support knee begins to bend.
- Slide the other foot outward: Let the opposite foot glide sideways along the floor with light pressure.
- Control the bottom position: Keep the support knee aligned with the toes while the sliding leg extends outward.
- Stay tall: Maintain an upright torso and avoid collapsing forward through the chest.
- Pull back to center: Use the inner thigh and hip muscles to slide the extended foot back under your body.
- Reset fully: Return to a balanced standing position before starting the next repetition.
Pro Tips & Common Mistakes
- Slide, do not step: Keep the moving foot in contact with the floor instead of lifting it into a side step.
- Control the support knee: Do not allow the knee to collapse inward as your hips shift sideways.
- Keep the torso upright: A small hip hinge is acceptable, but avoid folding forward excessively.
- Use the inner thigh on the return: Pull the sliding leg back with control instead of snapping it inward.
- Avoid rushing: A slower tempo improves balance, coordination, and muscle awareness.
- Shorten the range if needed: A smaller slide with perfect control is better than a wide slide with poor alignment.
- Keep both feet grounded: Maintain stable contact so the movement stays low-impact and balanced.
FAQ
What muscles does the Side Slide work?
The Side Slide mainly works the adductors, which are the inner thigh muscles. It also trains the glutes, quadriceps, hamstrings, hip stabilizers, and core because your body must control a lateral weight shift.
Is the Side Slide the same as a side lunge?
Not exactly. A side lunge usually involves stepping out and loading into a deeper side position. In contrast, the Side Slide uses a smoother gliding action, which makes it more controlled and often lower impact.
Should I feel this exercise in my inner thighs?
Yes. You may feel the inner thigh of the sliding leg during the outward phase and especially during the return. Additionally, the support leg may feel work in the glutes and quadriceps.
Can beginners do the Side Slide?
Yes, beginners can perform this exercise when the slide range is small and controlled. However, start slowly and use a stable surface so you can keep balance and knee alignment.
How can I make the Side Slide harder?
You can make it harder by sliding farther, slowing the return phase, pausing at the outer position, or holding a light dumbbell once your bodyweight form is stable.
Recommended Equipment
- Exercise Sliders — useful for smooth side-slide movement on carpet or hard floors.
- Non-Slip Exercise Mat — helps create a stable base for warm-ups and lower-body drills.
- Mini Resistance Bands — great for pairing with glute activation and hip stability exercises.
- Adjustable Dumbbell — optional progression once bodyweight control is consistent.
- Balance Pad — useful for improving ankle, knee, and hip stability during accessory work.
Choose equipment that supports control rather than speed. If any tool makes the movement slippery, unstable, or painful, remove it and return to a simpler bodyweight version.