Band Incline Palm-In Press: Upper Chest Form, Sets & Tips (Neutral-Grip Band Press)
Learn the Band Incline Palm-In Press to build upper chest with a shoulder-friendly neutral grip. Step-by-step form, sets by goal, pro tips, FAQs, and recommended band equipment.
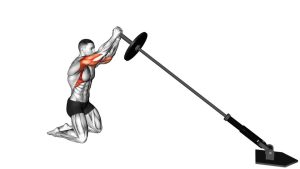
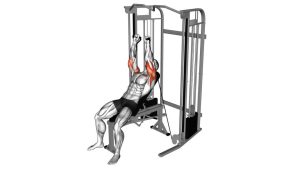
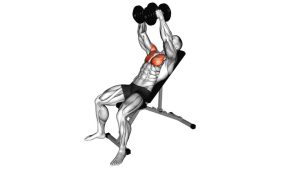
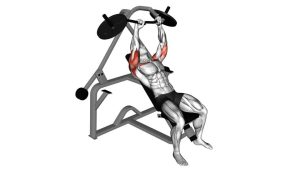
Band Incline Palm-In Press
Your goal is a smooth press path with the chest doing the work—not the shoulders shrugging or the lower back over-arching. Keep the ribcage stacked, the shoulder blades gently set, and press up and slightly inward while maintaining a neutral grip.
Quick Overview
| Body Part | Chest |
|---|---|
| Primary Muscle | Upper chest (clavicular head of pectoralis major) |
| Secondary Muscle | Anterior deltoids, triceps, serratus anterior (stability) |
| Equipment | Resistance band(s), incline bench (or incline back support), secure anchor (door anchor/pole) |
| Difficulty | Beginner–Intermediate (easy to scale by band tension and incline angle) |
Sets & Reps (By Goal)
- Muscle gain (hypertrophy): 3–5 sets × 8–15 reps (60–90 sec rest, controlled tempo)
- Strength focus (bands): 4–6 sets × 5–10 reps (90–150 sec rest, heavier band tension)
- Endurance / pump finisher: 2–3 sets × 15–25 reps (30–60 sec rest, constant tension)
- Shoulder-friendly pressing: 2–4 sets × 10–15 reps (smooth reps, no pain/pinch)
Progression rule: Add reps first, then add band tension or move the anchor slightly lower for more challenge. Only progress if your shoulders stay down and back and your ribcage stays stacked.
Setup / Starting Position
- Set the incline: Use a 30–45° incline bench (or a stable incline back support).
- Anchor the band: Secure the band behind you slightly below shoulder height (door anchor/pole works well).
- Start position: Sit/lie back with feet planted. Hold the band handles/ends with palms facing each other.
- Elbow position: Elbows slightly tucked (~30–45° from torso). Forearms mostly vertical.
- Scapular set: Lightly pull shoulder blades down and back. Keep chest up without over-arching.
- Pre-tension: Move forward just enough that the band has tension at the bottom—no slack.
Tip: If you feel shoulder pinching, reduce incline angle or bring elbows a little closer to your body.
Execution (Step-by-Step)
- Brace and breathe: Inhale, keep ribs stacked, and keep shoulders away from your ears.
- Press up: Drive the hands upward along the incline line, keeping a neutral grip.
- Slight inward path: Let the hands move slightly toward each other at the top (natural press arc).
- Control lockout: Stop just short of hard elbow lock. Keep chest engaged—don’t shrug.
- Lower slowly: 2–3 seconds down to the start with tension maintained and elbows still tucked.
Pro Tips & Common Mistakes
- Keep wrists neutral: Don’t let wrists bend back—stack knuckles over forearms.
- Don’t flare elbows: Excess flaring shifts stress to shoulders; keep a soft tuck.
- Avoid shrugging: Shoulders down; think “long neck” as you press.
- Don’t over-arch: Keep ribs down and glutes/feet stable—press with chest, not lower back.
- Use tempo for growth: 2–3 sec eccentric + brief pause near the bottom builds control and tension.
- Adjust the anchor: Lower anchor = more upper-chest line; higher anchor = more shoulder emphasis.
FAQ
Where should I feel the Band Incline Palm-In Press?
You should feel it mainly in the upper chest, with triceps helping near lockout. If you feel mostly shoulders, reduce the incline, tuck elbows slightly more, and lower the anchor point.
What incline angle is best for upper chest?
Most lifters do best around 30–45°. Higher inclines often shift more work to the front delts. Choose the angle where you feel the upper chest most without shoulder discomfort.
Why is the top of the rep so hard with bands?
Bands create ascending resistance, meaning tension increases as you press. Step closer to the anchor, use a lighter band, or reduce range slightly until your lockout is controlled.
Can I do this without an incline bench?
Yes. You can use a sturdy incline surface (adjustable bench, firm back support, or floor press with a low anchor), but the incline bench makes the press path and upper-chest emphasis easier to maintain.
Recommended Equipment (Optional)
- Resistance Bands with Handles — easy grip and quick tension changes for pressing variations
- Door Anchor for Resistance Bands — stable anchoring at different heights (key for incline pressing)
- Adjustable Incline Weight Bench — supports consistent incline angles and safer setup
- Loop Resistance Bands Set — useful for adding tension or pairing with upper-back work
- Band Handle Attachments — improves comfort and wrist alignment when pressing
Tip: Prioritize a secure anchor and smooth control. Bands should feel stable—no snapping, twisting, or sliding.