Cable Bent-Over Single-Arm Crossover: Form, Sets, Tips & FAQ
Learn the Cable Bent-Over Single-Arm Crossover to isolate the chest with constant cable tension. Step-by-step form, sets by goal, common mistakes, FAQs, and recommended equipment.
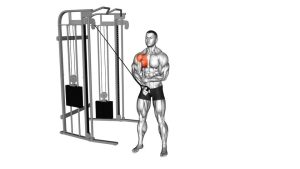
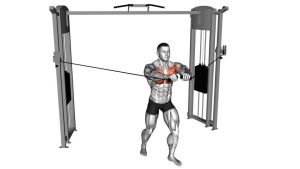
Cable Bent-Over Single-Arm Crossover
Think of this as a single-arm cable fly performed in a slight hinge. The goal is a smooth “hugging” motion: your hand travels in a gentle arc and crosses the midline. You should feel the chest doing the work—not your traps, biceps, or back.
Quick Overview
| Body Part | Chest |
|---|---|
| Primary Muscle | Pectoralis major (chest) |
| Secondary Muscle | Anterior deltoid; serratus anterior; core stabilizers (anti-rotation) |
| Equipment | Cable machine + single D-handle (optional: ankle strap as handle alternative) |
| Difficulty | Beginner–Intermediate (easy to learn, best results with strict control) |
Sets & Reps (By Goal)
- Muscle growth (hypertrophy): 3–4 sets × 10–15 reps/side (60–90 sec rest)
- Chest pump / finisher: 2–3 sets × 15–25 reps/side (30–60 sec rest)
- Strength-focused accessory: 3–5 sets × 6–10 reps/side (75–120 sec rest)
- Technique / symmetry: 2–3 sets × 8–12 reps/side (slow tempo, 45–75 sec rest)
Progression rule: Add reps first, then add a small amount of weight. If your torso twists or your shoulder rolls forward, the load is too heavy for clean isolation.
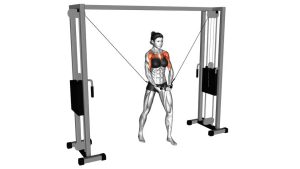
Setup / Starting Position
- Set the pulley: Position the cable at mid-to-upper chest height (adjust for comfort).
- Grab the handle: Use a single D-handle. Stand sideways to the machine and step out until the cable is taut.
- Hinge forward: Soft knees, hips back, torso angled about 30–45°. Keep a proud chest.
- Lock the shoulder: Pull the working shoulder down and slightly back (no shrugging).
- Arm position: Start with the arm slightly out to the side, elbow softly bent and wrist neutral.
- Brace: Light core tension to resist rotation as you pull across your body.
Tip: If you struggle with balance, stagger your stance (one foot slightly back) to improve stability.
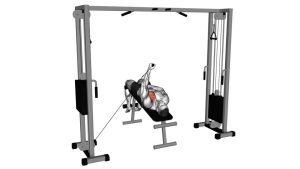
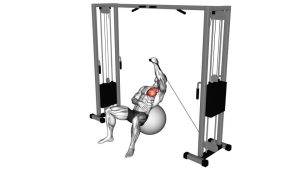
Execution (Step-by-Step)
- Inhale and set: Keep ribs down, core braced, and shoulder packed (down/back).
- Start the arc: Pull the handle in a smooth curve—think “hug the room,” not “row.”
- Cross the midline: Bring the hand across your body toward the opposite side (hip-to-rib area based on angle).
- Squeeze: Pause 1 second and contract the chest hard without shrugging or twisting.
- Control the return: Slowly open back to the start position, keeping tension on the chest (2–3 seconds).
- Repeat: Maintain the same hinge angle and elbow bend for every rep, then switch sides.
Pro Tips & Common Mistakes
Pro Tips
- Keep a soft elbow bend: Don’t straighten at lockout—this keeps tension on the pecs.
- Pull with the chest: Think “bring the upper arm across,” not “curl the handle.”
- Control the stretch: The eccentric is where you build great reps—move slowly and stay stable.
- Find your best cable height: Mid-chest usually feels natural, but small adjustments matter.
- Match both sides: Use the same stance, hinge angle, and finish point on each arm.
Common Mistakes
- Turning it into a row: Elbow driving back = back exercise. Keep the arc in front of you.
- Shoulder rolling forward: This shifts stress to the front delt—pack the shoulder first.
- Twisting the torso: Use core stability; lower weight if you can’t stay square.
- Using momentum: Swinging reduces tension—pause and control both directions.
- Overstretching: Don’t chase extreme range if it causes shoulder discomfort.
FAQ
Where should I feel this exercise?
Mostly in the chest, especially as you cross the arm in front of the body and squeeze. You may feel the front delt and serratus assisting, but your chest should dominate.
Is this better than a regular cable fly?
It’s not “better,” just different. The single-arm version helps correct imbalances and increases control. If you struggle to feel your chest in bilateral flys, this is often a great option.
What cable height should I use?
Start around mid-to-upper chest. If you feel shoulder strain, lower it slightly. If you want more upper-chest emphasis, raise it a bit and keep the same arc and control.
How heavy should I go?
Use a load that lets you keep the torso still and the shoulder packed. If you need to twist or swing, the weight is too heavy for an isolation movement.
What’s the best tempo?
A reliable starting point is 1–2 seconds to pull across, 1-second squeeze, and 2–3 seconds to return. Slow eccentrics usually increase chest stimulus.
Recommended Equipment (Optional)
- Single D-Handle Cable Attachment — comfortable grip for strict single-arm fly and crossover work
- Ankle Strap / Multi-Use Cable Strap — a versatile strap alternative if you want a softer “handle” feel
- Lifting Straps (Optional) — helps if grip limits your set before the chest is fully fatigued
- Massage Ball (Lacrosse Ball) — useful for pec/front-shoulder soft tissue work and mobility between sessions
- Stretch Strap / Mobility Strap — supports chest and shoulder mobility drills to improve fly mechanics
Tip: Equipment should improve comfort and consistency—not add strain. If anything worsens shoulder discomfort, skip it.