Lever Front Pulldown: Proper Form, Muscles Worked, Sets, Tips & FAQ
Learn how to do the Lever Front Pulldown with proper form to build lats and upper-back strength. Includes muscles worked, setup, step-by-step execution, sets and reps by goal, common mistakes, FAQ, and recommended equipment.
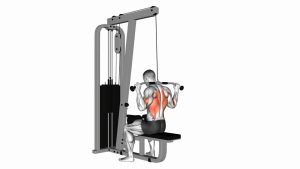
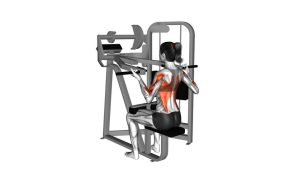
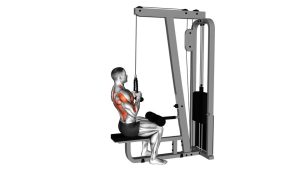
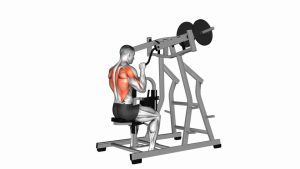
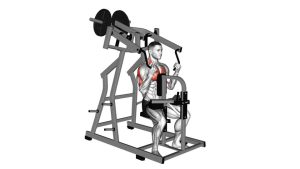
Lever Front Pulldown
Compared with free-moving cable pulldowns, the lever version offers a more fixed arc, which can make it easier to feel the lats and upper back working without excessive body swing. This makes it useful for beginners learning proper pulling mechanics and for experienced lifters chasing consistent tension and clean repetition quality.
Quick Overview
| Body Part | Back |
|---|---|
| Primary Muscle | Latissimus dorsi |
| Secondary Muscle | Rhomboids, middle trapezius, lower trapezius, teres major, posterior deltoids, biceps |
| Equipment | Lever pulldown machine / machine lat pulldown station |
| Difficulty | Beginner to intermediate |
Sets & Reps (By Goal)
- Muscle growth: 3–4 sets × 8–12 reps with 60–90 seconds rest
- Strength focus: 4–5 sets × 5–8 reps with 90–150 seconds rest
- Technique practice: 2–3 sets × 10–15 reps with light to moderate weight
- Upper-back endurance: 2–4 sets × 12–15 reps with smooth tempo and strict form
Progression rule: Add reps before adding load when possible. Once you can hit the top of your target rep range with clean control and no torso swinging, increase the resistance slightly.
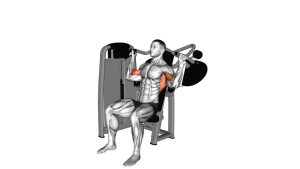
Setup / Starting Position
- Adjust the machine: Set the seat height so you can reach the handles comfortably while keeping your thighs secured under the pads.
- Choose your grip: Take the machine handles with a comfortable overhand or neutral grip, depending on the machine design.
- Set your torso: Sit tall with your chest up, core braced, and lower back in a natural position.
- Start overhead: Begin with your arms extended upward and shoulders controlled, not shrugged aggressively into your ears.
- Lock in posture: Keep your feet planted and avoid starting with excessive backward lean.
Tip: Before the first rep, think about pulling your shoulders down and keeping your chest proud. That usually improves lat engagement right away.
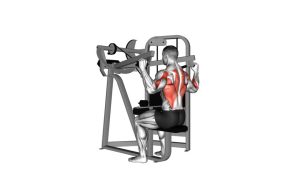
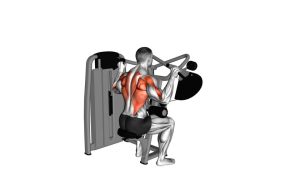
Execution (Step-by-Step)
- Initiate with the upper back: Start the rep by depressing the shoulders and driving the elbows down rather than bending the arms first.
- Pull through the elbows: Bring the handles down in front of you toward the upper chest while keeping the torso mostly upright.
- Squeeze at the bottom: At peak contraction, bring the elbows close to your sides and lightly squeeze your shoulder blades together.
- Pause briefly: Hold the contracted position for a moment without shrugging or collapsing your posture.
- Return under control: Let the handles travel back up slowly until your arms are extended and your lats feel a full stretch.
- Repeat smoothly: Perform the next rep without bouncing or letting the machine pull you out of position.
Pro Tips & Common Mistakes
- Lead with the elbows: Think elbows down, not hands down. This helps shift the effort into the lats.
- Keep the chest lifted: A proud chest helps maintain better shoulder position and a stronger pulling path.
- Do not swing: Excessive backward lean turns the exercise into a momentum-based row-pulldown hybrid.
- Avoid partial reps: Use a full controlled stretch overhead and a solid contraction at the bottom.
- Don’t shrug the top position: Keep your neck relaxed and shoulders controlled instead of jammed upward.
- Use a steady tempo: Pull with intent, then lower slowly to keep tension on the target muscles.
- Match the grip to comfort: Neutral or slightly angled grips often feel friendlier on the shoulders for many lifters.
FAQ
What muscles does the Lever Front Pulldown work most?
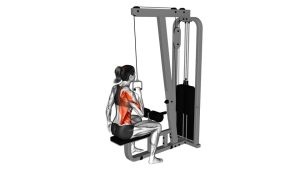
The main target is the latissimus dorsi. It also trains the rhomboids, mid and lower traps, teres major, rear delts, and biceps.
Is this better than a cable lat pulldown?
Not necessarily better, just different. The lever version gives you a more fixed movement path, which can make it easier to stay stable and feel the back working consistently.
Should I pull to the chest or behind the neck?
Pulling to the front of the body, usually toward the upper chest, is the more practical and shoulder-friendly option for most lifters. Behind-the-neck variations are usually less necessary.
Why do I feel this more in my arms than my back?
Usually that happens when the load is too heavy or the pull starts with the hands and elbows bending too early. Lower the resistance and focus on shoulder depression and driving the elbows down first.
Can beginners use the Lever Front Pulldown?
Yes. It is often a great beginner-friendly machine because the guided path can make it easier to learn vertical pulling mechanics and control.
Recommended Equipment
- Lat Pulldown Bar Attachment — useful for home cable systems and for varying grip width during pulldown work
- Weight Lifting Straps — helps reduce grip fatigue so you can focus more on the lats and upper back
- Cable Machine Handles — good for neutral-grip and unilateral pulling variations that complement pulldown training
- Home Lat Pulldown Pulley System — a space-saving option for building similar movement patterns at home
- Lat Pulldown Attachment Set — convenient if you want multiple handle options for back, arm, and cable accessory work
Tip: If your goal is better back activation, the most useful additions are usually lifting straps and a comfortable lat attachment or handle option that matches your shoulder mechanics.