Lever High Row (Plate-Loaded): Proper Form, Muscles Worked, Sets & Tips
Learn how to perform the Lever High Row (Plate-Loaded) with proper form. Discover muscles worked, setup, execution steps, sets by goal, common mistakes, FAQs, and recommended equipment.
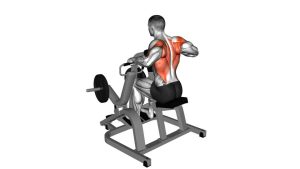
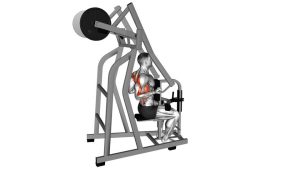
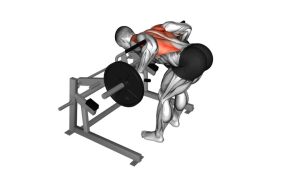
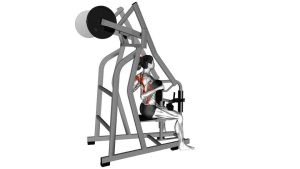
Lever High Row (Plate-Loaded)
This exercise is especially effective for lifters who want a controlled rowing movement without excessive torso momentum. The plate-loaded design helps create a natural pulling path while letting you train both sides evenly. In the video, the movement begins from a stretched position overhead and slightly forward, then finishes with the elbows pulled down and behind the torso. That combination makes the exercise a strong choice for developing the lats, rhomboids, middle traps, rear delts, and biceps.
Quick Overview
| Body Part | Upper Back |
|---|---|
| Primary Muscle | Latissimus dorsi, rhomboids, middle trapezius |
| Secondary Muscle | Rear deltoids, biceps, teres major, lower traps |
| Equipment | Plate-loaded lever high row machine |
| Difficulty | Beginner to intermediate |
Sets & Reps (By Goal)
- Muscle growth: 3–4 sets × 8–12 reps with controlled form
- Strength focus: 4–5 sets × 5–8 reps with heavier loading and full range of motion
- Technique and back activation: 2–3 sets × 10–15 reps with a pause at contraction
- Warm-up or accessory work: 2–3 sets × 12–15 reps using moderate weight
Progression rule: Increase the load only when you can complete every rep with a full stretch, a strong squeeze at the bottom, and no excessive swinging or torso cheating.
Setup / Starting Position
- Load the machine: Add an appropriate amount of weight to each side if the machine uses independent lever arms.
- Sit securely: Place your feet flat on the floor and position your thighs under the support pads if the machine includes them.
- Grip the handles: Reach up and forward to grab the machine’s handles with a neutral or machine-fixed grip.
- Set your torso: Sit tall with your chest up, shoulders controlled, and a natural arch in the lower back.
- Begin from a stretch: Let your arms extend fully while keeping tension through the upper back rather than collapsing into the movement.
Tip: Before pulling, think about locking your torso in place so the back muscles do the work instead of using momentum.
Execution (Step-by-Step)
- Start the pull with the back: Initiate the movement by driving your elbows down and back, not by yanking with the hands.
- Keep the chest proud: As the handles travel downward, maintain an upright torso and avoid rounding your upper spine.
- Retract the shoulder blades: Squeeze the scapulae together as the elbows move behind the torso.
- Pull to the finish: Bring the handles toward the upper chest or shoulder line, depending on the machine’s path.
- Pause briefly: Hold the contraction for a moment to maximize upper-back engagement.
- Lower under control: Slowly return the handles to the starting position, allowing the shoulders to move forward naturally into a full stretch.
Pro Tips & Common Mistakes
- Lead with the elbows: Thinking about elbow drive improves lat and upper-back recruitment.
- Use the full range: Get a deep stretch at the top and a hard squeeze at the bottom for better muscle stimulus.
- Do not overlean: A slight natural torso adjustment is fine, but avoid turning the row into a body swing.
- Keep the neck neutral: Do not crane your head forward or look excessively upward during the pull.
- Control the negative: The lowering phase helps build more back tension and better technique.
- Avoid uneven pulling: If the machine has independent arms, make sure both sides move evenly to prevent compensation.
FAQ
What muscles does the Lever High Row work the most?
It mainly targets the lats, rhomboids, and middle traps. The rear delts, biceps, and teres major also assist during the pull.
Is the Lever High Row better for upper back or lats?
It trains both, but the exact emphasis depends on the machine design and your elbow path. In general, it is excellent for upper-back thickness with strong lat involvement.
Should I pull heavy on this machine?
Yes, but only if you can keep the rep controlled. Heavy loading works well on machine rows, but losing range of motion or relying on momentum reduces the exercise’s effectiveness.
Can beginners use the Lever High Row?
Absolutely. Because the machine provides support and a guided path, it is often easier for beginners to learn than many free-weight row variations.
How is it different from a seated cable row?
The Lever High Row usually has a higher pulling angle and a more fixed movement path. That often creates a stronger upper-back contraction and reduces the stability demands on the lower back.
Recommended Equipment
- Weightlifting Straps — useful if grip strength limits your back training on heavier machine rows
- Lifting Gloves — can improve handle comfort and reduce slipping during long pulling sessions
- Fractional Weight Plates — helpful for making smaller progression jumps on plate-loaded machines
- Resistance Bands Set — great for warming up the shoulders, lats, and upper back before rowing exercises
- Foam Roller — useful for thoracic mobility work to improve posture and rowing mechanics
Tip: Accessories should support your training, not replace proper technique. Focus first on full range of motion, elbow path, and controlled reps.