Dumbbell Renegade Row: Proper Form, Sets, Tips & FAQ
Learn how to perform the Dumbbell Renegade Row with proper form. Discover setup tips, step-by-step execution, sets and reps by goal, common mistakes, FAQs, and recommended equipment.
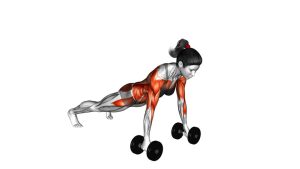
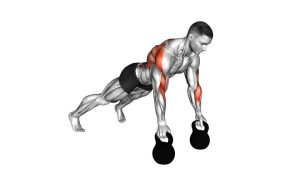
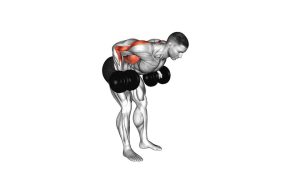
Dumbbell Renegade Row
This exercise builds more than rowing strength. It teaches you to create full-body tension while moving one arm at a time, making it excellent for improving core control, shoulder stability, grip strength, and anti-rotation capacity. Because you are supporting your body on one arm during each rep, technique matters more than heavy loading. Start with manageable dumbbells and prioritize posture, balance, and smooth repetition quality.
Quick Overview
| Body Part | Back |
|---|---|
| Primary Muscle | Latissimus dorsi, rhomboids, middle trapezius |
| Secondary Muscle | Core, rear deltoids, biceps, forearms, glutes, spinal stabilizers |
| Equipment | Two dumbbells |
| Difficulty | Intermediate due to the balance, core stability, and unilateral loading demands |
Sets & Reps (By Goal)
- Strength and control: 3-4 sets × 6-8 reps per side with 60-90 seconds rest
- Muscle building: 3-4 sets × 8-12 reps per side with 45-75 seconds rest
- Core stability and movement quality: 2-3 sets × 6-10 reps per side using lighter dumbbells and slower tempo
- Conditioning circuits: 2-4 rounds × 8-12 alternating reps per side with controlled pacing
Progression rule: First improve plank stability and reduce body rotation. Then increase reps, tempo control, or dumbbell load. Do not chase heavier weights until the torso stays steady throughout every rep.
Setup / Starting Position
- Place two dumbbells on the floor shoulder-width apart so they can act as stable handles.
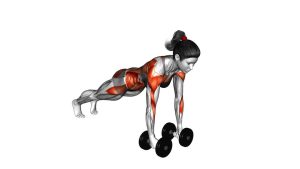
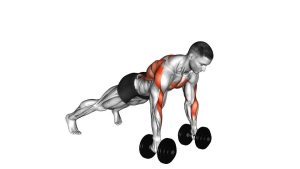
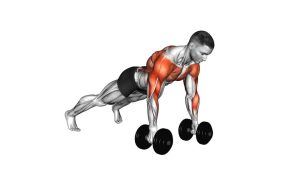
- Grip the dumbbells firmly and step into a high plank position with arms extended.
- Set your feet wider than hip-width to create a more stable base and reduce side-to-side tipping.
- Stack the shoulders over the hands and keep the wrists neutral as much as the dumbbell shape allows.
- Brace the core hard by tightening the abs, squeezing the glutes, and keeping the ribs down.
- Align the body in one straight line from head to heels, with the neck neutral and eyes down.
Tip: Hex dumbbells are often easier to control because they are less likely to roll during the setup and between reps.
Execution (Step-by-Step)
- Lock in your plank: Before rowing, create tension through the core, glutes, and legs so the body stays rigid.
- Shift weight slightly into the support arm: Transfer just enough pressure to stabilize without collapsing the shoulder.
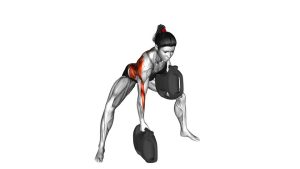
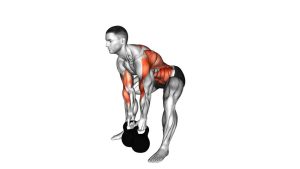
- Row one dumbbell upward: Pull the elbow back toward the hip or lower rib area while keeping it close to the torso.
- Pause briefly at the top: Squeeze the back without rotating the chest open or hiking the hip upward.
- Lower under control: Return the dumbbell to the floor slowly instead of dropping it.
- Re-stabilize the plank: Reset your balance before performing the row on the opposite side.
- Continue alternating sides for the target number of repetitions while keeping the hips as level as possible.
Pro Tips & Common Mistakes
- Widen the feet for stability: A broader stance makes it easier to resist rotation and maintain balance.
- Keep the hips square: Do not let one side open toward the ceiling while rowing.
- Pull with the back, not just the arm: Focus on driving the elbow back and squeezing the shoulder blade.
- Do not rush alternating reps: Reset your plank between sides instead of bouncing from one arm to the other.
- Avoid sagging through the lower back: Keep the abs and glutes engaged the entire time.
- Do not use excessive momentum: Swinging the dumbbell defeats the anti-rotation and strength benefits.
- Press the support hand hard into the dumbbell: This helps stabilize the shoulder and protect alignment.
- Use lighter loads than a normal dumbbell row: This exercise is limited more by stability than raw pulling strength.
FAQ
What muscles does the Dumbbell Renegade Row work most?
It mainly targets the lats, rhomboids, middle traps, and rear delts, while also heavily training the core, obliques, shoulders, glutes, and forearms for stability.
Is the Dumbbell Renegade Row more of a back exercise or a core exercise?
It is both. The rowing action trains the back, but the plank position makes the core work hard to resist rotation and maintain posture. That combination is what makes the exercise so effective.
Why do my hips rotate when I do renegade rows?
Hip rotation usually happens because the weight is too heavy, the feet are too narrow, or the core is not braced hard enough. Widen your stance, reduce the load, and move more slowly.
Can beginners do Dumbbell Renegade Rows?
Many beginners need a regression first, such as a plank hold, a bird-dog row, or a dumbbell row from a bench. The full renegade row is better suited to people who already have decent plank control and shoulder stability.
Should the dumbbell touch the floor between reps?
Yes. In most controlled versions, the dumbbell returns to the floor each rep. This helps you re-center your position and maintain cleaner technique.
What is the best way to make this exercise harder?
You can increase the dumbbell load, slow the lowering phase, add a pause at the top, or reduce how wide the feet are. Only progress once you can keep the body stable with minimal rotation.
Recommended Equipment
- Hex Dumbbells — stable dumbbells that are less likely to roll during plank-based rowing movements
- Adjustable Dumbbells — practical for progressing load without needing multiple dumbbell pairs
- Exercise Mat — adds comfort for hands and feet while improving grip on the floor
- Push-Up Handles — useful for people who want a more wrist-friendly plank setup during similar support work
- Training Gloves or Grip Aids — can help improve comfort and grip security when holding dumbbells for extended sets
Tip: For most people, hex dumbbells and an exercise mat are the most useful starting combination for safe and controlled renegade rows.