Archer Pull-Up: Proper Form, Muscles Worked, Sets, Tips & FAQ
Learn how to do the Archer Pull-Up with proper form. Discover muscles worked, setup, step-by-step execution, sets and reps by goal, common mistakes, FAQs, and recommended equipment.
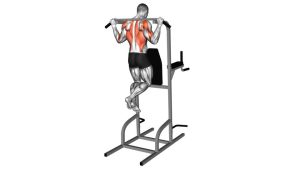
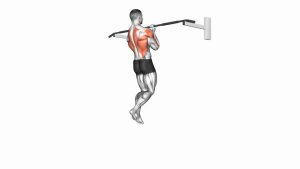
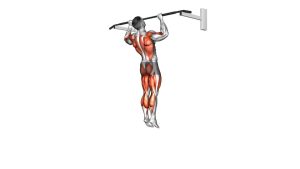
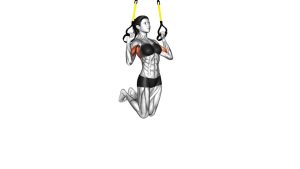
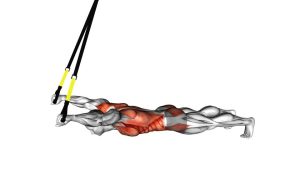
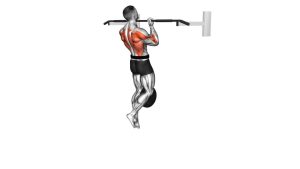
Archer Pull-Up
Based on the movement shown, the exercise is performed with a wide grip from a dead hang. As the rep begins, the body shifts toward one side, the working arm bends deeply, and the assisting arm stays more extended. At the top, the chin approaches the bar near the working hand while the upper back and lats visibly contract. This makes the Archer Pull-Up an excellent tool for developing unilateral pulling strength without going fully single-arm.
Quick Overview
| Body Part | Upper Back |
|---|---|
| Primary Muscle | Latissimus dorsi |
| Secondary Muscle | Rhomboids, teres major, biceps, rear delts, lower traps, forearms, core |
| Equipment | Pull-up bar or sturdy overhead bar |
| Difficulty | Advanced |
Sets & Reps (By Goal)
- Strength development: 3–5 sets × 3–5 reps per side, 90–150 sec rest
- Pull-up progression toward one-arm work: 3–4 sets × 2–4 reps per side, 2–3 min rest
- Hypertrophy / upper-back focus: 3–4 sets × 4–8 total reps, 75–120 sec rest
- Skill practice: 2–3 sets × 2–3 clean reps per side, long rest, prioritize perfect control
Progression rule: First improve control, pause quality, and even left-right performance. Then increase reps. Only after that should you reduce assistance from the extended arm.
Setup / Starting Position
- Use a wide grip: Take a pull-up bar grip wider than shoulder width so you have room to shift from side to side.
- Hang tall: Start from a dead hang with straight arms, tight core, and legs quiet under the body.
- Set the shoulders: Pull the shoulders slightly down and back before initiating the rep.
- Choose your working side: Decide which arm will do most of the pulling while the opposite arm stays more extended.
- Brace the body: Squeeze the glutes and abs lightly to limit swinging and wasted motion.
Tip: A false start from a loose hang often leads to elbow strain or momentum. Set your shoulder position before every rep.
Execution (Step-by-Step)
- Initiate the pull: Drive the elbows down and begin pulling your chest upward from the dead hang.
- Shift toward one side: Move your body toward the chosen working arm instead of pulling straight up through the center.
- Bend the working arm: Let that elbow flex strongly as the lat and upper back take over the rep.
- Keep the assisting arm long: The opposite arm remains more extended and helps guide balance, not dominate the movement.
- Reach the top under control: Bring your chin close to the bar near the working hand while keeping the torso stable.
- Pause briefly: Hold the top for a moment to own the position rather than rushing through it.
- Lower slowly: Descend with control, let the body re-center, and return to a full hang without dropping.
- Repeat on the other side: Alternate arms evenly unless you are using it as a targeted weakness correction drill.
Pro Tips & Common Mistakes
- Pull toward one hand, not just upward: This keeps the archer pattern clear and trains the intended side dominance.
- Control the assisting arm: It should help stabilize, but not turn the movement back into a standard pull-up.
- Use a slight torso turn, not an excessive twist: Some rotation is normal, but too much usually means lost tension.
- Do not kip or swing: Momentum hides weakness and reduces the unilateral demand.
- Lower all the way down: Full controlled eccentrics improve strength and prepare you for harder progressions.
- Keep the shoulders active: Avoid hanging passively into the joints at the bottom between reps.
- Train both sides honestly: Most people have a clear stronger arm, so match quality before chasing extra reps.
FAQ
What muscles does the Archer Pull-Up work most?
The main driver is the latissimus dorsi on the working side, with major help from the rhomboids, teres major, biceps, rear delts, forearms, and core. The extended arm assists with balance and partial force production.
Is the Archer Pull-Up a good progression toward a one-arm pull-up?
Yes. It is one of the best intermediate-to-advanced progressions because it teaches you to shift load heavily to one side without removing the assisting hand completely. It builds the unilateral pulling pattern needed for one-arm work.
How many regular pull-ups should I have before trying Archer Pull-Ups?
A solid base is usually at least 8–12 strict pull-ups with strong control. You should also be able to perform slow negatives and hold the top position confidently before moving into advanced unilateral variations.
Should I alternate sides every rep?
Alternating sides every rep works well for balance and symmetry. You can also do all reps on one side first if you are specifically trying to address a weaker arm, but keep total volume even over time.
What are the most common mistakes in Archer Pull-Ups?
The biggest mistakes are using momentum, pulling too centrally, over-bending the assisting arm, rushing the lowering phase, and losing shoulder control at the bottom. Clean mechanics matter much more than chasing sloppy reps.
Recommended Equipment (Optional)
- Doorway Pull-Up Bar — convenient home option for pull-up practice and progression work
- Heavy Resistance Bands Set — useful for assisted archer pull-ups, warm-ups, and additional back work
- Gymnastics Grips / Pull-Up Grips — can improve comfort and grip security during high-tension bodyweight pulling
- Liquid Chalk — helps reduce slipping and improves bar grip during advanced pull-up sets
- Weighted Vest — useful later for stronger athletes once strict bodyweight pulling is fully controlled
Tip: For most people, a quality pull-up bar and a strong resistance band set are the most useful tools for safely progressing into Archer Pull-Ups.