Lying Prone A-Back: Proper Form, Sets, Tips & FAQ
Learn how to perform the Lying Prone A-Back with proper form to activate the lats, mid-back, and rear shoulder stabilizers. Includes setup, execution, sets by goal, mistakes, FAQs, and recommended equipment.
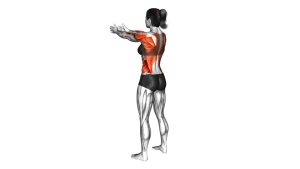
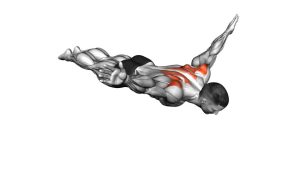
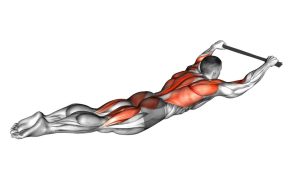
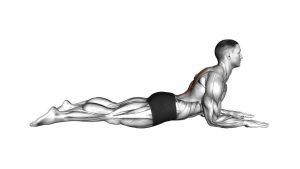
Lying Prone A-Back
This exercise is best used as a back activation drill, a posture accessory, or a beginner-friendly movement for learning how to engage the upper back and lats without equipment. You should feel tension across the mid-back, along the lats, and lightly around the rear shoulders. The movement should stay smooth, modest in range, and highly controlled from start to finish.
Quick Overview
| Body Part | Back |
|---|---|
| Primary Muscle | Latissimus dorsi, middle trapezius, rhomboids |
| Secondary Muscle | Rear deltoids, lower trapezius, spinal erectors |
| Equipment | None |
| Difficulty | Beginner |
Sets & Reps (By Goal)
- Warm-up / activation: 2–3 sets × 8–12 reps with slow, controlled tempo
- Posture / movement quality: 2–4 sets × 10–15 reps with a 1–2 second squeeze at the top
- Muscular endurance: 3–4 sets × 12–20 reps with strict form and short rest
- Rehab-style control: 2–3 sets × 6–10 reps using a smaller range and longer pauses
Progression rule: First improve control, pause quality, and total reps. Only increase difficulty once you can keep the shoulders down, the neck relaxed, and the motion smooth on every rep.
Setup / Starting Position
- Lie face down: Position yourself flat on the floor or on an exercise mat with the legs extended behind you.
- Set the arms in an “A” angle: Place your arms slightly out from your sides, angled downward toward the hips, with the palms facing down or slightly inward.
- Keep the body long: Engage the core lightly, squeeze the glutes gently, and keep the neck in a neutral position.
- Relax the shoulders: Let the shoulders stay away from the ears before starting the lift.
- Start from the back: Think about moving from the shoulder blades first, not just throwing the arms upward.
Tip: A folded towel under the forehead can help you keep the neck more neutral if lying flat feels awkward.
Execution (Step-by-Step)
- Brace lightly: Keep the ribs stable and the core engaged so the movement stays focused on the upper back.
- Pull the shoulders down and back: Initiate the rep by retracting and slightly depressing the shoulder blades.
- Lift the arms: Raise the arms a few inches off the floor while keeping them long and controlled.
- Squeeze at the top: Pause briefly when the arms hover off the ground and feel the lats, rhomboids, and mid-back working.
- Lower slowly: Return to the floor under control without dropping the arms or losing posture.
Pro Tips & Common Mistakes
- Lead with the upper back: Start each rep by moving the shoulder blades, not by flinging the arms.
- Keep the neck neutral: Don’t jam the chin forward or over-lift the head.
- Use a modest range: You do not need a huge lift to make this effective.
- Avoid shrugging: Keep tension out of the upper traps by pulling the shoulders away from the ears.
- Don’t over-arch the lower back: Keep the abs lightly braced and the glutes active.
- Pause with purpose: A short squeeze at the top improves mind-muscle connection and back activation.
FAQ
What muscles does the Lying Prone A-Back work most?
It mainly targets the lats, middle traps, and rhomboids. The rear delts and spinal erectors also assist, especially as you hold the top position.
Is this exercise good for posture?
Yes. It helps reinforce better scapular control and strengthens muscles that support a more open chest and stronger upper-back position, which can be useful for posture-focused training.
Should I lift my chest high off the floor?
No. A slight chest lift is fine, but the movement should stay focused on the back muscles. Too much spinal extension usually shifts tension away from the target muscles.
Where should I feel this exercise?
You should mostly feel it across the mid-back, upper back, and along the sides of the back near the lats. You may also feel light work in the rear shoulders.
Can beginners use this as part of a back workout?
Absolutely. It is a strong choice for beginners because it builds awareness, improves control, and teaches proper back engagement before moving on to heavier rows, pulldowns, or pull-up variations.
Recommended Equipment (Optional)
- Exercise Mat — adds comfort for prone floor work and helps you maintain a stable setup
- Foam Exercise Pad — useful if you want extra cushioning under the chest, hips, or forearms
- Resistance Bands Set — great for progressing into rows, pull-aparts, and other back-strengthening drills
- Pilates Small Ball — can be used for support, positioning, or adding body-awareness work during mobility sessions
- Peanut Massage Ball — helpful for soft-tissue work around the upper back before activation drills
Tip: This exercise does not require equipment, but a comfortable floor setup can improve consistency and help you focus on clean movement quality.