Assisted Single-Arm Pull-Up: Form, Muscles Worked, Sets, Tips & FAQ
Learn how to perform the Assisted Single-Arm Pull-Up with proper form. Discover muscles worked, setup, step-by-step execution, sets by goal, common mistakes, FAQs, and recommended equipment.
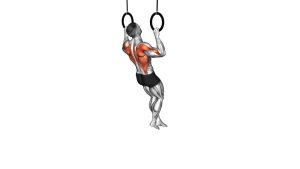
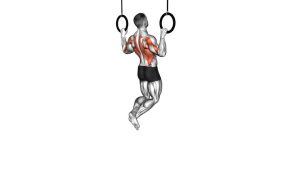
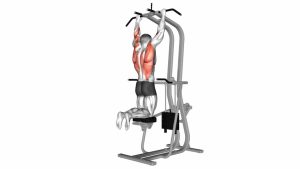
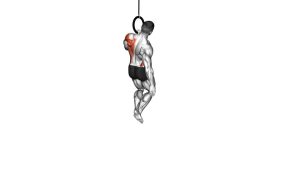
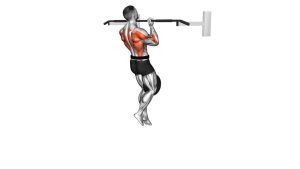
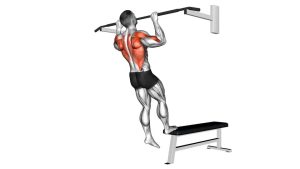
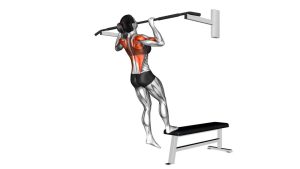
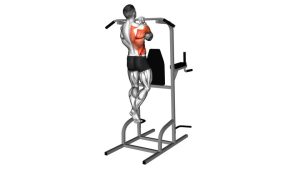
Assisted Single-Arm Pull-Up
This movement is a valuable progression toward the full one-arm pull-up and a powerful tool for building unilateral back strength. It strongly challenges the latissimus dorsi, teres major, biceps, and upper-back stabilizers while also demanding serious core tension to resist twisting. The best reps are controlled, deliberate, and driven by the back rather than momentum.
Quick Overview
| Body Part | Back |
|---|---|
| Primary Muscle | Latissimus dorsi |
| Secondary Muscle | Teres major, biceps brachii, brachialis, rhomboids, lower traps, rear delts, forearms, core stabilizers |
| Equipment | Pull-up bar or sturdy overhead bar; optional band or support assistance |
| Difficulty | Advanced |
Sets & Reps (By Goal)
- Strength development: 3–5 sets × 2–5 reps per side, 90–150 sec rest
- Skill progression toward one-arm pull-up: 3–4 sets × 3–6 reps per side with controlled tempo
- Eccentric-focused training: 3–5 sets × 2–4 reps per side with 3–6 sec lowering phase
- Advanced back accessory work: 2–4 sets × 4–8 reps per side using moderate assistance
Progression rule: Reduce the amount of help from the assisting arm over time, not by sacrificing control. Smooth reps with full-body tension matter more than forcing harder variations too early.
Setup / Starting Position
- Grip the bar: Take a firm overhand grip with the working hand. Place the assisting hand in a position that helps reduce load without taking over the rep.
- Hang with tension: Start from a dead-hang or near dead-hang with the ribs down, glutes tight, and legs slightly bent to limit swinging.
- Pack the shoulder: Depress the shoulder blade slightly on the working side before pulling. Think about keeping the shoulder away from the ear.
- Brace the torso: Tighten the abs to resist rotation. A small lean toward the working side is normal, but avoid excessive twisting.
- Set your intent: Pull through the elbow and drive it down toward your side rather than thinking only about your hand moving.
Tip: The less help the assisting arm gives, the harder the movement becomes. Use just enough support to keep the rep strict.
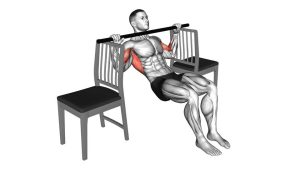
Execution (Step-by-Step)
- Initiate with the scapula: Begin by pulling the working shoulder blade down and slightly back to engage the lat before bending the elbow.
- Drive upward: Pull your body toward the bar using the working arm as the main force source while the assisting arm provides minimal support.
- Keep the elbow path tight: Let the working elbow travel down and in toward your torso rather than flaring excessively outward.
- Reach the top with control: Pull until your chin reaches bar height or slightly above while keeping the shoulder stable and the body under control.
- Lower slowly: Descend under control to full extension or near full extension without dropping, swinging, or losing shoulder position.
Pro Tips & Common Mistakes
- Lead with the back: Start the pull by engaging the scapula first, not by instantly curling with the arm.
- Keep assistance honest: The assisting hand should guide and reduce load, not turn the rep into a standard two-arm pull-up.
- Control rotation: A slight torso shift is normal, but excessive twisting reduces lat efficiency and can stress the shoulder.
- Avoid shrugging: Letting the working shoulder rise toward the ear weakens the pull and may irritate the joint.
- Train the eccentric: Slow negatives are one of the best ways to build the strength needed for harder single-arm progressions.
- Do not rush fatigue: Once form breaks down, the value of the set drops fast. Quality reps beat sloppy grinders.
FAQ
What muscles does the Assisted Single-Arm Pull-Up work most?
The main target is the latissimus dorsi. It also heavily involves the teres major, biceps, rhomboids, lower traps, forearms, and core stabilizers that resist rotation.
Is this a good progression toward a full one-arm pull-up?
Yes. It is one of the best transitional exercises because it teaches unilateral pulling mechanics, grip endurance, and body positioning while still allowing enough support to practice high-quality reps.
How much help should the assisting arm provide?
Only enough to keep the movement strict and controlled. The working arm should clearly do most of the pulling. If both arms are sharing the load equally, the exercise becomes much less specific.
Can beginners do this exercise?
This is generally too advanced for most beginners. A better path is to first master dead hangs, scapular pull-ups, band-assisted pull-ups, and strict two-arm pull-ups before attempting unilateral assisted variations.
Should I train both sides equally even if one side is stronger?
Yes. Train both sides, but you may use slightly more assistance on the weaker side to maintain technique. The goal is symmetry in control and strength, not grinding ugly reps on the weaker arm.
Recommended Equipment
- Pull-Up Bar — essential for practicing strict pull-up progressions at home or in a training space
- Resistance Bands Set — useful for assisted pull-up progressions and for reducing load while refining unilateral technique
- Gymnastics Grips or Lifting Straps — helpful for athletes limited by grip fatigue during high-tension pulling work
- Liquid Chalk — improves grip security and reduces slipping during hard pulling sets
- Dip Belt — useful later for building foundational weighted pull-up strength that supports harder single-arm progressions
Tip: For most athletes, a pull-up bar and a quality resistance band set provide the best starting combination for progressing this movement safely.