Ring Inverted Row: Proper Form, Sets, Muscles Worked & FAQ
Learn how to do the Ring Inverted Row with proper form. Discover muscles worked, setup, step-by-step execution, sets and reps by goal, common mistakes, FAQs, and recommended equipment.
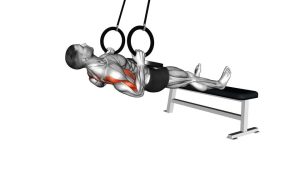
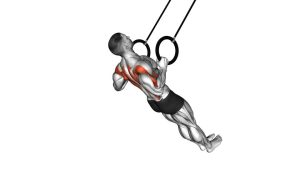
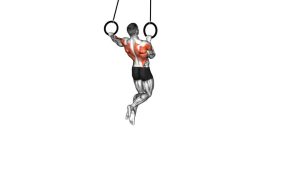
Ring Inverted Row
This exercise is excellent for building horizontal pulling strength, improving posture, and teaching better upper-back engagement. It can be made easier or harder simply by changing body angle, foot position, and tempo. A more upright body reduces difficulty, while lowering the body closer to parallel with the floor increases the challenge. Done correctly, the movement should feel strong through the upper back with minimal swinging, shrugging, or lower-back compensation.
Quick Overview
| Body Part | Back |
|---|---|
| Primary Muscle | Latissimus dorsi, rhomboids, middle trapezius |
| Secondary Muscle | Rear deltoids, biceps, brachialis, forearms, core |
| Equipment | Gymnastic rings or suspension trainer |
| Difficulty | Beginner to intermediate, depending on body angle and setup |
Sets & Reps (By Goal)
- General strength: 3–5 sets × 6–10 reps with controlled tempo and 60–90 sec rest
- Muscle growth: 3–4 sets × 8–15 reps with full range of motion and 45–75 sec rest
- Technique and posture work: 2–4 sets × 10–15 reps with a pause at the top and smooth control
- Beginner progression: 2–3 sets × 6–10 reps using a more upright angle to keep form clean
Progression rule: First improve control, range, and pause quality. Then make the exercise harder by lowering the rings, elevating the feet, slowing the eccentric, or adding external load.
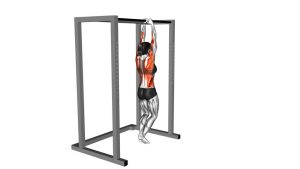
Setup / Starting Position
- Set the rings: Adjust the rings to a height that matches your strength level. Higher rings are easier; lower rings are harder.
- Take a neutral grip: Grab the rings with palms facing each other and wrists in a comfortable, straight position.
- Walk your feet forward: Lean back under the rings until your body forms a straight line from head to heels.
- Brace the body: Tighten the glutes and abs so the hips do not sag or twist during the row.
- Start with arms extended: Let the shoulders move naturally, but keep them controlled rather than collapsed.
Tip: Beginners can bend the knees and place the feet flatter under the body to reduce load and make the movement easier to learn.
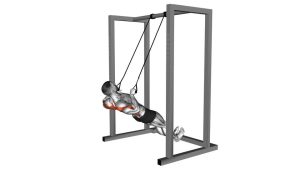
Execution (Step-by-Step)
- Set your posture: Keep your chest open, ribs down, glutes tight, and head neutral.
- Initiate with the upper back: Begin by pulling the shoulder blades back and down before bending the elbows hard.
- Row your body upward: Pull your chest toward the rings while keeping elbows traveling back in a natural path.
- Reach the top with control: Bring the chest close to the rings and squeeze the upper back without shrugging.
- Lower under control: Extend the arms slowly and return to the starting position without losing body alignment.
Pro Tips & Common Mistakes
- Keep the body rigid: Treat every rep like a moving plank. Do not let the hips drop or the lower back arch excessively.
- Lead with the chest: Pull your sternum toward the rings instead of jutting the chin forward.
- Use a full range of motion: Extend fully at the bottom and squeeze the back at the top.
- Do not shrug: Keep the shoulders away from the ears to maintain strong back engagement.
- Avoid momentum: Swinging or bouncing reduces tension on the target muscles and makes form inconsistent.
- Adjust difficulty smartly: Ring rows are scalable, so choose an angle that lets you own every rep.
- Pause at the top: A brief squeeze improves mind-muscle connection and reinforces scapular control.
FAQ
What muscles does the Ring Inverted Row work most?
The main muscles are the lats, rhomboids, and middle traps. It also trains the rear delts, biceps, forearms, and core as supporting muscles.
Is the Ring Inverted Row good for beginners?
Yes. It is one of the best beginner-friendly pulling exercises because you can easily adjust the difficulty by changing your body angle or bending your knees.
Are rings better than a fixed bar for inverted rows?
Rings allow a more natural arm and shoulder path, which many people find more comfortable. They also challenge stability slightly more than a fixed bar.
How do I make Ring Inverted Rows harder?
Lower the rings, elevate your feet, slow down the lowering phase, add a pause at the top, or wear a weighted vest once bodyweight reps become easy.
Can this exercise help improve posture?
Yes. When performed with good scapular control, Ring Inverted Rows strengthen the upper back muscles that help counter rounded-shoulder posture.
Recommended Equipment (Optional)
- Wooden Gymnastic Rings with Adjustable Straps — the most direct setup for ring rows, pull-ups, dips, and general bodyweight training
- Suspension Trainer — a practical alternative to rings for home workouts and scalable inverted row variations
- Non-Slip Workout Mat — helps protect flooring and improves foot traction during setup and reps
- Pull-Up / Training Grips — useful for reducing grip fatigue and protecting the hands during higher-volume pulling work
- Weighted Vest — a strong progression option once standard ring rows become too easy
Product ideas above are based on current Amazon listings for gymnastic rings, suspension trainers, workout mats, pull-up grips, and weighted vests.