Suspension Single-Arm Rear Delt Row: Form, Muscles Worked, Sets, Tips & FAQ
Learn how to do the Suspension Single-Arm Rear Delt Row with proper form. Discover muscles worked, setup, step-by-step execution, sets by goal, common mistakes, FAQs, and recommended equipment.
Suspension Single-Arm Rear Delt Row
This exercise works best when the movement stays smooth and deliberate. The strap adds instability, so your shoulder and core have to work together to keep the pull clean. You should feel the effort mostly in the rear delt and upper back, not in the lower back, neck, or wrists. A more upright body angle makes the exercise easier, while leaning farther back increases the load.
Quick Overview
| Body Part | Rear Shoulders |
|---|---|
| Primary Muscle | Rear deltoid (posterior deltoid) |
| Secondary Muscle | Rhomboids, middle trapezius, rotator cuff, biceps, core stabilizers |
| Equipment | Suspension trainer / TRX-style straps |
| Difficulty | Beginner to intermediate, depending on body angle and control |
Sets & Reps (By Goal)
- Muscle growth: 3–4 sets × 8–15 reps per arm, 60–90 sec rest
- Shoulder stability and control: 2–4 sets × 10–15 reps per arm, slow tempo, 45–75 sec rest
- Warm-up / activation: 2–3 sets × 8–12 reps per arm, light angle, 30–45 sec rest
- Posture-focused accessory work: 2–3 sets × 12–20 reps per arm, moderate tempo, 45–60 sec rest
Progression rule: First improve control, then increase reps, then make the movement harder by leaning farther back. Keep the elbow path clean and avoid using body rotation to create extra range.
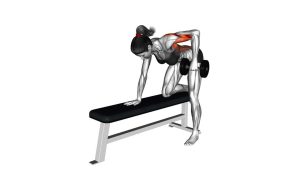
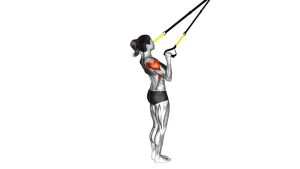
Setup / Starting Position
- Set the straps: Adjust the suspension trainer so the handle is easy to grip and the anchor point is secure.
- Face the anchor: Hold one handle with your working arm and step your feet forward so your body leans back slightly.
- Use a solid stance: Keep feet planted about hip-width apart for balance.
- Brace the core: Maintain a straight line from head to heels without arching the lower back.
- Start with the arm extended: The working arm should be straight but not aggressively locked out, with the shoulder packed down.
- Set the pulling path: Let the elbow travel slightly out from the body so the rear delt can lead the motion.
Tip: If you are new to the movement, begin more upright. This makes it easier to control the pull and keep tension on the rear delt instead of relying on momentum.
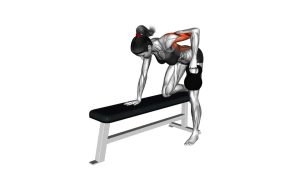
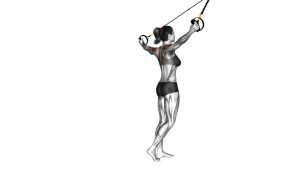
Execution (Step-by-Step)
- Lock in your position: Keep your chest open, core tight, and body aligned from shoulders to ankles.
- Initiate with the upper back: Start the pull by drawing the shoulder blade back slightly as the elbow begins to move out and back.
- Row with a wide elbow: Pull the handle toward the upper chest or shoulder line, not down toward the ribs.
- Pause at the top: Squeeze the rear delt and upper back briefly without shrugging the shoulder toward the ear.
- Lower under control: Extend the arm slowly back to the start while keeping tension through the strap.
- Repeat smoothly: Perform all reps on one arm, then switch sides and match the same quality of motion.
Pro Tips & Common Mistakes
- Keep the elbow wide: This is the main detail that shifts emphasis onto the rear delt.
- Do not twist the torso: Rotation makes the exercise easier, but it reduces tension on the target muscle.
- Stay rigid from head to heel: A loose body position turns the rep into a swing instead of a controlled row.
- Avoid shrugging: Keep the shoulder away from the ear so the rear delt and mid-back do the work.
- Control the eccentric: The lowering phase is valuable for building shoulder stability and muscle control.
- Adjust difficulty with foot position: Step closer under the anchor to make it harder, or stand more upright to make it easier.
- Use moderate range: Pull until the rear delt contracts hard, but do not force a range that causes shoulder discomfort.
FAQ
What muscle does the Suspension Single-Arm Rear Delt Row target most?
The primary target is the rear deltoid. The rhomboids, middle traps, biceps, and rotator cuff also help during the pull and stabilization phase.
Is this different from a normal suspension row?
Yes. A normal suspension row usually keeps the elbows closer to the body and spreads more of the work across the lats and upper back. This variation uses a wider elbow path to place more emphasis on the rear shoulder.
How do I make this exercise harder?
Lean farther back, slow down the tempo, add a pause at the top, or increase total reps while keeping strict form. Make the movement harder only if you can maintain body alignment and shoulder control.
Can beginners use this exercise?
Yes. Beginners can simply stand more upright to reduce the load. The suspension trainer makes it easy to scale the resistance by changing body angle.
Where should I feel it if I am doing it correctly?
You should mainly feel it in the rear delt and upper back. If you mostly feel the biceps, neck, or lower back, adjust your elbow path, body position, and tempo.
Recommended Equipment (Optional)
- Suspension Trainer System — the main tool for performing this exercise at home, outdoors, or in the gym
- Door Anchor for Suspension Trainer — useful for secure indoor setup when you do not have a permanent anchor point
- Resistance Bands Set — great for pairing rear delt rows with face pulls, pull-aparts, and shoulder warm-up drills
- Shoulder Rehab Bands — helpful for lighter rotator cuff and shoulder stability work on recovery days
- Workout Gloves with Grip — optional for better handle comfort during higher-volume suspension training
These product categories are commonly available on Amazon for suspension training setups and shoulder accessory work.