Kettlebell Kneeling Shoulder Bottom-Up Hold: Form, Benefits, Sets & Tips
Learn the Kettlebell Kneeling Shoulder Bottom-Up Hold for shoulder stability, grip strength, and core control. Includes form cues, sets by goal, common mistakes, FAQs, and recommended equipment.
Kettlebell Kneeling Shoulder Bottom-Up Hold
This exercise is less about moving heavy weight and more about building joint control. You should feel your shoulder working to stabilize, your forearm and hand gripping hard, and your trunk staying braced to prevent wobbling. When done properly, it can improve overhead control, shoulder resilience, and unilateral stability for pressing, carries, and athletic movement.
Quick Overview
| Body Part | Shoulders |
|---|---|
| Primary Muscle | Deltoids (especially front and side delts) |
| Secondary Muscle | Rotator cuff, forearms, upper traps, serratus anterior, obliques, and glutes |
| Equipment | Kettlebell; optional kneeling pad or exercise mat |
| Difficulty | Intermediate (advanced with heavier loads or overhead variations) |
Sets & Reps (By Goal)
- Shoulder stability: 3–4 sets × 15–30 second holds per side
- Warm-up / activation: 2–3 sets × 10–20 second holds per side with a lighter bell
- Grip and control development: 3–5 sets × 20–40 second holds per side
- Pressing prep: 2–3 sets × 1–3 controlled reps into a short hold at shoulder level
Progression rule: Increase hold time first, then load. Only move to a heavier kettlebell when you can keep the bell vertical, wrist stacked, and shoulder stable without excessive shaking.
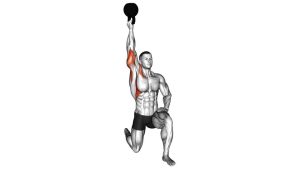
Setup / Starting Position
- Take a half-kneeling stance: Place one knee on the floor and the opposite foot in front, both legs around 90 degrees.
- Brace from the ground up: Squeeze the glute on the down-knee side and keep your ribs stacked over your pelvis.
- Grip the kettlebell firmly: Hold the handle so the bell is upside down, with the bottom of the kettlebell facing the ceiling.
- Bring it to shoulder level: Position the elbow under the wrist and keep the forearm vertical.
- Set your posture: Stay tall, keep the chin neutral, and avoid leaning away from the working side.
Tip: Start with the stronger side first so you can better feel the correct stacked position before switching.
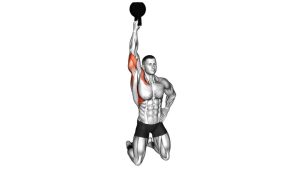
Execution (Step-by-Step)
- Lock in the rack position: Keep the kettlebell bottom-up at shoulder height with your wrist straight and knuckles facing the ceiling.
- Create tension: Grip the handle hard, tighten your abs, and squeeze the glute of the kneeling leg.
- Hold the position: Keep the bell vertical and stable while resisting side-bending, twisting, or shoulder collapse.
- Breathe under control: Use short, calm breaths without letting your ribs flare or torso shift.
- Lower carefully: When the hold is finished, bring the kettlebell down slowly and reset before switching sides.
Pro Tips & Common Mistakes
- Crush the handle: A stronger grip usually creates a more stable shoulder.
- Stay tall in the torso: Don’t lean back or sideways to compensate for instability.
- Keep the wrist neutral: Avoid letting it bend backward under the kettlebell.
- Use a light kettlebell first: Bottom-up work feels much harder than standard holds.
- Don’t rush the setup: Most mistakes happen before the hold even begins.
- Avoid shrugging: Let the shoulder stay active, but don’t jam it up toward the ear.
- Watch the front knee: Keep the lead foot planted and don’t let your balance drift around.
FAQ
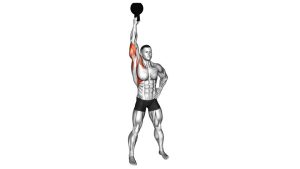
What does “bottom-up” mean in kettlebell training?
It means the kettlebell is held upside down, with the round bell above the handle. This creates instability and forces your grip, wrist, and shoulder to work much harder to keep the load balanced.
Where should I feel this exercise most?
You’ll usually feel it in the shoulder, forearm, and hand first, with strong support from the core and glutes. It should feel like controlled muscular effort, not joint pain or pinching.
Is this exercise good before pressing workouts?
Yes. It can be an excellent activation drill before overhead pressing because it teaches better shoulder packing, grip tension, and full-body stability.
Can beginners do it?
Beginners can learn it, but they should start with a very light kettlebell and short holds. The instability makes it more challenging than it looks.
Should I do this as a hold or as a press?
Start with the hold first. Once you can control the bottom-up position cleanly, you can explore a bottom-up press as a more advanced progression.
Recommended Equipment (Optional)
- Vinyl-Coated Kettlebell — ideal for practicing bottom-up holds with manageable weight and a secure handle
- Competition-Style Kettlebell — consistent shape and handle dimensions for smoother technique work
- Foam Kneeling Pad — adds comfort and support for the down knee during half-kneeling work
- Wrist Wraps — optional support if your wrists fatigue quickly during stability practice
- Non-Slip Exercise Mat — helps create a steadier base for kneeling and protects the training surface
Tip: For this exercise, choose equipment that improves control and position quality. A lighter kettlebell with better balance is usually more useful than jumping to a heavier one too soon.