Band Seated Neutral-Grip Shoulder Press: Form, Sets, Tips & FAQ
Learn how to do the Band Seated Neutral-Grip Shoulder Press with proper form. Discover muscles worked, setup, step-by-step execution, sets by goal, common mistakes, FAQs, and useful equipment.
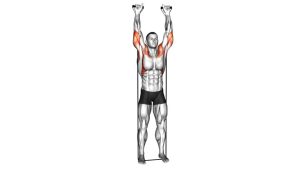
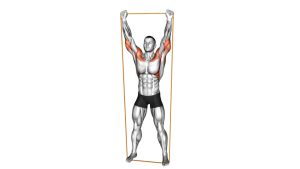
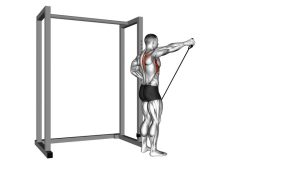
Band Seated Neutral-Grip Shoulder Press
This exercise works best when you combine upright posture, smooth pressing mechanics, and consistent band tension. Because the band gets harder as you press higher, the top half of the rep challenges shoulder stability and lockout strength. You should feel the shoulders doing most of the work, while the triceps assist to finish the press. Keep the ribs down, avoid shrugging early, and do not turn the movement into a back-leaning push press.
Quick Overview
| Body Part | Shoulders |
|---|---|
| Primary Muscle | Anterior deltoid (front delts) |
| Secondary Muscle | Lateral deltoid, triceps brachii, upper chest, upper traps (stabilization) |
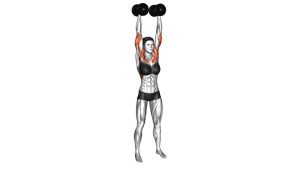
| Equipment | Resistance band with handles, bench or sturdy seat |
| Difficulty | Beginner to Intermediate |
Sets & Reps (By Goal)
- Muscle growth: 3–4 sets × 8–15 reps, 60–90 sec rest
- Shoulder strength: 4–5 sets × 6–10 reps, 90–120 sec rest
- General fitness: 2–4 sets × 10–15 reps, 45–75 sec rest
- Warm-up / activation: 2–3 sets × 12–20 reps with a lighter band, 30–45 sec rest
Progression rule: First improve control, then add reps, then move to a stronger band. Keep every rep clean before increasing resistance.
Setup / Starting Position
- Sit tall on a bench or sturdy seat: Plant both feet firmly on the band to anchor it evenly.
- Grab the handles with a neutral grip: Palms should face each other.
- Bring the handles to shoulder level: Elbows bent, wrists stacked over elbows, elbows slightly in front of the torso.
- Brace your core: Keep your chest up, ribs down, and spine neutral.
- Set the shoulders: Keep them stable and avoid shrugging before the press begins.
Tip: Sit near the front of the bench so the band path stays clean and the feet can anchor the resistance evenly.
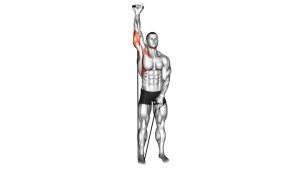
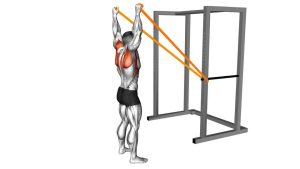
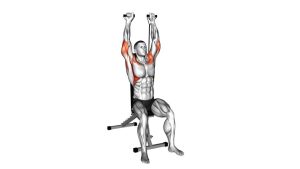
Execution (Step-by-Step)
- Start from shoulder height: Hold the handles beside the shoulders with palms facing inward.
- Press upward: Drive the handles overhead in a smooth vertical path while extending the elbows.
- Keep the torso still: Avoid leaning back or using momentum to finish the rep.
- Reach a controlled top position: Arms extend overhead without aggressively locking out or losing shoulder position.
- Lower slowly: Bring the handles back to shoulder height under control, maintaining tension in the band.
- Repeat with the same path: Every rep should look the same from start to finish.
Pro Tips & Common Mistakes
- Use the neutral grip well: Keep palms facing each other to encourage a joint-friendly pressing path.
- Stay tall: Do not turn the movement into a seated back bend.
- Press straight up: Avoid drifting too far forward or too far out to the sides.
- Control the lowering phase: Don’t let the band yank your arms down.
- Keep shoulders active, not shrugged: Let the delts press; don’t overuse the traps too early.
- Anchor evenly: Uneven foot placement can make one side work harder than the other.
- Don’t rush lockout: Finish the press smoothly and stay in control at the top.
- Match the band to your strength: Too much resistance usually leads to poor posture and short reps.
FAQ
What muscles does the Band Seated Neutral-Grip Shoulder Press work?
It mainly targets the front delts, while the side delts and triceps help drive the press. The upper chest and upper traps also assist with stability.
Why use a neutral grip instead of a pronated grip?
A neutral grip often feels more comfortable on the shoulders because the elbows stay slightly in front of the body. For many lifters, this creates a smoother pressing path and reduces shoulder irritation.
Can beginners use this exercise?
Yes. Beginners can start with a light band and focus on posture, control, and full but comfortable range of motion. It is a good option for home shoulder training when dumbbells are not available.
Should I lock out fully at the top?
You can extend the arms fully overhead, but avoid snapping the elbows into an aggressive lockout. Finish each rep with control and keep the shoulders stable.
What are the most common mistakes with this exercise?
The most common issues are leaning back too much, pressing with uneven band tension, rushing the lowering phase, and using a band that is too heavy to control properly.
Recommended Equipment
- Resistance Bands Set — useful for progressive overhead pressing, home workouts, and full-body training
- Resistance Band Handles — improves grip comfort and control during pressing variations
- Door Anchor for Resistance Bands — adds more setup options for shoulder training and accessory movements
- Adjustable Weight Bench — gives you a stable seated position for presses and many other upper-body exercises
- Shoulder Resistance Bands — useful for lighter shoulder work, warm-ups, and higher-rep training
Choose durable bands and stable seating so you can press with confidence and keep your posture consistent throughout the set.