Hip Raise Bent Knee: Proper Form, Benefits, Sets, Tips & FAQ
Learn the bent-knee hip raise for stronger glutes, better hip extension, and core stability. Includes form steps, sets, mistakes, FAQs, and equipment.
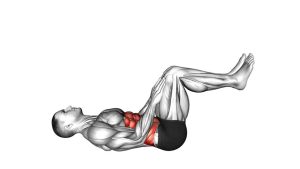
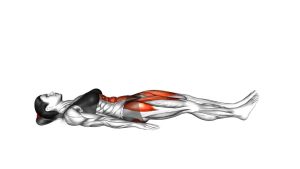
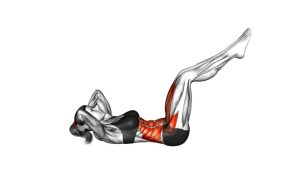
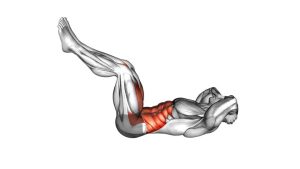
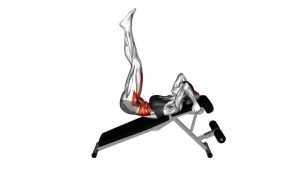
Hip Raise (Bent Knee)
This exercise is performed while lying on the back with the knees bent and the feet flat on the floor. From there, the hips rise until the body forms a strong line from the shoulders to the knees. Although the movement looks simple, good technique matters. When performed correctly, the bent-knee hip raise teaches the body to extend the hips while keeping the ribs controlled, the lower back stable, and the knees tracking in line with the feet.
In the video demonstration, the performer uses a smooth tempo and avoids rushing the reps. First, the hips begin on the floor. Then, the feet press into the ground as the glutes contract. As a result, the hips rise in a controlled path until the pelvis reaches the top position. Finally, the hips lower back down with control instead of dropping. This steady rhythm makes the exercise safer and more effective.
Quick Overview
| Body Part | Glutes |
|---|---|
| Primary Muscle | Gluteus maximus |
| Secondary Muscle | Hamstrings, core stabilizers, lower back stabilizers, hip stabilizers |
| Equipment | No equipment required; optional exercise mat, mini band, or ankle weights |
| Difficulty | Beginner |
Sets & Reps (By Goal)
- Glute activation: 2–3 sets of 12–15 reps with a 1–2 second squeeze at the top.
- Beginner strength: 3 sets of 10–12 controlled reps with 45–60 seconds of rest.
- Muscle endurance: 3–4 sets of 15–25 reps with a smooth and steady tempo.
- Warm-up before lower-body training: 1–2 sets of 10–15 reps before squats, lunges, deadlifts, or hip thrusts.
- Glute-focused finisher: 2–3 sets of 20 reps, holding the final rep for 10–20 seconds.
Progression rule: Add control before adding resistance. First, improve your top squeeze and lowering phase. Then, progress with a mini band, dumbbell, plate, or longer pause.
Setup / Starting Position
- Lie on your back: Place your upper back, shoulders, and head comfortably on the floor or an exercise mat.
- Bend your knees: Keep both knees bent with your feet flat on the floor, roughly hip-width apart.
- Set your foot position: Bring your heels close enough that you can drive through them without your feet sliding.
- Relax your upper body: Keep your arms on the floor beside your body for balance and stability.
- Brace lightly: Tighten your core just enough to keep your ribs from flaring upward.
- Set your pelvis: Slightly tuck your pelvis so the lower back does not overarch before the lift.
A good starting position should feel stable. If your hamstrings cramp quickly, move your feet slightly farther away or reduce the height of each rep.
Execution (Step-by-Step)
- Start from the floor: Keep your hips down, knees bent, feet flat, and shoulders relaxed. Before moving, take a controlled breath and prepare your core.
- Press through your heels: Push the floor away with your feet. At the same time, begin squeezing your glutes to lift your hips upward.
- Raise your hips smoothly: Continue lifting until your shoulders, hips, and knees form a straight diagonal line. However, do not push so high that your lower back arches.
- Pause at the top: Hold the top position briefly. During this pause, squeeze the glutes and keep the ribs down.
- Control the descent: Lower your hips slowly toward the floor. Instead of dropping, guide the body down with control.
- Reset and repeat: Touch the hips lightly to the floor, then begin the next rep with the same clean setup and steady tempo.
Pro Tips & Common Mistakes
Pro Tips
- Drive through the heels: This helps shift tension toward the glutes instead of the calves or quads.
- Use a small pause: A 1–2 second squeeze at the top improves glute activation and control.
- Keep the ribs down: This prevents the movement from turning into a lower-back arch.
- Move with control: A slower lowering phase increases tension and improves technique.
- Track your knees: Keep both knees pointing in the same direction as your toes.
Common Mistakes
- Arching the lower back: This reduces glute work and may create discomfort.
- Pushing through the toes: This can shift tension away from the posterior chain.
- Letting the knees collapse inward: This reduces hip stability and weakens the movement pattern.
- Lifting too fast: Momentum makes the exercise less effective.
- Overextending at the top: Higher is not always better. Stop when the hips are extended and the glutes are tight.
FAQ
What muscles does the hip raise bent knee work?
The exercise mainly targets the gluteus maximus. In addition, the hamstrings, core stabilizers, and hip stabilizers assist the movement.
Is the hip raise the same as a glute bridge?
Yes, this version is commonly known as a glute bridge. The bent-knee hip raise describes the same basic movement pattern of lifting the hips from the floor with bent knees.
Should I feel this exercise in my lower back?
You may feel light stabilizing work, but the main effort should come from the glutes. If the lower back dominates, lower the hips slightly, brace your core, and avoid overextending at the top.
Can beginners do the bent-knee hip raise?
Yes. It is beginner-friendly because it uses bodyweight resistance and a stable floor position. However, beginners should focus on control, alignment, and smooth reps before adding resistance.
How can I make the exercise harder?
You can add a mini band above the knees, place a dumbbell or plate across the hips, hold the top position longer, or perform single-leg hip raises once your basic form is strong.
Recommended Equipment
- Exercise Mat — adds comfort for the back, shoulders, and hips during floor-based reps.
- Mini Resistance Bands — useful for increasing glute medius engagement and improving knee tracking.
- Adjustable Dumbbell — can be placed carefully across the hips for added resistance.
- Barbell Pad / Hip Thrust Pad — protects the hips when progressing to weighted hip raises or hip thrusts.
- Ankle Weights — helpful for related glute and leg exercises in a complete lower-body routine.
Choose equipment based on your current level. For most beginners, an exercise mat and mini band are enough before progressing to external weight.