Cobra Yoga Pose: Form, Benefits, Muscles Worked, Tips & FAQ
Learn the Cobra Yoga Pose with safe form, step-by-step cues, muscles worked, sets, mistakes, FAQs, and useful equipment for back mobility.
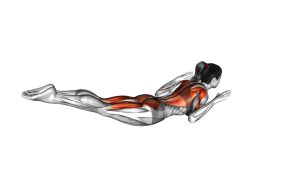
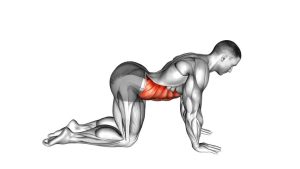
Cobra Yoga Pose
This exercise works best when the lift is slow, the hips stay planted, and the chest opens without aggressive lower-back compression. Therefore, use your hands for light support, but do not turn the pose into a hard arm press. You should feel a comfortable stretch across the front of the body and a controlled extension through the back, not sharp pain or pinching.
Quick Overview
| Body Part | Lower Back |
|---|---|
| Primary Muscle | Spinal erectors |
| Secondary Muscle | Glutes, upper back stabilizers, chest, shoulders, triceps |
| Equipment | Yoga mat or exercise mat |
| Difficulty | Beginner |
Sets & Reps (By Goal)
- Mobility warm-up: 2–3 sets × 6–10 slow reps with a 1–2 second pause at the top.
- Yoga flow practice: 2–4 rounds, holding each cobra position for 5–15 seconds.
- Posture and back-extension control: 2–3 sets × 8–12 reps with smooth breathing.
- Beginner recovery stretch: 1–2 sets × 20–30 second easy holds, only if comfortable.
Progression rule: First improve control and breathing. Then, gradually increase hold time. Do not force a higher backbend if the lower back feels compressed.
Setup / Starting Position
- Lie face down: Start in a prone position with your legs extended behind you.
- Place your hands near your shoulders: Keep your palms flat and elbows bent close to the torso.
- Relax the lower body: Keep the hips, thighs, and feet grounded throughout the setup.
- Lengthen your neck: Keep your head in line with the spine before lifting.
- Prepare your breath: Inhale gently before raising the chest.
Tip: Keep the movement small at first. A clean low cobra is more useful than a forced high cobra.
Execution (Step-by-Step)
- Press lightly through the hands: Begin lifting the chest away from the floor.
- Extend the spine gradually: Let the torso rise as the back arches in a controlled way.
- Keep the hips grounded: Do not let the pelvis lift off the floor.
- Open the chest: Draw the shoulders gently down and back without shrugging.
- Look forward naturally: Keep the neck long instead of throwing the head back.
- Pause briefly: Hold the top position while breathing smoothly.
- Lower with control: Bend the elbows and return the chest toward the floor slowly.
Pro Tips & Common Mistakes
- Use your hands as support, not force: Let the back extension stay comfortable and controlled.
- Keep the elbows close: Flaring the elbows too wide can reduce shoulder control.
- Avoid shrugging: Keep your shoulders away from your ears as the chest opens.
- Do not overextend the neck: Look forward or slightly upward without compressing the back of the neck.
- Keep the hips down: Lifting the pelvis changes the movement and reduces the cobra-position focus.
- Breathe steadily: Holding your breath can create unnecessary tension through the ribs and lower back.
- Lower slowly: Control the return phase instead of dropping the chest to the floor.
FAQ
What muscles does the Cobra Yoga Pose work?
The Cobra Yoga Pose mainly works the spinal erectors, especially through controlled back extension. Additionally, the glutes, upper back stabilizers, shoulders, chest, and triceps assist the movement.
Is Cobra Yoga Pose good for beginners?
Yes. It is beginner-friendly when performed with a small range of motion and steady breathing. However, beginners should avoid forcing the chest too high, especially if the lower back feels tight.
Should my hips stay on the floor during Cobra Pose?
Yes. In the visible movement, the hips and legs remain grounded while the chest lifts. This helps keep the exercise focused on controlled spinal extension instead of turning it into a full push-up.
Why does my lower back feel compressed during Cobra Pose?
Lower-back compression usually happens when the range is too high, the glutes are over-braced, or the hands push too aggressively. Reduce the height, lengthen through the chest, and keep the movement smooth.
How long should I hold Cobra Yoga Pose?
Start with 5–15 seconds per hold. Then, increase gradually only if your breathing stays relaxed and the lower back feels comfortable.
Recommended Equipment
- Non-Slip Yoga Mat — provides cushioning and grip for prone cobra practice.
- Extra Thick Exercise Mat — useful if your hips, ribs, or knees feel pressure on hard floors.
- Yoga Blocks — helpful for modified mobility work and beginner-friendly yoga support.
- Yoga Towel — improves comfort and helps reduce slipping during longer sessions.
- Foam Roller for Back Mobility — useful before or after cobra practice for gentle thoracic mobility work.
Tip: Choose equipment that improves comfort without forcing range. Cobra Pose should feel controlled, smooth, and repeatable.