Incline Push-Up with Chair: Proper Form, Sets & Reps, Tips + FAQ
Learn the Incline Push-Up with Chair to build chest strength with better range of motion at home. Step-by-step form, sets by goal, common mistakes, FAQs, and recommended equipment.
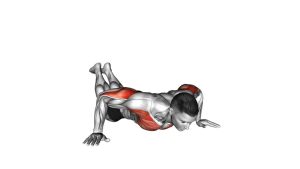
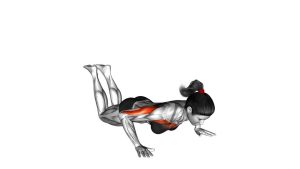
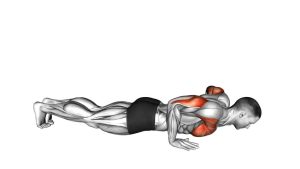
Incline Push-Up with Chair
This variation is ideal for learning push-up mechanics, building pressing volume, and improving chest activation without the difficulty of full floor push-ups. Because the hands are elevated, you can focus on clean reps: steady tempo, stable shoulders, and full-body tension.
Quick Overview
| Body Part | Chest |
|---|---|
| Primary Muscle | Pectoralis major (chest) |
| Secondary Muscle | Triceps, anterior deltoids, serratus anterior (stability) |
| Equipment | Two sturdy chairs (optional: yoga mat, non-slip pads) |
| Difficulty | Beginner → Intermediate (easier than floor push-ups; deeper range can increase challenge) |
Sets & Reps (By Goal)
- Strength (controlled reps): 3–5 sets × 4–8 reps (2–3 min rest)
- Muscle/Hypertrophy: 3–4 sets × 8–15 reps (60–90 sec rest)
- Endurance / Conditioning: 2–4 sets × 12–25 reps (30–60 sec rest)
- Push-up skill practice: 3–6 sets × 5–10 reps (leave 2–3 reps in reserve)
Progression rule: First add reps (or slow tempo), then reduce incline (hands lower) or move to a harder variation. Only progress when you can keep a straight plank and smooth control for every rep.
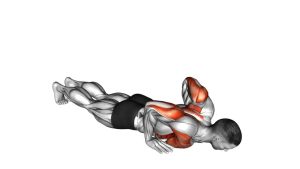
Setup / Starting Position
- Secure the chairs: Place two sturdy chairs on a non-slip surface (rug/mat). Check that they don’t wobble or slide.
- Hand placement: Hands on the chair seats, roughly shoulder-width. Fingers spread, wrists stacked under shoulders.
- Body position: Step your feet back until your body forms a straight line from head to heels.
- Brace: Tighten glutes and core (think “ribs down”). Keep your neck neutral—don’t crane forward.
- Shoulders set: Gently “pack” shoulders down and away from ears. Don’t collapse into the shoulder blades.
Tip: The farther your feet are from the chairs, the harder it becomes. Start closer, then walk back as you gain strength.
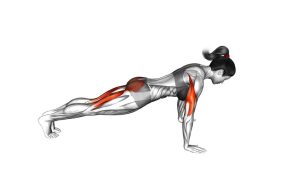
Execution (Step-by-Step)
- Inhale and lower: Bend elbows and lower your chest toward the space between the chairs. Keep a rigid plank.
- Elbow path: Let elbows travel at about 30–60° from your torso (not flared straight out).
- Control the bottom: Stop when your chest is near chair level or when your shoulders feel tight/pinchy—don’t force depth.
- Press up: Exhale and push the chairs away, extending elbows while keeping your chest proud and core braced.
- Finish strong: At the top, reach full extension without shrugging. Keep shoulder blades stable (no “sink” through shoulders).
Pro Tips & Common Mistakes
Pro Tips
- Own the plank: Squeeze glutes + brace abs like a moving plank.
- Use tempo: Try 2–3 seconds down, brief pause, then press up smoothly.
- Adjust difficulty fast: Walk feet back to make it harder; step closer to make it easier.
- Shoulder-friendly elbows: Keep elbows slightly tucked, not fully flared.
- Stable setup: Use non-slip pads or place chair legs against a wall if needed (without restricting your movement).
Common Mistakes
- Hips sagging: Usually a bracing issue—tighten glutes and shorten the range if needed.
- Half reps: Skipping depth/top lockout reduces stimulus—aim for consistent range you can control.
- Elbows flared hard: Can irritate shoulders—use a 30–60° elbow angle.
- Shoulders shrugged: Keep shoulders away from ears and press “through” the palms.
- Unstable chairs: If anything slides or wobbles, stop and fix the setup first.
FAQ
Is this easier than a regular floor push-up?
Yes. Elevating the hands reduces the percentage of bodyweight you lift, making it a great push-up progression. To increase difficulty, walk your feet farther back or use a lower incline.
Where should I feel it?
You should feel the work mainly in the chest and triceps, with your core working to keep you stable. If you feel shoulder pinching, reduce depth, tuck elbows slightly, and ensure the chairs are stable.
How far should I lower between the chairs?
Lower only as far as you can maintain a rigid plank and your shoulders feel comfortable. A slightly deeper range can increase chest stretch, but never force depth if it creates discomfort.
How do I progress from this to full push-ups?
Gradually reduce the incline (hands lower), increase reps with perfect form, and practice controlled eccentrics. Once you can do multiple sets of 10–15 clean incline reps, transitioning to floor push-ups becomes much easier.
What if my wrists hurt?
Try push-up handles, parallettes, or dumbbells to keep wrists more neutral. You can also do a quick wrist warm-up and reduce the angle (don’t let wrists collapse backward).
Recommended Equipment (Optional)
- Push-Up Handles — neutral wrist position and more comfort for higher volume
- Parallettes Bars — stable elevated grip and easier wrist alignment than flat palms
- Non-Slip Furniture Pads / Grippers — helps prevent chairs from sliding on tile/wood floors
- Thick Yoga Mat — improves traction and comfort for hands/feet and floor setup
- Resistance Bands Set — add back/posture work (rows, pull-aparts) to balance pressing volume
Tip: Prioritize stability over “fancy” gear—sliding chairs are the #1 risk factor. If stability is questionable, switch to a wall incline push-up or hands on a sturdy bench.