Hands-Release Push-Up: Proper Form, Muscles Worked, Sets, Tips & FAQ
Learn the hands-release push-up for chest, triceps, shoulders, and core strength with strict form, full range, sets, mistakes, FAQs, and gear.
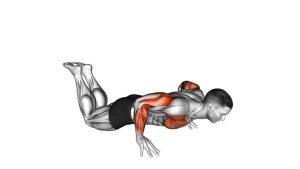
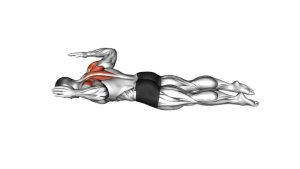
Hands-Release Push-Up
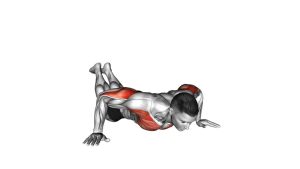
This exercise works best when the body moves as one solid line from head to heels. First, lower the chest to the floor with control. Then, briefly lift both hands while the chest stays down. After that, return the hands to the floor and press back up without letting the hips sag or the torso “worm” upward. Because the hands-release phase removes bounce, this variation is excellent for building honest push-up strength and better upper-body control.
Quick Overview
| Body Part | Chest |
|---|---|
| Primary Muscle | Pectoralis major |
| Secondary Muscle | Triceps, anterior deltoids, serratus anterior, abdominals, glutes, and upper-back stabilizers |
| Equipment | No equipment required; optional exercise mat for comfort |
| Difficulty | Intermediate because each rep starts from a dead-stop bottom position |
Sets & Reps (By Goal)
- Strength: 4–5 sets × 4–8 reps with 90–150 seconds of rest
- Muscle building: 3–4 sets × 8–12 reps with 60–90 seconds of rest
- Technique practice: 2–3 sets × 5–8 slow reps with 60 seconds of rest
- Conditioning: 3–5 rounds × 10–15 reps, only if form stays strict
- Beginner progression: 2–4 sets × 5–10 incline hands-release push-ups
Progression rule: Add reps first, then add sets, and finally reduce rest time. However, do not progress if your hips lift first, chest peels up before the legs, or your elbows flare hard under fatigue.
Setup / Starting Position
- Start in a high plank: Place your hands slightly wider than shoulder-width with your fingers spread for grip.
- Stack your body: Keep your head, ribs, hips, knees, and heels aligned in one long line.
- Brace before moving: Tighten your abs and glutes so your lower back does not sag during the descent.
- Set the shoulders: Keep the shoulders stable and avoid shrugging toward your ears.
- Use a neutral neck: Look slightly ahead of your hands while keeping the back of the neck long.
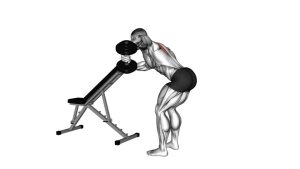
Tip: If the floor version is too difficult, perform the same hands-release pattern with your hands elevated on a sturdy bench or box.
Execution (Step-by-Step)
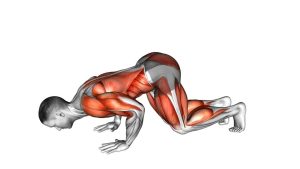
- Lower under control: Bend your elbows and bring your chest toward the floor without dropping your hips.
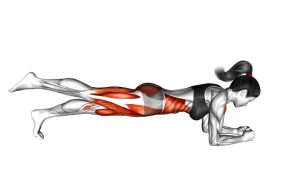
- Reach the bottom: Let your chest make controlled contact with the floor while keeping your legs and core active.
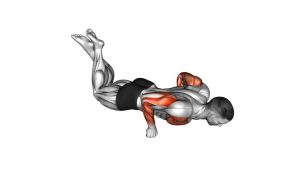
- Release the hands: Briefly lift both hands off the floor while your chest remains down.
- Return the hands: Place your hands back in the same position, close to where they started.
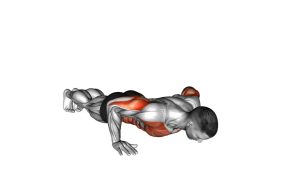
- Press as one unit: Drive the floor away and lift your chest, hips, and thighs together.
- Finish tall: Lock out at the top with straight arms, a braced core, and a neutral spine.
Pro Tips & Common Mistakes
- Do not bounce off the floor: The hand release should remove momentum, not create a resting break.
- Keep the elbows controlled: Aim for a natural angle instead of flaring the elbows straight out to the sides.
- Avoid worming upward: Your chest, hips, and legs should rise together during the press.
- Do not over-lift the hands: A small, clear hand lift is enough to prove the release.
- Brace before pressing: Tight abs and glutes protect the lower back and improve force transfer.
- Keep reps honest: Each rep should touch down, release, reset, and press—not rush through partial range.
- Use incline regressions when needed: Better alignment on an incline beats sloppy floor reps.
FAQ
What muscles do hands-release push-ups work?
Hands-release push-ups mainly train the chest. However, they also involve the triceps, front shoulders, serratus anterior, abs, glutes, and upper-back stabilizers.
Are hands-release push-ups harder than regular push-ups?
Yes, they are often harder because every rep starts from a dead-stop position. Therefore, you cannot rely on bounce or stored tension from the bottom of the movement.
Should my chest touch the floor?
Yes. In the version shown, the chest reaches the floor before the hands lift. However, the contact should be controlled, not a hard drop.
How high should I lift my hands?
Lift your hands just enough to clearly break contact with the floor. A large lift is unnecessary and may disrupt your pressing position.
Why does my lower back sag during the press?
Lower-back sag usually means your core and glutes are not staying braced, or the variation is too difficult. Use an incline version and focus on pressing the body up as one solid unit.
Can beginners do hands-release push-ups?
Beginners can use an incline version first. Once they can control the lowering phase, release the hands, and press up without sagging, they can gradually move closer to the floor.
Recommended Equipment (Optional)
- Exercise Mat — adds comfort for the chest, hands, knees, and toes during floor training
- Push-Up Handles — useful for wrist comfort, although the standard hands-release version uses palms on the floor
- Resistance Bands Set — helpful for assisted push-up progressions and upper-back warm-up work
- Weighted Vest — advanced option for adding load after strict bodyweight reps are easy
- Yoga Blocks — useful for incline regressions, depth reference, or controlled warm-up variations
Tip: Equipment is optional. The most important tool is strict control: full lowering, clear hand release, stable hand return, and a strong press back to plank.