Middle Back Stretch: Proper Form, Benefits, Tips & FAQ
Learn how to do the Middle Back Stretch with proper form to improve thoracic mobility, reduce upper-back stiffness, and support better posture.
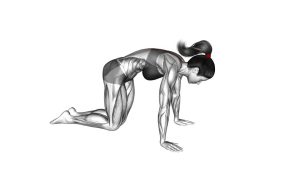
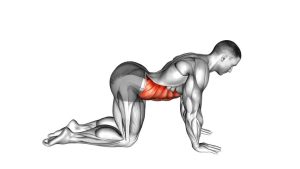
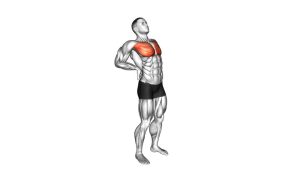
Middle Back Stretch
This stretch is useful for people who feel stiff through the upper back after sitting, working at a desk, training pressing movements, or spending long periods with rounded shoulders. It helps restore comfortable rotation through the thoracic spine while encouraging the shoulders, neck, and lower back to stay relaxed.
The goal is not to twist aggressively. Instead, move slowly into the stretch, let the shoulder and side of the head lower toward the floor, then hold the position while breathing into the rib cage. A smooth repetition should feel controlled, calm, and spacious across the middle back.
Quick Overview
| Body Part | Upper Back |
|---|---|
| Primary Muscle | Thoracic spine muscles, rhomboids, middle trapezius |
| Secondary Muscle | Rear deltoids, latissimus dorsi, spinal erectors, obliques |
| Equipment | No equipment required; exercise mat optional |
| Difficulty | Beginner |
Sets & Reps (By Goal)
- General mobility: 2–3 sets × 6–10 reps per side with a slow 2–3 second reach.
- Posture reset: 1–2 sets × 5–8 reps per side during desk breaks or after long sitting periods.
- Warm-up preparation: 2 sets × 6–8 reps per side before upper-body or back training.
- Deep stretch hold: 2–3 sets × 20–40 seconds per side with relaxed breathing.
- Recovery session: 2 sets × 30–60 seconds per side after training or on rest days.
Progression rule: Start with short holds and smooth repetitions. Increase hold time before increasing range. The stretch should feel open and controlled, not forced or compressed.
Setup / Starting Position
- Start on all fours: Place your hands under your shoulders and your knees under your hips.
- Set your base: Spread your fingers, press lightly through the floor, and keep your knees hip-width apart.
- Neutralize your spine: Keep your back long without over-arching or rounding excessively.
- Relax your neck: Keep your head in line with your spine and avoid lifting the chin.
- Brace lightly: Engage your core enough to keep the hips stable as the upper body rotates.
- Prepare the working arm: Choose one arm to slide under the opposite side of your body.
A soft exercise mat can make the position more comfortable for the knees, shoulder, and side of the head.
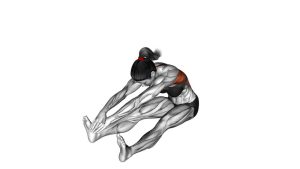
Execution (Step-by-Step)
- Begin in quadruped: Keep both hands grounded and settle into a balanced hands-and-knees position.
- Slide one arm underneath: Reach the working arm under your chest and across the body. Let the palm rotate naturally as the arm passes beneath you.
- Rotate through the middle back: Allow your chest and upper spine to turn as the arm threads through. Keep your hips as square as possible.
- Lower into the stretch: Gently bring the shoulder and side of the head toward the floor. Do not drop suddenly or collapse into the neck.
- Hold and breathe: Pause in the end position. Take slow breaths and feel the stretch across the upper and middle back.
- Return with control: Press lightly through the supporting hand, unthread the arm, and return to the starting position.
- Repeat on the other side: Perform the same controlled pattern with the opposite arm.
Pro Tips & Common Mistakes
Pro Tips
- Breathe into the ribs: Slow breathing helps the middle back relax into the stretch.
- Move from the thoracic spine: Think about rotating the upper back, not twisting the lower back.
- Keep the support arm active: Use the grounded hand to control your descent and return.
- Use a comfortable range: A smaller clean stretch is better than a forced deep position.
- Pause at the bottom: A short hold improves awareness and allows the muscles to release gradually.
Common Mistakes
- Forcing the neck down: Let the head rest gently instead of pushing the neck into the floor.
- Shifting the hips too far: Excessive hip movement reduces the thoracic mobility benefit.
- Rushing the repetition: Fast reps often turn the stretch into a sloppy twist.
- Holding the breath: Breath holding increases tension and limits relaxation.
- Overreaching with pain: Stretch sensation is fine; sharp pain is not.
FAQ
What muscles does the Middle Back Stretch target?
The Middle Back Stretch mainly targets the thoracic spine area, rhomboids, middle trapezius, rear deltoids, and surrounding upper-back tissues. It also lightly involves the obliques and spinal stabilizers.
Is the Middle Back Stretch the same as Thread the Needle?
Yes, this movement is very similar to the Thread the Needle stretch. Both involve reaching one arm under the body to create a controlled rotational stretch through the middle and upper back.
Should I feel this stretch in my lower back?
You may feel a mild stretch through the side body, but the main focus should stay in the middle and upper back. If your lower back feels strained, reduce the twist and keep your hips more stable.
How long should I hold the Middle Back Stretch?
Hold the stretched position for 20–40 seconds per side if you are using it as a static stretch. For mobility work, perform 6–10 slow repetitions per side instead.
Can beginners do this stretch?
Yes. This stretch is beginner-friendly when performed slowly and within a comfortable range. Use a mat under your knees and avoid forcing the shoulder or neck toward the floor.
When should I do the Middle Back Stretch?
You can use it during a warm-up, after workouts, during mobility sessions, or as a posture reset after sitting. It works especially well before back, shoulder, chest, and upper-body training.
Recommended Equipment
- Exercise Mat — adds comfort for the knees, hands, shoulder, and side of the head during floor stretches.
- Yoga Blocks — useful for modifying range of motion and supporting the body during mobility work.
- Foam Roller — helpful for pairing this stretch with thoracic extension and upper-back release drills.
- Massage Ball Set — supports soft-tissue release around the upper back, lats, traps, and rear shoulders.
- Resistance Bands Set — useful for combining this stretch with posture-focused strengthening exercises like pull-aparts and rows.
Tip: Use equipment only to make the stretch more comfortable or effective. Do not use props to force a deeper range.