Roll Triceps Side-Lying on Floor: Form, Benefits, Tips & FAQ
Learn the Roll Triceps Side-Lying on Floor for targeted triceps self-myofascial release. Discover proper setup, rolling technique, common mistakes, FAQs, and recommended recovery equipment.
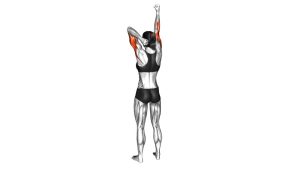
Roll Triceps Side-Lying on Floor
This movement is best used as a recovery and preparation drill, especially if your triceps feel dense, tender, or overworked after pressing, extensions, dips, or other upper-body training. The pressure should feel noticeable but manageable. You want steady contact with the roller, relaxed breathing, and smooth body shifts instead of forcing the arm into discomfort.
Quick Overview
| Body Part | Triceps |
|---|---|
| Primary Muscle | Triceps brachii |
| Secondary Muscle | Rear deltoid and surrounding upper-arm soft tissues (light involvement) |
| Equipment | Foam roller; exercise mat optional for comfort |
| Difficulty | Beginner (easy to learn, but pressure tolerance should be built gradually) |
Sets & Reps (By Goal)
- Warm-up / movement prep: 1–2 sets × 20–30 seconds per arm with light-to-moderate pressure
- Post-workout recovery: 2–3 sets × 30–45 seconds per arm with slow rolling tempo
- Mobility / tissue quality focus: 2–4 sets × 30–60 seconds per arm, pausing briefly on tight spots
- Between upper-body sessions: 1–2 easy rounds per arm as needed to reduce tightness
Progression rule: Increase time under pressure before increasing pressure itself. Better results usually come from slower, more controlled rolling—not from pressing harder.
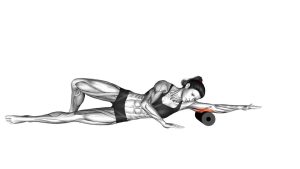
Setup / Starting Position
- Place the roller: Set a foam roller on the floor and lie on your side with the working arm extended overhead.
- Position the triceps: Rest the back of the upper arm on the roller, usually just above the elbow to start.
- Use your legs for balance: Keep the top leg bent in front of the body to stabilize your torso.
- Relax the shoulder: Let the arm stay long and relatively passive while the body controls the pressure.
- Brace lightly: Keep your ribs and torso steady so the rolling motion stays controlled and focused on the triceps.
Tip: A softer surface under your body, such as a mat, can make the position more comfortable without reducing roller pressure too much.
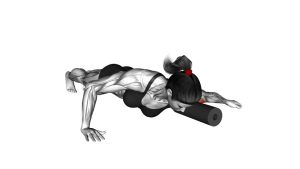
Execution (Step-by-Step)
- Start near the lower triceps: Position the roller under the back of the upper arm, just above the elbow.
- Shift your body slowly: Move your torso so the roller travels along the triceps toward the upper arm.
- Keep the arm relaxed: Let the pressure come from body weight and positioning, not from tensing the arm.
- Pause on tight spots: If you find a tender section, hold for 1–3 seconds while breathing steadily.
- Roll back with control: Reverse the movement and return toward the starting position near the elbow.
- Repeat smoothly: Continue with short, deliberate passes instead of fast back-and-forth rolling.
Pro Tips & Common Mistakes
- Roll slowly: Slower passes help you identify tight areas and keep the pressure more effective.
- Don’t force pain: Mild discomfort is normal, but sharp or nerve-like pain is a sign to reduce pressure.
- Avoid the elbow: Stay on the soft tissue of the upper arm, not the joint itself.
- Use body position to adjust intensity: A small torso angle change can make the drill easier or harder.
- Keep your neck relaxed: Don’t tense the upper traps or shrug while trying to create more pressure.
- Pair it wisely: This drill works well before pressing sessions or after triceps-heavy workouts.
FAQ
What should I feel during the Roll Triceps Side-Lying on Floor?
You should feel steady pressure on the back of the upper arm, especially through the triceps. It may feel tender in tight areas, but it should not feel sharp, electric, or unstable.
Is this a strength exercise or a recovery drill?
This is primarily a recovery and mobility drill. It is designed to improve tissue quality, reduce tightness, and prepare the upper arm for training rather than build strength directly.
How long should I spend on each arm?
Most people do well with 20 to 60 seconds per arm depending on the goal. Shorter sessions work well before training, while longer controlled passes are better for recovery.
Can I use a massage ball instead of a foam roller?
Yes, but a massage ball creates more concentrated pressure. That can be useful for very specific tight spots, though it is usually more intense than a standard foam roller.
When should I avoid this exercise?
Skip it if you have a recent upper-arm injury, severe bruising, acute inflammation, or symptoms that feel like nerve irritation. When in doubt, use less pressure or consult a qualified professional.
Recommended Equipment
- TriggerPoint GRID Foam Roller — a popular textured foam roller option for controlled muscle release work
- Massage Ball Set for Myofascial Release — useful for more precise pressure on smaller triceps trigger points
- Exercise Mat — adds comfort under the torso and hips during side-lying recovery drills
- Yoga Strap / Stretching Strap — helpful for pairing recovery work with light shoulder and triceps mobility
- Foam Roller Recovery Set — a convenient bundle if you want a roller plus smaller self-massage tools
Tip: Start with the foam roller first. If you need more focused pressure later, add a massage ball rather than increasing pressure too aggressively.