Roll Biceps Lying on Floor: Proper Form, Benefits, Tips & FAQ
Learn how to perform the Roll Biceps Lying on Floor for targeted biceps myofascial release. Discover setup, technique, benefits, common mistakes, FAQs, and recommended equipment.
Roll Biceps Lying on Floor
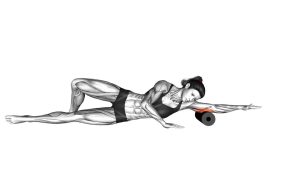
This movement is best used as a recovery and mobility tool, not a strength exercise. In the video, the athlete lies face down with one biceps muscle resting across the foam roller while the opposite hand helps control pressure against the floor. The rolling motion is short and smooth, with subtle pauses over tender spots. You should feel firm but manageable pressure across the front of the upper arm, never sharp pain, numbness, or joint discomfort.
Quick Overview
| Body Part | Biceps |
|---|---|
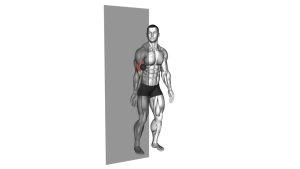
| Primary Muscle | Biceps brachii |
| Secondary Muscle | Brachialis, surrounding upper-arm fascia, forearm flexors (light involvement) |
| Equipment | Foam roller, floor or exercise mat |
| Difficulty | Beginner |
Sets & Reps (By Goal)
- Warm-up mobility: 1–2 rounds of 20–30 seconds per arm with light pressure
- Post-workout recovery: 2–3 rounds of 30–45 seconds per arm with slow passes and brief pauses
- Targeted tightness relief: 2–4 rounds of 20–40 seconds per arm, pausing 5–10 seconds on tender spots
- General maintenance: 1–2 rounds per arm a few times per week as part of your upper-body recovery routine
Progression rule: Increase pressure gradually by shifting more body weight onto the roller, not by moving faster. Better results usually come from slower passes and cleaner positioning.
Setup / Starting Position
- Lie face down: Get into a prone position on the floor or on an exercise mat.
- Place the foam roller: Position it under the front of one upper arm so the biceps rests across the roller.
- Extend the target arm: Reach the working arm out to the side or slightly forward so the biceps can fully contact the roller.
- Use your free hand for support: Plant the opposite palm on the floor to help control body weight and rolling pressure.
- Set your body: Keep the torso stable, neck neutral, and lower body relaxed so the movement comes from a controlled body shift.
Tip: Start with the roller under the middle of the biceps, then make small position changes to find the tightest areas.
Execution (Step-by-Step)
- Sink onto the roller: Let the biceps settle into the foam roller with gentle, controlled pressure.
- Roll slowly forward: Shift your body slightly so the roller travels along the biceps from one section of the muscle to another.
- Use short passes: Keep the rolling distance small and deliberate instead of sliding too far too fast.
- Pause on tender areas: When you find a tight or sensitive spot, stop and hold light pressure for several seconds.
- Roll back smoothly: Reverse the movement and pass back across the same section of the biceps.
- Repeat with control: Perform several slow forward-and-back passes, then switch arms if needed.
Pro Tips & Common Mistakes
- Roll slowly: Faster rolling usually reduces the quality of the release.
- Stay on the muscle belly: Avoid placing the roller on the elbow crease or shoulder joint.
- Use your support hand: Control how much pressure you place on the roller instead of collapsing onto it.
- Pause on hotspots: Tender areas often respond better to a short hold than constant movement.
- Keep the arm relaxed: Don’t actively flex the biceps while rolling.
- Make small angle changes: Slight rotation of the arm can help target different parts of the biceps and nearby fascia.
- Don’t overdo it: A little pressure goes a long way, especially in the front of the arm.
FAQ
What is the Roll Biceps Lying on Floor good for?
It helps reduce biceps tightness, improve upper-arm tissue quality, and support better comfort during pressing, pulling, and arm training. It can also be useful before mobility work or after upper-body workouts.
Where should I feel this exercise?
You should feel firm pressure along the front of the upper arm, especially in the biceps. It may feel tender on tight spots, but it should not feel sharp, electric, or joint-related.
How long should I foam roll the biceps?
Most people do well with 20 to 45 seconds per arm per round. You can spend slightly more time on stubborn areas, but avoid excessive rolling that leaves the muscle overly irritated.
Should I use this before or after training?
It can work in both situations. Before training, use lighter and shorter passes to improve tissue readiness. After training, use slower passes and brief pauses to help with recovery.
Can beginners use this movement?
Yes. It is beginner-friendly as long as pressure stays controlled. Start gently and use your support hand to manage how much body weight rests on the roller.
Recommended Equipment (Optional)
- Standard Foam Roller — the main tool for applying broad, manageable pressure to the biceps
- High-Density Foam Roller — a firmer option for experienced users who want deeper pressure
- Exercise Mat — adds comfort under the torso, knees, and support hand while rolling on the floor
- Massage Peanut Roller — useful for more targeted soft-tissue work around smaller upper-arm areas
- Massage Stick Roller — a practical alternative for controlled arm tissue work without lying on the floor
Tip: Softer rollers are usually better for beginners. Firmer tools can be effective, but only if you can keep the pressure controlled and comfortable.