Spine Stretch Forward Pilates: Form, Benefits, Sets, Tips & FAQ
Learn Spine Stretch Forward Pilates for core control, spinal mobility, posture, and hamstring flexibility with setup, form tips, FAQs, and equipment.
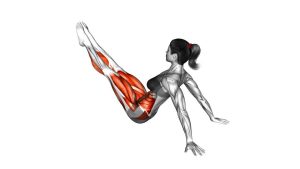
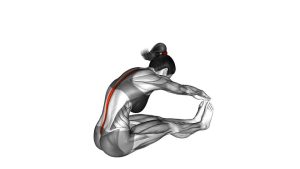
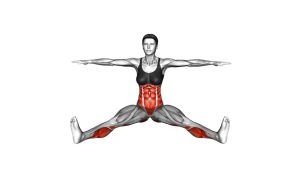
Spine Stretch Forward
Spine Stretch Forward works best when the movement feels calm, precise, and breath-led. You begin seated tall with the legs extended forward, then gradually round the spine as the arms reach ahead. The exercise improves spinal articulation because each part of the back moves in sequence instead of bending all at once. It also teaches the abdominals to support the trunk during forward flexion.
Although it looks like a simple seated stretch, this Pilates exercise is more than flexibility work. The abdominals draw inward, the ribs soften, the shoulders stay relaxed, and the pelvis remains steady. Because of that, the movement can help build better posture control while giving the back and hamstrings a gentle active stretch.
Quick Overview
| Body Part | Core |
|---|---|
| Primary Muscle | Rectus abdominis, transverse abdominis, and deep spinal stabilizers |
| Secondary Muscle | Hamstrings, erector spinae, hip flexors, upper back stabilizers, and shoulder stabilizers |
| Equipment | Exercise mat only; optional yoga block, Pilates ring, towel, or resistance band |
| Difficulty | Beginner to Intermediate, depending on hamstring flexibility and spinal control |
Sets & Reps (By Goal)
- Beginner technique practice: 2 sets × 5–8 slow reps with 30–45 seconds rest.
- Spinal mobility and posture control: 2–3 sets × 8–10 reps with a smooth breathing rhythm.
- Pilates flow routine: 1–3 rounds × 6–10 reps between core or mat exercises.
- Flexibility focus: 2 sets × 6–8 reps with a 2–4 second controlled reach at the end range.
- Warm-up or cooldown: 1–2 sets × 5–8 easy reps using a gentle range of motion.
Progression rule: Improve control before increasing range. A smaller, smoother C-curve is better than a deep reach that pulls the shoulders forward or lifts the hips.
Setup / Starting Position
- Sit tall on the mat: Extend both legs forward. Keep the legs hip-width apart or slightly wider if your hamstrings feel tight.
- Flex the feet: Point the toes upward and gently press through the heels. This keeps the legs active and helps prevent passive collapsing.
- Stack the spine: Sit on the sit bones with the crown of the head reaching upward. Avoid leaning back before the movement begins.
- Reach the arms forward: Extend both arms at shoulder height with palms facing down or inward. Keep the shoulders away from the ears.
- Prepare the breath: Inhale to grow taller. Exhale to begin rounding forward from the head, neck, and upper spine.
If sitting upright is difficult, place a folded towel or yoga block under the hips. This helps the pelvis stay more neutral and makes the exercise safer for tight hamstrings.
Execution (Step-by-Step)
- Start tall: Sit upright with your spine long, legs extended, feet flexed, and arms reaching forward at shoulder level.
- Inhale to prepare: Lengthen through the crown of your head without lifting the ribs or shrugging the shoulders.
- Exhale and nod the head: Gently tuck the chin toward the chest. Let the upper spine begin the curve.
- Round forward segment by segment: Continue curling through the upper back, mid-back, and lower back while reaching the arms forward.
- Keep the hips grounded: Do not slide the pelvis forward or lift the sit bones. The stretch should come from spinal articulation, not from forcing the hips.
- Reach without collapsing: Keep the abdominals gently drawn in. Imagine the waist pulling backward as the fingertips reach forward.
- Pause briefly: Hold the end position for one calm breath while maintaining a rounded C-shape.
- Return with control: Inhale and rebuild the spine from the lower back upward until you are seated tall again.
- Reset posture: Relax the shoulders, re-stack the head over the ribs, and repeat with the same smooth tempo.
Pro Tips & Common Mistakes
- Think “round and reach,” not “fold and force”: The exercise is about spinal articulation. Do not yank yourself toward the feet.
- Keep the arms active but relaxed: Reach forward through the fingertips while keeping the shoulders soft. Avoid locking the elbows aggressively.
- Use the breath: Exhale during the forward curve. This helps the ribs soften and allows the abdominals to support the spine.
- Avoid bouncing: Bouncing at the end range reduces control and may irritate the back or hamstrings.
- Do not lead with the hips: A common mistake is turning the movement into a seated forward fold. Keep the pelvis stable and let the spine move first.
- Keep the legs grounded: If the knees bend slightly because of hamstring tightness, that is acceptable. However, avoid letting the legs roll outward or become completely passive.
- Return slowly: The upward phase matters as much as the forward reach. Re-stack the spine with control.
- Modify when needed: Sit on a folded towel, bend the knees slightly, or reduce the range if your lower back rounds too aggressively.
FAQ
What is Spine Stretch Forward good for?
Spine Stretch Forward helps improve spinal mobility, core control, posture awareness, and hamstring flexibility. It is also useful for learning how to round the spine with control instead of collapsing into the lower back.
Is Spine Stretch Forward a stretch or a core exercise?
It is both. The hamstrings and back receive a gentle stretch, but the abdominals must stay active to control the rounded spine. In Pilates, the control is just as important as the flexibility.
Should my legs stay straight during Spine Stretch Forward?
Straight legs are traditional, but slightly bent knees are fine if your hamstrings are tight. The priority is a tall starting position and a smooth spinal curve, not forcing the knees straight.
Why do I feel this mostly in my hamstrings?
Tight hamstrings can limit the starting position. Try sitting on a folded towel or bending the knees slightly. Once the pelvis is more comfortable, you can focus better on spinal articulation and abdominal control.
Should I reach for my toes?
No. Reaching for the toes is not the main goal. Reach forward while keeping the spine rounded and supported. If chasing the toes makes you collapse, shorten the movement.
Can beginners do Spine Stretch Forward?
Yes. Beginners can perform it with a small range of motion, bent knees, or a towel under the hips. The exercise becomes more advanced when the spine moves smoothly and the legs stay active.
How often should I practice this exercise?
You can practice it 3–5 times per week as part of a Pilates routine, warm-up, or mobility session. Keep the volume moderate and focus on clean, pain-free movement.
Recommended Equipment (Optional)
- Pilates Exercise Mat — provides cushioning for seated Pilates work and helps keep the hips comfortable.
- Yoga Block — useful under the hips to improve seated posture if the hamstrings are tight.
- Pilates Ring — can be held lightly between the hands to improve arm position and shoulder awareness.
- Stretching Strap — helpful for hamstring mobility work that supports better seated Pilates positions.
- Foldable Yoga Towel — works as a simple hip prop or extra mat support during seated mobility exercises.
Tip: Equipment should make the movement cleaner, not harder. If a prop causes strain, remove it and return to a smaller, smoother version of the exercise.