Hip Twist Supported Arms: Pilates Core Twist Form, Sets, Tips & FAQ
Learn the Hip Twist Supported Arms Pilates exercise for obliques, core control, and hip stability with step-by-step form, tips, sets, and FAQs.
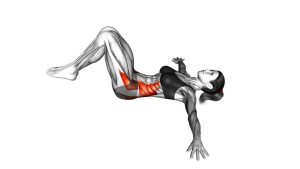
Hip Twist Supported Arms
This exercise is excellent for building rotational control without needing heavy equipment. It teaches the body how to rotate through the hips and pelvis while the trunk stays stable. Because the arms are supported on the floor, the upper body has a wider base of stability. That makes the movement easier to control than unsupported twisting variations.
The Hip Twist Supported Arms works best when every repetition is smooth, quiet, and deliberate. Your legs should move together, your ribs should stay controlled, and your shoulders should remain connected to the mat. If the lower back arches, the feet drop too quickly, or the shoulders lift, reduce the range of motion.
Quick Overview
| Body Part | Core |
|---|---|
| Primary Muscle | Obliques |
| Secondary Muscle | Transverse abdominis, rectus abdominis, hip flexors, lower-back stabilizers |
| Equipment | Exercise mat only |
| Difficulty | Beginner to intermediate, depending on leg position and range of motion |
Sets & Reps (By Goal)
- Core control practice: 2–3 sets × 6–8 reps per side with slow tempo.
- Pilates warm-up: 1–2 sets × 5–6 reps per side using a small, controlled range.
- Oblique endurance: 3–4 sets × 8–12 reps per side with steady breathing.
- Beginner stability: 2 sets × 4–6 reps per side with knees bent and feet higher.
- Advanced control: 3 sets × 6–10 reps per side with longer legs and slower lowering.
Progression rule: First increase control, then increase range of motion. Do not progress by dropping the legs faster. A slower twist with a smaller range is usually better than a wide twist that pulls the shoulders off the floor.
Setup / Starting Position
- Lie on your back: Place your body on a mat with your head, shoulders, ribs, and pelvis supported.
- Open the arms: Extend both arms out to the sides in a “T” shape. Press the palms or backs of the hands lightly into the floor.
- Lift the legs: Bring both legs up together. Beginners can bend the knees, while stronger users can keep the legs longer.
- Set the ribs: Keep the ribs down without forcing the lower back flat. The trunk should feel braced but not stiff.
- Keep the neck relaxed: Let the head rest naturally. Avoid lifting the chin, clenching the jaw, or turning the head aggressively.
- Connect the legs: Keep the inner thighs close together so the legs move as one controlled unit.
Setup matters because the arms create your support base. If the shoulders are unstable before you begin, the twist will usually become too large or too fast.
Execution (Step-by-Step)
- Start in the center: Hold the legs above the hips or slightly angled depending on your strength. Keep the shoulders wide and grounded.
- Inhale to prepare: Brace gently through the lower abdomen. Keep the ribs from flaring upward.
- Lower the legs to one side: Rotate the hips and legs together. Move slowly, as if the legs are controlled by the waist.
- Stop before losing control: Pause when you feel the opposite shoulder wanting to lift or the lower back starting to arch.
- Exhale back to center: Use the obliques to return the legs to the middle. Avoid kicking or swinging.
- Repeat on the opposite side: Keep the same range, tempo, and control from side to side.
- Finish with control: Bring the legs back to center, lower them carefully, and avoid relaxing suddenly into the lower back.
Pro Tips & Common Mistakes
- Use your arms as support, not force: Press gently into the floor to stabilize the upper body, but do not jam the shoulders down aggressively.
- Keep the shoulders grounded: The main mistake is allowing the opposite shoulder to peel away from the mat. Stop the twist before that happens.
- Control the lowering phase: The descent is where the obliques work hardest. Do not let gravity pull the legs down.
- Avoid excessive range: A clean half-range twist is more effective than a large twist with back strain.
- Keep both legs connected: If one leg drops faster than the other, slow down and squeeze the inner thighs lightly.
- Do not hold your breath: Exhale as the legs return to center. This helps the deep core engage naturally.
- Modify with bent knees: Bent knees reduce lever length and make the exercise safer for beginners.
- Watch the lower back: If the back arches or twists sharply, use a smaller range and reset your ribs.
FAQ
What muscles does the Hip Twist Supported Arms exercise work?
It primarily works the obliques. It also trains the transverse abdominis, rectus abdominis, hip flexors, and spinal stabilizers because the trunk must control rotation while the legs move side to side.
Is Hip Twist Supported Arms good for beginners?
Yes, it can be beginner-friendly when the knees are bent and the range of motion is small. Beginners should focus on keeping the shoulders down and moving slowly before trying a larger twist.
Should my legs touch the floor during the twist?
Not necessarily. In most cases, the legs should stop before they touch the floor. Touching the floor is only useful if you can do it without losing shoulder contact, rib control, or lower-back comfort.
Why do I feel this exercise in my lower back?
You may be using too much range, moving too quickly, or letting the legs drop instead of controlling them. Bend your knees, reduce the twist, and focus on pulling the legs back with the obliques.
How is this different from windshield wipers?
The movements are similar, but this Pilates variation usually emphasizes slower tempo, smaller range, controlled breathing, and trunk stability. Windshield wipers are often performed with more strength-focused intensity.
Can I do this exercise every day?
You can practice it frequently if the intensity is low and your body feels good. For harder sets with longer legs or larger range, use it 2–4 times per week as part of a balanced core routine.
Recommended Equipment
- Pilates Exercise Mat — provides comfortable support for the spine, shoulders, and hips during floor-based twisting exercises.
- Thick Yoga Mat for Pilates — useful if your lower back or tailbone needs extra cushioning during supine core work.
- Small Pilates Ball — can be placed between the knees to help keep the legs connected and improve inner-thigh control.
- Pilates Ring — helpful for adding gentle adductor engagement and improving leg alignment during Pilates training.
- Non-Slip Pilates Socks — improve grip and comfort during mat sessions, especially when transitioning between floor exercises.
Tip: For this movement, the best equipment is simple. A stable mat and controlled tempo are more valuable than heavy resistance.