Standing Side Stretch: Form, Benefits, Muscles Worked & Tips
Learn the Standing Side Stretch for obliques, lats, and side-body mobility. Step-by-step form, sets, tips, FAQs, and equipment.
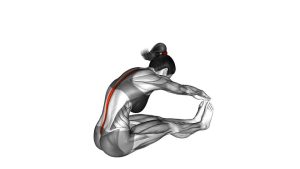
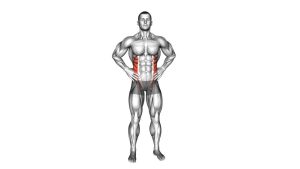
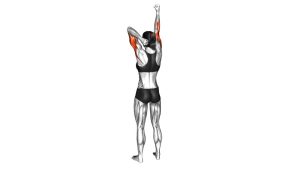
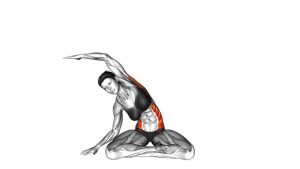
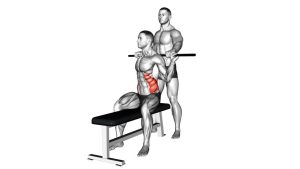
Standing Side Stretch
This stretch is useful before workouts, after long sitting periods, or during a light recovery routine. Because it combines overhead reaching with lateral flexion, it can improve awareness through the ribs, waist, and upper torso. In addition, it helps prepare the body for exercises that require side bending, rotation, overhead motion, or better trunk control.
For best results, move slowly and avoid bouncing. The stretch should feel broad and comfortable along one side of your torso. However, it should not create sharp pain in the lower back, shoulder, neck, or ribs. If you feel pinching instead of length, reduce the bend, soften the knees, and keep the chest open.
Quick Overview
| Body Part | Obliques |
|---|---|
| Primary Muscle | Obliques |
| Secondary Muscle | Latissimus dorsi, intercostals, serratus anterior, quadratus lumborum, spinal stabilizers |
| Equipment | No equipment required |
| Difficulty | Beginner |
Sets & Reps (By Goal)
- Warm-up mobility: 1–2 sets × 6–10 reps per side with a smooth 2–3 second reach.
- Flexibility focus: 2–3 sets × 20–40 second holds per side with calm breathing.
- Desk-break reset: 1–2 sets × 15–25 second holds per side at easy intensity.
- Cool-down stretch: 2 sets × 30–45 second holds per side after training.
- Daily posture routine: 1–3 rounds per side, especially after sitting or overhead work.
Progression rule: First improve breathing, posture, and control. Then increase hold time gradually. Do not chase a deeper bend if your hips shift, your chest collapses, or your lower back feels compressed.
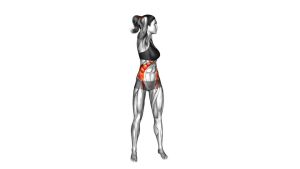
Setup / Starting Position
- Stand tall: Place your feet about hip-width apart and distribute your weight evenly through both feet.
- Soften the knees: Keep a slight bend in the knees so the lower back does not become stiff or locked.
- Stack the ribs: Keep your ribs over your pelvis before you start bending sideways.
- Relax the shoulders: Let the neck stay long and avoid shrugging as the arm rises overhead.
- Raise one arm: Reach one arm overhead with the elbow straight but not aggressively locked.
- Prepare the opposite side: Let the other arm rest by your side, on your hip, or lightly across the body for balance.
- Look forward: Keep your head neutral and your chest open before moving into the stretch.
Setup matters because the stretch should come from controlled side bending, not from twisting, leaning forward, or forcing the shoulder into an uncomfortable position.
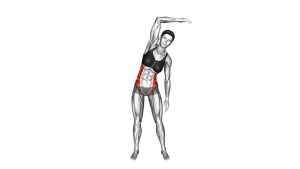
Execution (Step-by-Step)
- Inhale to get tall: Lengthen through the crown of your head and reach the raised arm upward.
- Begin the side bend: Slowly lean your torso away from the raised arm while keeping both feet grounded.
- Create a long arc: Reach through the fingertips as the ribs open on the stretched side.
- Keep the chest open: Avoid rolling the shoulders forward or turning the torso toward the floor.
- Control the hips: Let the hips stay mostly centered instead of pushing them far to the opposite side.
- Hold and breathe: Pause in the stretch while taking slow, comfortable breaths into the ribs.
- Return with control: Come back to upright slowly rather than snapping out of the position.
- Switch sides: Repeat the same controlled pattern on the opposite side.
Pro Tips & Common Mistakes
Pro Tips
- Reach up before you bend: This creates length first, which makes the side stretch cleaner and safer.
- Breathe into the open side: Slow breathing helps expand the ribs and makes the stretch more effective.
- Keep both feet grounded: A stable base prevents the movement from turning into a hip shift.
- Use a small range first: A controlled shallow stretch is better than a deep bend with poor alignment.
- Move slowly: Smooth tempo helps you feel the target area instead of rushing through the drill.
- Pair it with rotation work: After side stretching, gentle thoracic rotations can improve total trunk mobility.
Common Mistakes
- Collapsing forward: This reduces the side-body stretch and may place more stress on the lower back.
- Shrugging the shoulder: Keep the shoulder away from the ear so the neck stays relaxed.
- Bouncing at end range: Use stillness and breathing instead of quick pulses.
- Overarching the lower back: Keep the ribs controlled and avoid turning the stretch into a backbend.
- Forcing the arm overhead: If shoulder mobility is limited, bend the elbow slightly or keep the hand on the hip.
- Holding the breath: Breathing is part of the stretch, especially because the ribs and intercostals are involved.
FAQ
What muscles does the Standing Side Stretch target?
The Standing Side Stretch mainly targets the obliques and the side of the trunk. In addition, it can stretch the latissimus dorsi, intercostals, serratus anterior, and nearby spinal stabilizers depending on your arm position and range.
Is the Standing Side Stretch good for beginners?
Yes. This exercise is beginner-friendly because it requires no equipment and uses a simple movement pattern. However, beginners should start with a small range, breathe slowly, and avoid forcing the torso into a deep side bend.
Should I feel this stretch in my lower back?
You may feel a mild stretch near the side of the lower back, especially around the quadratus lumborum area. However, you should not feel sharp pressure, pinching, or compression. If that happens, stand taller, reduce the bend, and keep the ribs stacked over the pelvis.
Can I use the Standing Side Stretch before a workout?
Yes. It works well as a warm-up drill when performed dynamically with short holds and smooth reps. For example, you can do 6–10 controlled side bends per side before core training, upper-body training, or full-body mobility work.
How long should I hold the Standing Side Stretch?
For general mobility, hold each side for 20–40 seconds. For a warm-up, use shorter holds or controlled reps. Meanwhile, for a cool-down, longer relaxed holds usually work better as long as the stretch stays comfortable.
Why does my shoulder feel tight during the stretch?
Shoulder tightness can happen if you force the arm overhead or shrug toward the ear. To fix this, soften the elbow slightly, reach diagonally instead of straight overhead, and keep the shoulder blade relaxed.
Recommended Equipment (Optional)
- Yoga Mat — useful for warm-ups, stretching routines, and comfortable floor-based mobility work.
- Foam Roller — helpful for preparing the lats, upper back, and rib area before side-body mobility drills.
- Stretching Strap — useful for assisted mobility routines and controlled flexibility practice.
- Yoga Blocks — provide support during mobility sessions, especially for beginners who need balance help.
- Resistance Bands Set — useful for pairing this stretch with upper-back, posture, and shoulder activation drills.
Tip: Equipment is optional for this exercise. However, a mat, foam roller, or light band can make your full mobility routine more comfortable and complete.