Assisted Obliques Stretch: Form, Benefits, Sets, Tips & FAQ
Learn the Assisted Obliques Stretch for better side-body mobility, trunk flexibility, and core recovery with setup, form tips, mistakes, FAQs, and equipment.
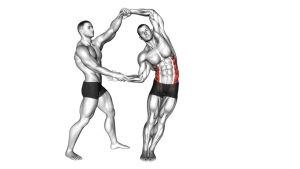
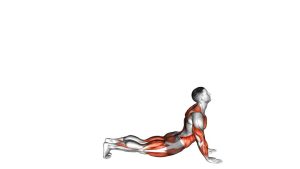
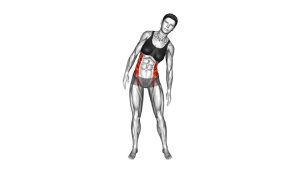
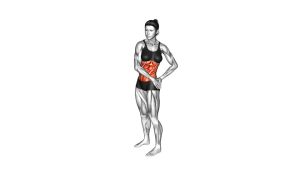
Assisted Obliques Stretch
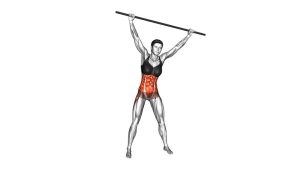
This exercise is best used when you want to improve side-body mobility, reduce stiffness around the waist, and restore better movement through the ribs and trunk. Although the movement looks simple, the details matter. The stretch should come from a clean sideways bend, not from twisting, bouncing, collapsing forward, or shifting the hips aggressively.
In the video, the movement is performed slowly. The working arm reaches overhead first, then the torso bends to the opposite side. As the stretch deepens, the body forms a gentle curve instead of a sharp fold. Therefore, the exercise works well as a warm-up mobility drill, a cooldown stretch, or a short desk-break reset for people who sit for long periods.
Quick Overview
| Body Part | Core |
|---|---|
| Primary Muscle | Obliques, especially the external obliques and internal obliques |
| Secondary Muscle | Latissimus dorsi, intercostals, quadratus lumborum, and lateral trunk fascia |
| Equipment | No equipment required. Optional support includes a wall, yoga mat, stretching strap, or light assistance from the opposite hand. |
| Difficulty | Beginner-friendly. Suitable for mobility, flexibility, warm-ups, cooldowns, and gentle recovery sessions. |
Sets & Reps (By Goal)
- General flexibility: Hold each side for 20–30 seconds, repeat 2–3 rounds per side.
- Warm-up mobility: Perform 6–8 slow reps per side, holding the end range for 2–3 seconds.
- Cooldown stretching: Hold each side for 30–45 seconds, repeat 1–2 rounds per side.
- Desk-break posture reset: Hold each side for 15–20 seconds, repeat once or twice during the day.
- Gentle recovery work: Use 2 sets of 20 seconds per side with calm nasal breathing and no aggressive pulling.
Progression rule: Add time before adding intensity. Once the stretch feels smooth and comfortable, increase the hold by 5–10 seconds. However, avoid pulling harder just to create a stronger sensation.
Setup / Starting Position
- Stand tall: Place your feet about hip-width to shoulder-width apart so your base feels stable.
- Stack your posture: Keep the ribs, pelvis, and head aligned before you begin the stretch.
- Raise one arm overhead: Extend the working-side arm upward without shrugging the shoulder toward the ear.
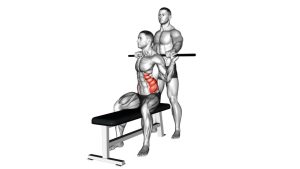
- Use light assistance: If needed, use the opposite hand to gently guide the wrist or forearm of the raised arm.
- Keep the chest open: Face forward and avoid rotating the torso before the side bend starts.
- Relax the neck: Keep your jaw soft, shoulders relaxed, and breathing steady before moving.
A good starting position should feel tall and open. Before bending, imagine lengthening through the raised fingertips. This small reach creates space through the ribs and helps the stretch travel through the side of the torso instead of compressing the lower back.
Tip: If balance is difficult, perform the stretch near a wall. You can also stagger your feet slightly for more control.
Execution (Step-by-Step)
- Start from a tall standing position: Keep both feet grounded and let your spine lengthen upward before you bend.
- Reach one arm overhead: Extend the arm on the side you want to stretch. Keep the elbow mostly straight, but do not lock it aggressively.
- Begin the side bend: Slowly bend your torso away from the raised arm. Move through the ribs and waist rather than dropping the shoulder forward.
- Add gentle assistance: Use the opposite hand only to guide the stretch. The assistance should feel light, smooth, and controlled.
- Hold the end position: Pause when you feel a clear stretch along the side of your torso. Continue breathing without bouncing.
- Keep the hips stable: Allow a small natural shift if needed, but avoid pushing the hips far to the side.
- Return slowly: Come back to center with control. Keep the arm overhead during most of the return so the movement stays smooth.
- Reset and switch sides: Lower the arm, breathe, then repeat the same sequence on the opposite side.
Pro Tips & Common Mistakes
Pro Tips
- Reach before you bend: First create length through the arm and ribs. Then move into the side bend.
- Breathe into the stretched side: Slow breathing helps the ribs expand and makes the stretch more effective.
- Keep the movement smooth: A slow tempo protects the spine and improves body awareness.
- Use assistance lightly: The assisting hand should guide the stretch, not pull the body into an extreme range.
- Stay tall through the chest: An open chest helps prevent forward collapse and keeps the obliques targeted.
- Match both sides: Spend equal time on the right and left side, especially if one side feels tighter.
Common Mistakes
- Twisting instead of side bending: Rotation changes the exercise and reduces the clean oblique stretch.
- Bouncing at the bottom: Jerky movement can irritate the ribs, spine, or shoulder.
- Overarching the lower back: Keep the ribs controlled so the stretch does not turn into lumbar compression.
- Shrugging the raised shoulder: Let the shoulder stay relaxed while the arm reaches long.
- Pulling too hard: More force does not mean better flexibility. Instead, use time, breathing, and consistency.
- Collapsing forward: Keep your torso facing mostly forward throughout the stretch.
FAQ
What muscles does the Assisted Obliques Stretch target?
The main target is the oblique muscle group on the side of the abdomen. It also stretches the side of the trunk, ribs, lat area, and sometimes the quadratus lumborum. Because the arm reaches overhead, many people also feel a gentle stretch through the shoulder and upper side body.
Should I feel this stretch in my lower back?
You may feel a mild stretch along the side of the lower trunk. However, you should not feel sharp pressure, pinching, or compression in the lower back. If that happens, reduce the bend, keep your ribs more controlled, and avoid pushing your hips too far sideways.
Is this exercise good before a core workout?
Yes, it can be useful before core training when performed dynamically and gently. Use shorter holds or slow repetitions before training. For longer static holds, it is usually better after the workout or during a dedicated mobility session.
How long should I hold the Assisted Obliques Stretch?
Most people do well with 20–30 seconds per side. If you are using it for cooldown work, you can hold for 30–45 seconds. Still, the stretch should remain comfortable and controlled.
Can beginners do this stretch?
Yes. This is a beginner-friendly stretch when performed with a small range of motion. Beginners should focus on posture, breathing, and a gentle side bend before trying to increase depth.
Is the Assisted Obliques Stretch the same as a standing side stretch?
It is very similar. The assisted version adds light guidance from the opposite hand or another support to improve positioning and stretch control. Even so, the movement should still stay smooth and gentle.
Recommended Equipment (Optional)
- Yoga Mat — useful for warm-ups, cooldowns, mobility flows, and floor-based core stretches.
- Stretching Strap — helps provide light assistance if shoulder mobility limits your overhead reach.
- Foam Roller — helpful for preparing the lats, upper back, and rib area before side-body stretching.
- Yoga Blocks — useful for supported mobility variations and controlled stretching positions.
- Resistance Bands Set — ideal for pairing this stretch with core stability, anti-rotation, and posture exercises.
Equipment is optional for this exercise. However, simple tools can make mobility sessions more comfortable, especially when you combine stretching with core activation and upper-back work.