Band Standing Hammer Curl: Form, Muscles Worked, Sets, Tips & FAQ
Learn how to do the Band Standing Hammer Curl with proper form to build stronger biceps, brachialis, and forearms. Includes setup, execution steps, sets by goal, common mistakes, FAQs, and recommended equipment.
Band Standing Hammer Curl
The Band Standing Hammer Curl is a great choice for lifters who want stronger, thicker upper arms without needing dumbbells or machines. The hammer grip shifts more work toward the brachialis and forearms, which can improve total arm development and help support stronger pulling and curling mechanics. It is easy to scale by changing the band tension, stance width, or rep tempo, making it useful for beginners, home workouts, warm-ups, and higher-rep arm finishers.
Quick Overview
| Body Part | Biceps |
|---|---|
| Primary Muscle | Brachialis |
| Secondary Muscle | Biceps brachii and brachioradialis |
| Equipment | Resistance band |
| Difficulty | Beginner to Intermediate |
Sets & Reps (By Goal)
- Muscle building: 3-4 sets × 8-15 reps with controlled tempo and 45-75 seconds rest
- Endurance / home training: 2-4 sets × 15-25 reps with steady tension and 30-60 seconds rest
- Warm-up / activation: 2-3 sets × 10-15 reps using a lighter band and perfect form
- Arm finisher: 2-3 sets × 12-20 reps with short rest and a slow eccentric phase
Progression rule: First increase reps or improve tempo control, then move to a thicker band or a wider stance on the band for more resistance.
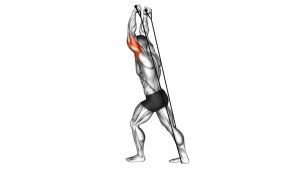
Setup / Starting Position
- Step on the band: Place both feet firmly on the middle of the resistance band about hip-width apart.
- Grab the ends: Hold the band handles or ends with a neutral grip, palms facing inward.
- Stand tall: Keep your chest up, shoulders down, and core lightly braced.
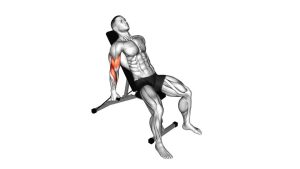
- Set the arms: Let your arms hang straight down with elbows close to your torso.
- Start under tension: There should be light tension in the band at the bottom without shrugging the shoulders.
Tip: If the band feels too loose at the bottom, narrow your grip on the band or widen your stance slightly to create more starting tension.
Execution (Step-by-Step)
- Brace and stay tall: Keep your torso upright and avoid leaning back as you begin the rep.
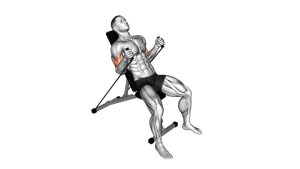
- Curl upward: Bend your elbows and pull your hands upward while maintaining the neutral hammer grip.
- Keep elbows pinned: Your elbows should stay close to your sides instead of drifting forward.
- Reach the top with control: Curl until your hands approach shoulder level or until you reach a strong contraction without losing posture.
- Pause briefly: Squeeze the upper arms for a moment at the top.
- Lower slowly: Return to the start under control, resisting the band all the way down.
- Repeat smoothly: Maintain constant tension and consistent form for every rep.
Pro Tips & Common Mistakes
- Keep a true hammer grip: Palms should face each other throughout the full rep.
- Do not swing the body: Using momentum reduces arm tension and shifts stress away from the target muscles.
- Control the lowering phase: The eccentric portion is valuable for muscle growth and technique.
- Keep wrists neutral: Avoid curling the wrists inward or backward.
- Do not let elbows drift forward too much: Excess shoulder movement turns it into a less strict curl.
- Use full, pain-free range: Extend the arms well at the bottom without losing shoulder position.
- Match the band to your goal: Lighter bands work well for higher reps and cleaner contractions.
FAQ
What muscles does the Band Standing Hammer Curl work?
This exercise primarily targets the brachialis, with strong assistance from the biceps brachii and brachioradialis. It is a great option for building thicker-looking arms and stronger forearms.
Is the Band Standing Hammer Curl good for beginners?
Yes. It is beginner-friendly because resistance bands are easy to scale. A lighter band allows you to learn proper elbow control, grip position, and tempo before increasing resistance.
Should I use a neutral grip the whole time?
Yes. The neutral grip is what makes this a hammer curl. Keeping that grip throughout the exercise helps emphasize the brachialis and forearms more than a fully supinated curl.
Why does the exercise feel harder near the top?
Resistance bands usually create more tension as they stretch. That means the curl often feels easier at the bottom and harder near the top, where the band is under the most tension.
Can I do this exercise instead of dumbbell hammer curls?
Yes. Band hammer curls are an effective alternative, especially for home workouts or travel training. They provide a different resistance curve but still train the same major muscles.
Recommended Equipment
- Resistance Bands Set — gives you multiple tension options for curls, rows, presses, and full-body training
- Resistance Band Handles — improves grip comfort and control during standing curls
- Exercise Mat — useful for warm-ups, accessory work, and protecting flooring during home workouts
- Door Anchor for Resistance Bands — expands your band exercise options beyond curls for a more complete routine
- Workout Gloves — can improve comfort and reduce hand irritation during high-rep band training
Tip: Choose a band set with several resistance levels so you can use lighter tension for strict curls and heavier tension for progression over time.