Rear Decline Bridge: Glute Exercise Form, Sets, Tips & FAQ
Learn the Rear Decline Bridge for stronger glutes, better hip extension, and controlled lower-body stability with form tips, sets, mistakes, and FAQs.
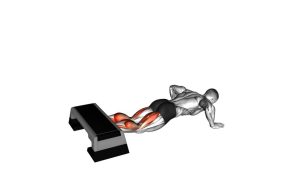
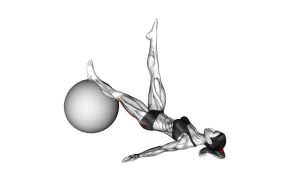
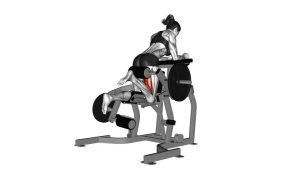
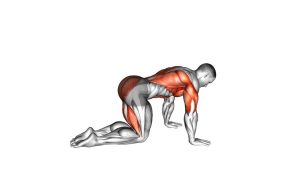
Rear Decline Bridge
This exercise is best performed with slow control rather than speed. First, set your feet firmly on the higher end of the decline surface. Then, brace your core lightly and lift the hips by squeezing the glutes. Although the range of motion may feel small, the decline position can make the top contraction feel stronger. Therefore, every rep should focus on clean hip extension, steady breathing, and stable knee position.
Quick Overview
| Body Part | Glutes |
|---|---|
| Primary Muscle | Gluteus Maximus |
| Secondary Muscle | Hamstrings, core stabilizers, lower back stabilizers, adductors |
| Equipment | Decline bench, sloped platform, or stable elevated surface |
| Difficulty | Beginner to Intermediate |
Sets & Reps (By Goal)
- Glute activation: 2–3 sets × 10–15 reps with a 1–2 second squeeze at the top.
- Muscle endurance: 3–4 sets × 15–25 reps using a smooth, controlled tempo.
- Strength control: 3–5 sets × 8–12 reps with a slower eccentric lower.
- Warm-up use: 1–2 sets × 10–12 reps before squats, hip thrusts, deadlifts, or lower-body training.
- Beginner practice: 2 sets × 8–10 reps on a mild decline until the position feels stable.
Progression rule: First, improve control and top-position glute squeeze. Next, increase reps. After that, add a mini band, a light dumbbell, or a longer pause only if your lower back stays relaxed.
Setup / Starting Position
- Choose a stable decline: Use a secure decline bench or sloped platform that does not slide during the exercise.
- Lie back on the surface: Position your upper body on the decline with your head lower than your hips.
- Plant your feet: Place both feet firmly on the higher end of the surface, about hip-width apart.
- Bend your knees: Keep the knees bent enough so you can press through the heels instead of pushing mostly through the toes.
- Set your spine: Keep the ribs down, pelvis controlled, and neck neutral against the surface.
- Prepare your arms: Rest the arms beside the body or lightly hold the surface for balance without pulling yourself upward.
- Brace gently: Tighten the core slightly before each rep so the hips move without the lower back taking over.
The setup should feel secure before you start. If your feet slide, the surface moves, or your lower back feels compressed, reduce the decline angle or switch to a flat bridge.
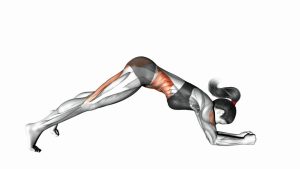
Execution (Step-by-Step)
- Start from the lowered position: Let the hips sit close to the bench while keeping the feet planted and the knees stable.
- Press through the heels: Begin the lift by driving the heels into the surface, not by pushing through the toes.
- Squeeze the glutes: Lift the hips upward by contracting the glutes and extending the hips.
- Keep the ribs controlled: As the hips rise, avoid flaring the ribs or arching the lower back.
- Reach the top position: Stop when your hips are fully extended and your body forms a strong line from shoulders to knees.
- Pause briefly: Hold the top for 1–2 seconds while breathing steadily and keeping the glutes engaged.
- Lower with control: Slowly return the hips toward the starting position without dropping or relaxing suddenly.
- Reset before the next rep: Recheck foot pressure, knee position, and core tension before repeating.
Pro Tips & Common Mistakes
Pro Tips
- Use a controlled tempo: Lift for 1–2 seconds, pause at the top, then lower for 2–3 seconds.
- Keep pressure through the heels: This helps shift more work into the glutes and reduces unnecessary calf involvement.
- Pause at the top: A short squeeze improves glute activation and prevents rushing through the rep.
- Keep the knees tracking forward: Stable knees help keep the hips aligned during the bridge.
- Start with a small decline: A lower angle is easier to control and safer for beginners.
- Use breathing to stay stable: Exhale gently as you lift, then inhale as you lower.
Common Mistakes
- Over-arching the lower back: This shifts tension away from the glutes and may irritate the lumbar spine.
- Pushing through the toes: This can reduce glute involvement and make the exercise feel less stable.
- Dropping the hips too fast: A rushed descent removes tension and increases impact on the setup.
- Letting the knees cave inward: Keep the knees aligned with the feet to maintain better hip control.
- Using an unstable surface: The decline platform must be firm, secure, and wide enough for safe movement.
- Chasing too much range: Lift only until the hips extend. More height is not better if it comes from spinal extension.
FAQ
What muscles does the Rear Decline Bridge work?
The Rear Decline Bridge mainly works the gluteus maximus. In addition, the hamstrings, core, lower-back stabilizers, and inner thighs assist with control and alignment.
Is the Rear Decline Bridge better than a regular glute bridge?
It is not always better, but it is a useful variation. The decline angle changes the body position and can make the bridge feel more challenging for glute control. However, beginners should master the flat glute bridge first.
Where should I feel this exercise?
You should feel it mostly in the glutes. You may also feel some hamstring assistance. However, if you mainly feel lower-back pressure or cramping, reduce the range and focus on a stronger glute squeeze.
Can I add weight to the Rear Decline Bridge?
Yes, you can place a light dumbbell, plate, or sandbag across the hips after you learn the movement. Still, add load only when you can lift and lower with control.
Is this exercise good for glute activation before leg day?
Yes. It works well before squats, lunges, hip thrusts, Romanian deadlifts, and other lower-body exercises. Use moderate reps and avoid going to fatigue during a warm-up.
Who should avoid the Rear Decline Bridge?
Anyone with strong lower-back pain, hip pain, balance problems on the bench, or discomfort from the decline angle should avoid this variation and choose a flat bridge instead.
Recommended Equipment
- Adjustable Decline Bench — useful for setting a stable decline angle for bridge variations and core exercises.
- Hip Thrust Pad — adds comfort if you progress the exercise with a dumbbell, plate, or barbell.
- Mini Resistance Bands — helps increase glute medius engagement and improves knee tracking during bridges.
- Non-Slip Exercise Mat — improves comfort and reduces slipping when setting up near a bench or platform.
- Adjustable Dumbbell Set — provides simple loading options once bodyweight reps become easy and controlled.
Choose equipment that keeps the exercise stable and comfortable. The best progression is not the heaviest load; it is the one that lets you keep the glutes working without losing spinal control.