Front Lever Hold: Form, Sets, Tips, Muscles Worked & FAQ
Learn the Front Lever Hold with safe form, core tension cues, sets by goal, common mistakes, FAQs, and equipment for calisthenics strength.
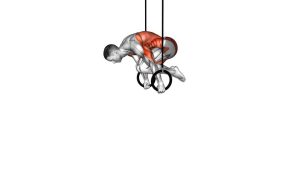
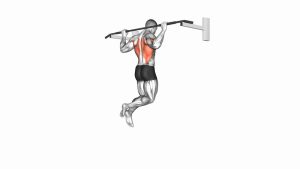
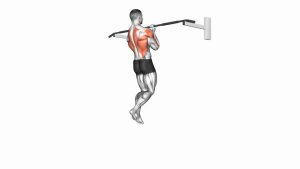
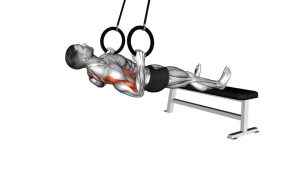
Front Lever Hold
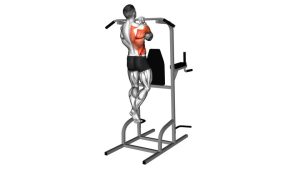
This exercise demands excellent control because the body must resist gravity without bending at the hips, knees, or elbows. Although the hold looks simple, it requires strong lats, deep core bracing, shoulder stability, and leg tension. For best results, keep the ribs pulled down, squeeze the glutes, point the toes, and hold the body as one solid unit.
Quick Overview
| Body Part | Back |
|---|---|
| Primary Muscle | Latissimus dorsi |
| Secondary Muscle | Core, shoulders, hip flexors, glutes, forearms, and scapular stabilizers |
| Equipment | Parallel bars, dip bars, pull-up bar, or gymnastics rings |
| Difficulty | Advanced |
Sets & Reps (By Goal)
- Skill practice: 4–6 sets × 5–10 second holds, with 90–150 seconds rest
- Strength development: 3–5 sets × 8–15 second holds, with 2–3 minutes rest
- Progression building: 4–6 sets × 10–20 second holds using tuck, advanced tuck, or one-leg variations
- Core control finisher: 2–3 sets × short clean holds after main pulling work
Progression rule: First increase hold quality, then hold duration. However, if your hips sag or your arms bend, return to an easier variation immediately.
Setup / Starting Position
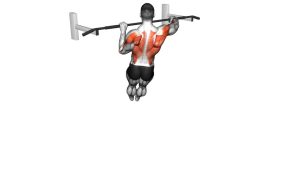
- Grip the bars firmly: Hold the parallel bars or pull-up bar with straight arms and strong hands.
- Lock the elbows: Keep the arms extended before lifting into the hold.
- Set the shoulders: Depress the shoulders and engage the lats so the upper body feels stable.
- Brace the core: Pull the ribs down and tighten the abs before the body reaches horizontal.
- Create a straight line: Keep the legs together, knees straight, glutes tight, and toes pointed.
In the video, the athlete is already in the full horizontal position. Because no entry phase is shown, the setup should be treated as preparation for a controlled static hold.
Execution (Step-by-Step)
- Begin from a secure support: Grip the bars and create tension through your arms, shoulders, back, and core.
- Lift or enter the hold carefully: Move into the front lever position only if you can control the body without swinging.
- Hold the body horizontal: Keep the torso and legs parallel to the floor, as shown in the video.
- Keep the arms straight: Do not turn the hold into a row or pull-up. Instead, maintain locked elbows and active shoulders.
- Squeeze the entire body: Brace the abs, tighten the glutes, keep the knees extended, and point the toes.
- Breathe with control: Take shallow, steady breaths while keeping the ribs from flaring upward.
- End before form breaks: Stop the set when the hips start dropping, the lower back arches, or the shoulders lose position.
Pro Tips & Common Mistakes
- Pull the bar down: Think about driving the arms down toward the hips to activate the lats more strongly.
- Keep the elbows locked: Bent elbows reduce the strictness of the hold and change the exercise mechanics.
- Avoid hip sag: If the hips drop, shorten the hold or use a tuck variation.
- Control your ribs: Rib flare usually leads to lower-back arching and weaker core tension.
- Do not swing into position: Momentum hides strength gaps and increases shoulder stress.
- Use progressions: Tuck front lever, advanced tuck, one-leg front lever, and straddle front lever are useful steps.
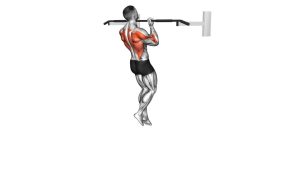
- Train pulling strength: Rows, pull-ups, scapular pulls, and lat-focused drills support better front lever control.
FAQ
What muscles does the front lever hold work?
The front lever hold mainly works the latissimus dorsi, core, shoulders, and scapular stabilizers. Additionally, the glutes, hip flexors, forearms, and legs help maintain full-body tension.
Is the front lever a back exercise or a core exercise?
It is both. The lats create the main pulling and shoulder-extension strength, while the core prevents the body from folding, sagging, or arching during the hold.
Why do my hips drop during the front lever?
Hip drop usually means the variation is too difficult, the lats are not strong enough, or the core is losing tension. Therefore, use tuck or advanced tuck holds until you can keep a straight, controlled position.
How long should I hold a front lever?
For clean strength work, short holds of 5–15 seconds are usually enough. However, every second should look controlled, straight, and stable.
Can beginners do the full front lever hold?
Most beginners should not start with the full front lever. Instead, they should build strength with rows, pull-ups, hollow body holds, scapular pulls, and tuck front lever progressions.
What is the biggest mistake in the front lever hold?
The biggest mistake is chasing the full position before the body can stay straight. As a result, the hips sag, the lower back arches, and the shoulders lose stability.
Recommended Equipment (Optional)
- Parallel Dip Bars — useful for practicing front lever holds, support strength, and bodyweight control
- Pull-Up Bar — essential for front lever progressions, pull-ups, and scapular strength drills
- Gymnastics Rings — advanced option for building straight-arm strength and calisthenics stability
- Resistance Bands — helpful for assisted front lever progressions and controlled strength practice
- Liquid Chalk — improves grip security during bar and ring-based calisthenics training
Tip: Choose stable equipment first. A strong grip and secure setup help you focus on body alignment instead of balance problems.