Lever Seated Crunch: Proper Form, Benefits, Sets, Tips & FAQ
Learn the Lever Seated Crunch for stronger abs with proper seated machine form, step-by-step cues, sets by goal, mistakes, FAQs, and equipment.
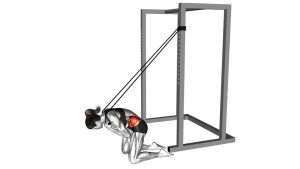
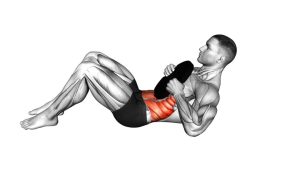
Lever Seated Crunch
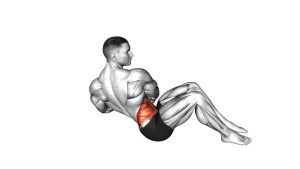
The Lever Seated Crunch works best when the motion comes from the abs rather than the hips, neck, or arms. In the uploaded exercise demonstration, the lifter sits firmly in the machine, keeps the feet stable, holds the handles or pads, and performs a smooth forward crunch. The torso flexes toward the thighs, then returns under control. This controlled path helps create direct abdominal tension while reducing the need for balance.
For the best result, keep each repetition clean and deliberate. Avoid rushing into the bottom position or letting the weight stack slam down. A strong rep should include a short squeeze at peak contraction, a steady return, and a full reset before the next repetition begins.
Quick Overview
| Body Part | Core |
|---|---|
| Primary Muscle | Rectus abdominis |
| Secondary Muscle | Obliques, deep core stabilizers, hip flexors lightly |
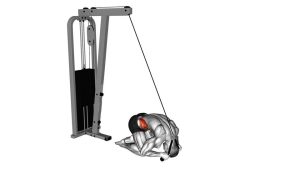
| Equipment | Lever seated crunch machine / abdominal crunch machine |
| Difficulty | Beginner to intermediate |
Sets & Reps (By Goal)
- Beginner core control: 2–3 sets × 10–12 reps with light resistance and slow tempo.
- Muscle building: 3–4 sets × 10–15 reps with moderate resistance and a strong squeeze.
- Strength-focused abs: 3–5 sets × 6–10 reps with heavier resistance and strict form.
- Core endurance: 2–4 sets × 15–20 reps with controlled breathing and no momentum.
- Finisher work: 1–3 sets × 12–20 reps near the end of a workout.
Progression rule: Increase resistance only when you can keep the ribs down, control the return, avoid pulling with the arms, and complete every repetition without bouncing.
Setup / Starting Position
- Adjust the seat: Set the machine so the pads or handles sit comfortably near your upper chest, shoulders, or front torso area.
- Plant your feet: Keep both feet flat and stable. A firm base helps you isolate the abs more effectively.
- Sit tall: Place your back against the support pad and keep your hips fully seated.
- Hold the handles lightly: Use your hands for positioning, not for yanking the machine forward.
- Brace before moving: Exhale slightly, draw the ribs down, and prepare to curl through the trunk.
- Keep the neck neutral: Look forward or slightly down without aggressively tucking the chin.
A good starting position should feel stable before the first rep begins. If the seat is too high or too low, the machine may encourage shoulder pulling instead of abdominal flexion.
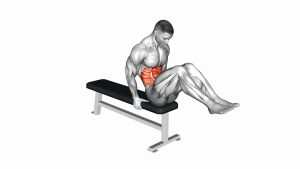
Execution (Step-by-Step)
- Start from a tall seated posture: Keep the hips anchored and the feet planted.
- Exhale as you crunch: Curl the ribs toward the pelvis while allowing the machine lever to move forward.
- Flex the spine gradually: Think about shortening the front of the torso instead of folding only at the hips.
- Squeeze at the bottom: Pause briefly when the abs are fully contracted.
- Return slowly: Let the torso rise back with control while keeping tension in the core.
- Reset before repeating: Avoid bouncing into the next rep. Begin each repetition with control.
Pro Tips & Common Mistakes
- Lead with the ribs: Bring the rib cage toward the pelvis to create true abdominal flexion.
- Do not yank the handles: Pulling hard with the arms shifts tension away from the abs.
- Control the negative: The return phase builds strength when you resist the machine instead of letting it pull you back.
- Avoid excessive weight: Heavy loads can turn the movement into a shoulder-and-hip pull.
- Keep the hips seated: Lifting the hips reduces ab isolation and may stress the lower back.
- Use a full but safe range: Crunch deeply enough to contract the abs, but do not force the spine into painful flexion.
- Breathe with the rep: Exhale during the crunch and inhale as you return to the start.
- Pause at peak tension: A short squeeze improves control and prevents rushed repetitions.
FAQ
What muscles does the Lever Seated Crunch work?
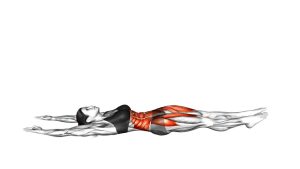
The main target is the rectus abdominis, which runs down the front of the abdomen. The obliques and deep core muscles assist by helping stabilize the trunk during the crunch.
Is the Lever Seated Crunch good for beginners?
Yes. The machine guides the movement, which makes it easier to learn than many free-body core exercises. Beginners should start with light resistance and focus on slow, clean repetitions.
Should I go heavy on the seated crunch machine?
You can use progressive resistance, but form must stay strict. If heavy weight causes arm pulling, hip lifting, or lower-back discomfort, the load is too high.
Why do I feel this exercise in my hip flexors?
Hip flexor tension usually happens when you fold mainly at the hips instead of curling through the spine. Reduce the weight, keep the hips seated, and focus on bringing the ribs toward the pelvis.
How often should I do the Lever Seated Crunch?
Most lifters can train it 2–4 times per week, depending on total core volume and recovery. Leave at least one rest day between hard weighted ab sessions if soreness is high.
Is this better than floor crunches?
It depends on your goal. Floor crunches are simple and require no equipment. The lever seated crunch is easier to load progressively, which makes it useful for building stronger abs in the gym.
Recommended Equipment
- Abdominal Crunch Machine — useful for home gyms if you want a guided seated crunch movement.
- Weight Lifting Gloves — help improve grip comfort on machine handles during higher-volume sets.
- Gym Towel — keeps the seat and back pad clean during machine-based core training.
- Weightlifting Belt — optional for heavy gym sessions, though not required for most ab machine work.
- Exercise Mat — useful for pairing machine crunches with floor-based core exercises.
Tip: Choose equipment that supports control and comfort. The machine provides the resistance, but clean technique creates the result.