Front Plank with Arm and Leg Lift: Form, Core Benefits, Sets, Tips & FAQ
Learn the Front Plank with Arm and Leg Lift to build core stability, shoulder control, glute strength, and anti-rotation balance.
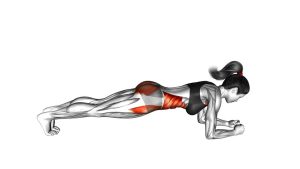
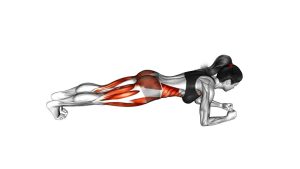
Front Plank with Arm and Leg Lift
This exercise works best when every repetition looks controlled and quiet. Because the arm and opposite leg leave the floor together, the body must create stability through the abs, obliques, shoulders, hips, and glutes. Therefore, the movement is especially useful for improving anti-rotation control, high-plank strength, and full-body coordination. Keep the lift small enough to maintain a straight body line from head to heels.
Quick Overview
| Body Part | Core |
|---|---|
| Primary Muscle | Rectus abdominis, transverse abdominis, and obliques |
| Secondary Muscle | Shoulders, glutes, hip stabilizers, lower back stabilizers, chest, and triceps |
| Equipment | No equipment required; optional exercise mat for comfort |
| Difficulty | Intermediate because the exercise requires balance, shoulder stability, and anti-rotation control |
Sets & Reps (By Goal)
- Core stability: 3 sets × 6–10 reps per side with slow, controlled movement
- Balance and coordination: 2–4 sets × 5–8 reps per side with a 1–2 second pause at the top
- Strength endurance: 3–4 sets × 8–12 alternating reps per side with steady breathing
- Warm-up activation: 2 sets × 4–6 reps per side before push-ups, planks, or upper-body training
- Beginner progression: 2–3 sets × 4–6 reps per side, lifting only one limb at a time if needed
Progression rule: First improve control, then increase reps. After that, add a longer pause. However, do not progress if the hips twist, the lower back drops, or the supporting shoulder loses position.
Setup / Starting Position
- Start in a high plank: Place your hands on the floor under your shoulders, similar to the top of a push-up.
- Extend both legs: Keep the legs straight and place the feet about hip-width apart for balance.
- Create a long body line: Keep your head, shoulders, hips, knees, and heels aligned.
- Brace the core: Gently tighten your abs as if preparing to resist movement through the torso.
- Set the shoulders: Press the floor away and keep the shoulder blades controlled without shrugging.
- Keep the gaze down: Look slightly ahead of your hands or toward the floor to keep the neck neutral.
Tip: A slightly wider foot position can make the exercise easier. Meanwhile, a narrower stance increases the balance challenge.
Execution (Step-by-Step)
- Hold the high plank: Begin with both hands and both feet on the floor. Keep the body straight and stable.
- Shift weight smoothly: Transfer a small amount of weight into the supporting hand and supporting foot.
- Lift opposite limbs: Raise one arm forward while lifting the opposite leg backward at the same time.
- Control the top position: Pause briefly while keeping the hips as level as possible.
- Keep the lift modest: The arm and leg should rise only as high as you can control without arching the back.
- Return with control: Lower the hand and foot back to the floor without dropping or rushing.
- Reset the plank: Rebuild tension through the abs, glutes, and shoulders before switching sides.
- Alternate sides: Repeat with the opposite arm and opposite leg while keeping the same steady tempo.
Pro Tips & Common Mistakes
- Keep the hips level: Avoid twisting the pelvis toward the lifted side.
- Do not over-lift the leg: Lifting too high often causes lower-back arching.
- Reach long, not high: Extend the arm forward while keeping the shoulder stable.
- Brace before each rep: Set your core first, then move the arm and leg.
- Avoid rushing: Fast reps reduce the anti-rotation benefit and increase compensation.
- Press the floor away: Keep the supporting shoulder strong instead of collapsing into it.
- Keep breathing: Exhale gently during the lift and avoid holding your breath too hard.
- Use a wider base if needed: Wider feet help you control the torso while learning the movement.
- Stop before form breaks: Once your plank line is gone, the set is no longer productive.
FAQ
What muscles does the Front Plank with Arm and Leg Lift work?
It mainly trains the core, especially the abs, obliques, and deep stabilizers. Additionally, it works the shoulders, glutes, hips, chest, triceps, and lower-back stabilizers because the body must stay balanced during each lift.
Is this exercise good for abs?
Yes. It is useful for abs because the torso must resist rotation and extension. However, it is not just a crunch-style ab exercise. Instead, it teaches the core to stabilize the spine while the arms and legs move.
Why do my hips twist during this plank variation?
Hip twisting usually happens when the stance is too narrow, the lift is too high, or the core is not braced before moving. To fix it, widen your feet, lift lower, slow down, and pause briefly before switching sides.
Is the Front Plank with Arm and Leg Lift beginner-friendly?
It can be challenging for beginners because one hand and the opposite foot leave the floor. Therefore, beginners should start by lifting only one arm or one leg at a time before combining both limbs.
How high should I lift my arm and leg?
Lift only as high as you can while keeping your spine neutral and your hips controlled. In most cases, a low, clean lift is more effective than a high lift that causes twisting or lower-back arching.
Can I do this exercise every day?
You can practice it often if the volume is low and your form stays clean. Nevertheless, for harder sets, 2–4 times per week is usually enough because the shoulders, wrists, and core need recovery.
Recommended Equipment
- Exercise Mat — adds comfort for hands, feet, and floor-based core training
- Push-Up Bars — can reduce wrist strain and improve hand position during high plank work
- Wrist Support Wraps — useful if your wrists need extra support during push-up-position exercises
- Exercise Sliders — helpful for progressing plank stability and controlled core movements
- Resistance Bands Set — useful for adding glute, shoulder, and anti-rotation training variations
Tip: Equipment is optional for this exercise. However, a good mat and wrist-friendly setup can help you focus on clean plank alignment and controlled opposite-limb movement.