Kneeling Push-Up: Proper Form, Sets & Reps, Tips, FAQ (Chest Focus)
Learn the kneeling push-up (modified push-up) for chest-focused strength with beginner-friendly form cues. Includes sets & reps by goal, setup, step-by-step execution, mistakes to avoid, FAQs, and recommended equipment.
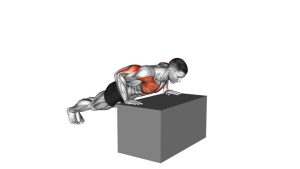
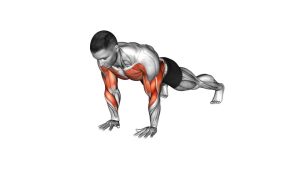
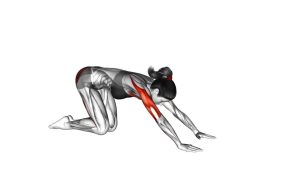
Kneeling Push-Up (Modified Push-Up)
Think of this as a “quality reps” push-up. Your goal is a straight line from knees to head, a controlled descent, and a strong press back up—without hips sagging, shoulders collapsing, or elbows flaring aggressively. Done well, kneeling push-ups can build serious strength and chest stimulation.
Quick Overview
| Body Part | Chest |
|---|---|
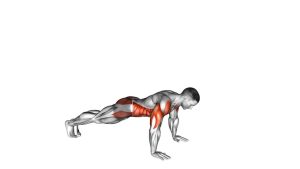
| Primary Muscle | Pectoralis major (chest) |
| Secondary Muscle | Triceps, anterior deltoids, serratus anterior, core stabilizers |
| Equipment | None (optional: yoga mat, push-up handles, resistance band) |
| Difficulty | Beginner (scalable by elevation, tempo, and range of motion) |
Sets & Reps (By Goal)
- Technique / learning: 2–4 sets × 6–10 reps (slow, perfect reps, 60–90 sec rest)
- Muscle gain (hypertrophy): 3–5 sets × 8–15 reps (1–2 reps in reserve, 60–120 sec rest)
- Endurance / conditioning: 2–4 sets × 12–25 reps (steady pace, 45–75 sec rest)
- Progress to full push-up: 3–5 sets × 6–12 reps + 1–2 slow negatives of full push-ups
Progression rule: First add reps with clean form. Then slow the tempo (e.g., 3 seconds down), increase range (chest closer to floor), or progress to incline → knee → full push-up.
Setup / Starting Position
- Hands placement: Place hands slightly wider than shoulders. Fingers spread for stability.
- Knees down: Kneel on a mat if needed. Lower legs relaxed behind you (or feet crossed if comfortable).
- Body line: Make a straight line from knees → hips → shoulders → head. Avoid piking or sagging.
- Brace lightly: Squeeze glutes gently and tighten abs as if preparing for a light punch.
- Neck neutral: Look at the floor slightly ahead of your hands—don’t crane your neck.
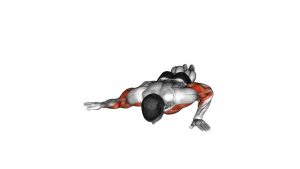
Execution (Step-by-Step)
- Inhale and lower: Bend elbows and lower your chest toward the floor under control (2–3 seconds).
- Elbow path: Keep elbows at roughly 30–60° from your body (diagonal back), not straight out to the sides.
- Stay rigid: Keep hips and shoulders moving together—no “worming” or collapsing through the midsection.
- Bottom position: Pause briefly when your chest is just above the floor (or your comfortable depth).
- Press up: Exhale and push the floor away, returning to the top with arms straight and shoulders stable.
Optional intensity: add a 1–2 second pause at the bottom or a 3–5 second negative to increase chest stimulus without adding load.
Pro Tips & Common Mistakes
Pro Tips
- “Screw hands into the floor” (light external rotation torque) for shoulder stability.
- Chest-first cue: Think “lower the chest between the hands,” not “face to floor.”
- Control wins: A slower negative usually improves form and increases chest tension.
- Range matters: Use the deepest pain-free range you can control.
- Progress smart: Gradually shift from knees to full push-up by using an incline (bench/couch) first.
Common Mistakes
- Hips sagging: Usually means the core is losing tension—brace and shorten the set.
- Piking up: Reduces chest loading—keep a straight knees-to-head line.
- Elbows flaring hard: Can stress shoulders—bring elbows slightly closer and keep wrists stacked.
- Half reps with no control: Use slower reps and consistent depth for better progress.
- Shoulders collapsing forward: Keep shoulder blades stable and avoid “dumping” into the bottom.
FAQ
What should I feel during kneeling push-ups?
You should feel your chest doing most of the work, with assistance from triceps and front shoulders. Mild core engagement is normal. If you mainly feel wrists or shoulder pinching, adjust hand placement, use handles, or elevate hands.
Are kneeling push-ups effective for building chest?
Yes—especially for beginners and high-quality volume. Use controlled tempo, solid range of motion, and sets close to technical fatigue. As you get stronger, progress to incline or full push-ups for higher loading.
How do I progress from knees to full push-ups?
A reliable path is wall → incline → knees → full. You can also add slow negatives of full push-ups, or gradually move knees farther back to increase the lever length.
What if my wrists hurt?
Try push-up handles, dumbbell grips, or a folded towel under the heel of the palm. Keep wrists stacked under the shoulders and avoid letting hands slide too far forward.
What’s the best hand width for chest focus?
Slightly wider than shoulder-width is a great starting point. Too wide can irritate shoulders, and too narrow shifts more load to triceps. Choose the widest position you can control without shoulder discomfort.
Recommended Equipment (Optional)
- Push-Up Handles — reduce wrist extension and can improve comfort and pressing depth
- Thick Exercise / Yoga Mat — cushions knees and hands for longer sets
- Resistance Bands Set — useful for warm-ups, chest activation, and progressive overload variations
- Ab Wheel — pairs well for core strength to improve push-up body line control
- Foam Roller — helps with upper-back mobility and chest tightness management
Tip: If your goal is your first full push-up, the most “valuable equipment” is often a stable incline surface (bench/couch/table). Elevation lets you practice full-body push-up mechanics at a manageable load.