Decline Push-Up with Chair: Form, Sets, Tips & FAQ
Master the Decline Push-Up with Chair to build upper-chest strength using bodyweight. Learn setup, step-by-step form cues, sets by goal, mistakes to avoid, FAQs, and recommended gear.
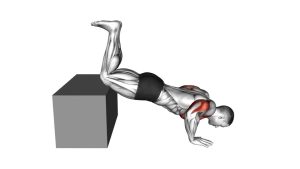
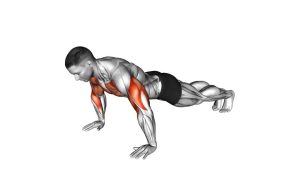
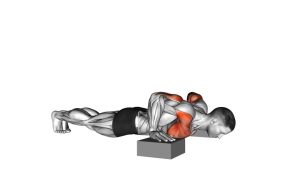
Decline Push-Up with Chair
This move rewards clean alignment and smooth tempo. You should feel the chest and triceps doing the work, with the core bracing to keep your body rigid. Choose an elevation that lets you hit full reps without losing control—higher feet increases difficulty and shoulder demand.
Quick Overview
| Body Part | Chest |
|---|---|
| Primary Muscle | Pectoralis major (upper/clavicular emphasis) |
| Secondary Muscle | Triceps, anterior deltoids, serratus anterior; core as a stabilizer |
| Equipment | Chair (or bench/box/step). Optional: push-up handles or mat |
| Difficulty | Intermediate (advanced with higher elevation or slower tempo) |
Sets & Reps (By Goal)
- Strength: 4–6 sets × 4–8 reps (2–3 min rest, slow controlled reps)
- Hypertrophy (muscle growth): 3–5 sets × 8–15 reps (60–90 sec rest)
- Endurance / conditioning: 2–4 sets × 15–25 reps (45–75 sec rest)
- Push-up progression: 3–4 sets × 6–12 reps (stop 1–2 reps before form breaks)
Progression rule: Add reps first, then add tempo (3–4 sec lowering), then increase foot elevation. Keep your body rigid and your shoulder blades controlled before progressing.
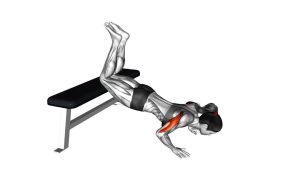
Setup / Starting Position
- Choose a stable chair: Place it on a non-slip surface (against a wall if needed).
- Feet elevated: Put the tops of your shoes or toes on the chair seat; start with a modest height.
- Hand position: Hands slightly wider than shoulder-width; fingers spread; wrists stacked under shoulders.
- Brace: Squeeze glutes, tighten abs, and keep a straight line from head to heels.
- Set shoulders: Think “shoulders away from ears” and keep the neck neutral (eyes slightly ahead).
Tip: If wrists get cranky, use push-up handles, dumbbells, or do the movement on fists to keep wrists more neutral.
Execution (Step-by-Step)
- Start tall: Arms locked out, core tight, glutes squeezed, feet stable on the chair.
- Lower under control: Bend elbows and bring your chest toward the floor. Keep elbows at about 30–60° from the torso.
- Stay rigid: Body moves as one unit—no hip sag, no piking, no head dropping.
- Hit your depth: Stop when your chest is close to the floor and shoulders still feel stable (no pinching).
- Press up: Push the floor away, extend elbows, and return to the top without bouncing.
Pro Tips & Common Mistakes
- Use a controlled tempo: 2–4 seconds down, brief pause, then strong press.
- Keep ribs down: Don’t over-arch the low back—brace like a plank.
- Elbows not too wide: Extreme flaring can stress shoulders; aim 30–60°.
- Don’t crane the neck: Keep chin slightly tucked and eyes a little forward.
- Stable feet: If the chair slides, place it against a wall or use a bench/box with better grip.
- Progress smart: Add reps/tempo before raising feet higher.
FAQ
What muscles do decline push-ups target most?
They primarily hit the chest (often with more upper-chest and front-shoulder demand than standard push-ups), plus triceps and serratus anterior. Your core works hard to keep you rigid.
How high should the chair be?
Start with a low-to-moderate height that lets you keep perfect form. Higher elevation increases difficulty and shoulder loading. If your hips sag or shoulders pinch, lower the height.
Why do my shoulders feel strained?
Common reasons are elbows flaring too wide, shrugging, going too deep without control, or using a height that’s too challenging. Reduce elevation, keep elbows 30–60°, and slow the descent.
How can I make it harder without raising the feet?
Use a 3–5 second negative, add a pause at the bottom, perform close-grip (if wrists/shoulders tolerate), or add external load with a weighted vest or plate backpack.
Recommended Equipment
- Push-Up Handles — reduces wrist extension and can improve pressing comfort
- Non-Slip Exercise Mat — improves grip for hands/feet and protects wrists
- Weighted Vest — simple way to progressively overload decline push-ups
- Resistance Bands Set — use for warm-ups (band pull-aparts) or to assist/progress push-ups
- Plyo Box (Stable Platform) — safer, sturdier elevation option than a lightweight chair
Tip: Your platform should be stable and non-slip. If a chair wobbles, switch to a bench/box or brace the chair against a wall.