Decline Shoulder Tap (Chest Focus): Form, Sets, Tips & FAQ (Feet-Elevated Shoulder Taps)
Master the Decline Shoulder Tap to build upper-chest stability, shoulder control, and anti-rotation core strength. Step-by-step form, sets by goal, common mistakes, FAQs, and recommended equipment.
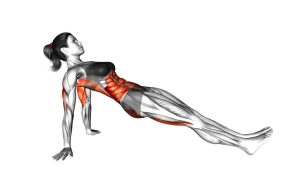
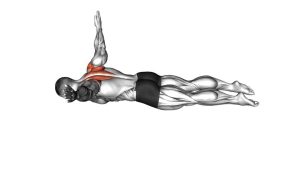
Decline Shoulder Tap (Chest Focus)
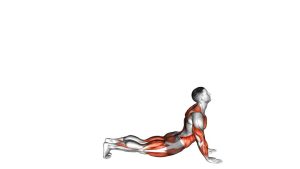
Think of this as a stability-first chest finisher—not a fast cardio move. You’ll build better pressing mechanics by learning to keep the torso quiet while the arms move. Done correctly, you’ll feel your upper chest and shoulders working isometrically, while the obliques fight rotation on every rep.
Quick Overview
| Body Part | Chest |
|---|---|
| Primary Muscle | Pectoralis major (upper/clavicular fibers) — isometric support |
| Secondary Muscle | Anterior deltoids, serratus anterior, triceps, obliques (anti-rotation), glutes |
| Equipment | Stable bench/box/step (for feet elevation) + floor space (optional mat) |
| Difficulty | Intermediate (higher elevation = harder) |
Sets & Reps (By Goal)
- Core stability (anti-rotation): 3–4 sets × 6–10 taps/side (slow, controlled; 45–75 sec rest)
- Upper-body stability finisher (chest day): 2–3 sets × 10–20 total taps (30–60 sec rest)
- Conditioning: 3–5 rounds × 20–40 sec (steady pace; 40–60 sec rest)
- Skill / warm-up: 2–3 sets × 4–6 taps/side (very strict form; 30–60 sec rest)
Progression rule: First reduce hip sway, then add reps/time. Only increase the bench height once your torso stays quiet and your hands land softly.
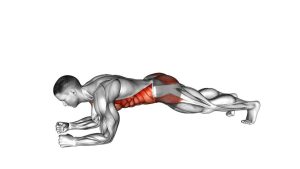
Setup / Starting Position
- Choose your elevation: Start low (step/low bench). Higher = harder.
- Hands under shoulders: Place palms flat, fingers spread. Press the floor away to “wrap” the shoulder blades forward slightly.
- Feet secure: Place toes/shoelaces on the bench/box so your feet won’t slip.
- Full-body brace: Squeeze glutes, tighten abs, and keep ribs stacked (avoid flaring).
- Set a wide base: Feet slightly wider than hip-width to reduce excessive rotation while learning.
Tip: If wrists are sensitive, perform on push-up handles or parallettes to keep wrists more neutral.
Execution (Step-by-Step)
- Lock in the plank: Long spine, glutes tight, chin slightly tucked, eyes on the floor a few inches ahead.
- Shift weight smoothly: Transfer pressure into your supporting hand without letting the hips twist.
- Tap the shoulder: Lift the opposite hand and tap the top of the shoulder (quick touch, not a reach).
- Return with control: Place the hand back where it started—quietly, without slamming.
- Alternate sides: Keep the same tempo and maintain a steady breathing rhythm.
Pro Tips & Common Mistakes
- Go slower than you think: Speed hides rotation. Control builds stability.
- Widen your feet to scale: Wider stance = easier control. Narrow stance = harder.
- Keep shoulders stacked: Avoid collapsing into the supporting shoulder.
- Don’t let the ribs flare: Rib flare often causes low-back sag. Keep ribs “down.”
- Tap, don’t reach: Overreaching increases rotation and shoulder strain.
- Avoid rocking: Rocking forward/back shifts load into wrists and breaks tension.
- Quality > quantity: Stop the set when your hips start to swing.
FAQ
Is this exercise really “chest” or more core?
It’s primarily a core anti-rotation drill, but your upper chest and shoulders work hard isometrically to stabilize the decline plank. Think “core-first stability with chest involvement.”
How do I make it easier?
Lower the foot elevation, widen your stance, slow the tempo, and reduce the reach distance. You can also do standard (non-decline) shoulder taps first.
How do I make it harder?
Increase bench height, narrow your stance, pause 1–2 seconds at the tap, or perform taps at a slower cadence (e.g., 2–0–2 tempo).
Why do my hips rotate a lot?
Rotation usually comes from moving too fast, a stance that’s too narrow, or not bracing glutes/abs. Widen your feet and “zip up” your core before each tap.
Can I do this if my wrists hurt?
Try push-up handles/parallettes, a slight external hand angle, or perform on fists if comfortable. If pain persists, choose a forearm plank variation and build up gradually.
Recommended Equipment (Optional)
- Adjustable Weight Bench — stable surface to elevate feet and scale difficulty
- Plyometric Box — sturdy height options for feet elevation (great for home training)
- Thick Exercise / Yoga Mat — improves hand comfort and reduces floor pressure
- Push-Up Handles / Parallettes — more neutral wrist position and stronger hand grip
- Loop Resistance Bands — useful for pairing with posture/upper-back work (pull-aparts, rows) for balanced shoulders
Tip: Choose equipment that feels stable and non-slip. If the feet platform moves, the exercise becomes risky and less effective.