Roll Chest Lying on Floor: Form, Sets, Tips & FAQ
Learn the Roll Chest Lying on Floor (Supine Chest Roll) to open the chest, improve shoulder control, and warm up pressing muscles. Includes step-by-step form, sets by goal, common mistakes, FAQs, and recommended equipment.
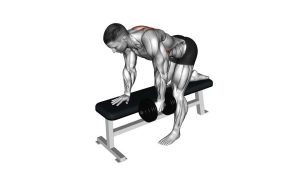
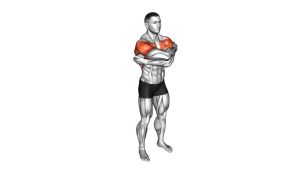
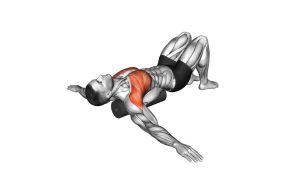
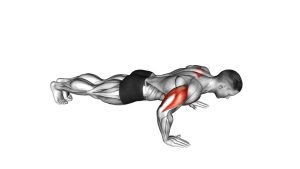
Roll Chest Lying on Floor
This drill is ideal before push-ups, bench variations, cable fly work, or anytime your chest feels tight from sitting and screen posture. You should feel a mild stretch across the chest/front shoulders and a gentle “wake-up” through the serratus and upper-back stabilizers—never sharp pinching in the shoulder. Keep your ribs controlled and breathe smoothly.
Quick Overview
| Body Part | Chest |
|---|---|
| Primary Muscle | Pectoralis major (stretch + activation) |
| Secondary Muscle | Anterior deltoid, serratus anterior, upper-back stabilizers; obliques (light rotation control) |
| Equipment | None (optional: yoga mat / foam pad / small towel for comfort) |
| Difficulty | Beginner (excellent warm-up and posture-focused mobility drill) |
Sets & Reps (By Goal)
- Warm-up before chest training: 2–3 sets × 6–10 reps/side (slow, smooth tempo; 30–45 sec rest)
- Chest mobility / posture work: 2–4 sets × 8–12 reps/side (easy effort; 30–60 sec rest)
- Recovery / cooldown: 1–2 sets × 6–10 reps/side (long exhales; minimal range if needed)
- Desk break “reset”: 1–2 sets × 5–8 reps/side (very light; focus on breathing and rib control)
Progression rule: Don’t chase range first. Progress by improving control (slower tempo, smoother roll, calmer ribs), then gradually increase your comfortable range of motion.
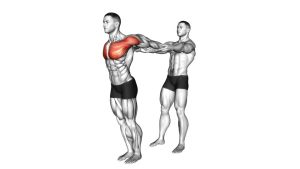
Setup / Starting Position
- Lie supine: On your back with your spine neutral. Use a mat if the floor feels too hard.
- Legs comfortable: Keep legs long or bend knees if your lower back wants to arch.
- Arms wide: Extend arms out at shoulder level (a wide “T”). Palms can face up or slightly forward.
- Shoulders down: Keep shoulders relaxed away from ears; avoid shrugging.
- Ribs controlled: Exhale gently and keep the ribcage from flaring up.
Tip: If shoulders feel tight, start with arms slightly lower than shoulder height and keep the elbows softly bent.
Execution (Step-by-Step)
- Start open: Arms wide, chest relaxed, breathing steady.
- Begin the roll: Sweep one arm slowly across your body as if giving yourself a gentle “hug.”
- Let the upper torso follow: Allow a small roll through the upper back and ribs (thoracic rotation), keeping hips mostly grounded.
- Keep the shoulder smooth: No pinching—keep the shoulder blade gliding (don’t jam it forward).
- Return to open: Reverse the path slowly until arms are wide again and the chest opens.
- Repeat other side: Alternate sides with the same controlled tempo.
Pro Tips & Common Mistakes
Pro Tips
- Breathe to unlock range: Use a long exhale during the “hug/roll” portion to keep ribs down.
- Soft elbows = happier shoulders: A slight bend reduces strain and improves control.
- Keep rotation in the upper torso: Aim for thoracic movement, not twisting hard through the lower back.
- Control the scapula: Think “shoulder blade glides” rather than forcing the arm across.
- Use it before pressing: Great paired with light band pull-aparts or scap push-ups.
Common Mistakes
- Forcing range: Rolling too far and losing control often leads to shoulder pinching.
- Rib flare: Arching the back to “fake” mobility reduces the benefit and stresses the spine.
- Shrugging: Tension in traps/neck usually means you’re moving too fast or too big.
- Hips spinning: Excessive hip rotation turns this into a full-body roll instead of chest/upper-torso control.
FAQ
Where should I feel this exercise?
Mostly across the chest and front shoulder as a gentle stretch, plus light activation around the shoulder blade (serratus/upper back). You should not feel sharp joint pain or pinching.
Is this a strength exercise for chest growth?
Not primarily. This is a mobility and activation drill. It can improve how your chest and shoulders move before pressing/fly work, which may help your training quality, but it’s not a main hypertrophy movement.
How big should the roll be?
Small to moderate. Start with a comfortable range where your ribs stay controlled and your shoulder feels smooth. Bigger is not better—clean reps are the goal.
What if I feel shoulder pinching?
Reduce the cross-body range, keep a slight elbow bend, slow the tempo, and ensure your ribs aren’t flaring. If it still pinches, swap to a simpler chest opener or consult a professional.
How often can I do it?
Most people can do it 3–6 days/week at low intensity, especially as a warm-up or posture reset. Keep it easy and stop if soreness or symptoms linger.
Recommended Equipment (Optional)
- Thick Yoga Mat — extra cushioning for shoulders/spine on hard floors
- Foam Exercise Mat — larger padded surface for floor mobility sessions
- Mini Foam Roller — optional thoracic mobility support (use gently and avoid neck)
- Massage Ball (Lacrosse-Style) — spot-release for pec/upper-back tightness (avoid nerves and sensitive areas)
- Resistance Bands Set — great pairing for posture work (pull-aparts, rows) after the drill
Tip: Keep tools optional. The best results come from consistent, comfortable reps—not aggressive stretching.