Plank Arm Lift: Proper Form, Benefits, Sets, Tips & FAQ
Learn how to do the Plank Arm Lift with proper form to build core stability, shoulder control, and anti-rotation strength. Includes setup, step-by-step execution, sets and reps by goal, mistakes, FAQ, and recommended equipment.
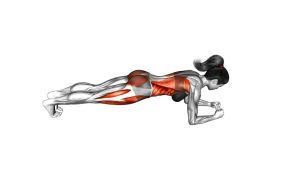
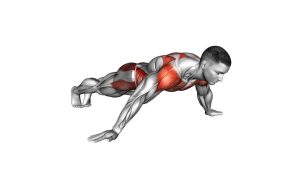
Plank Arm Lift
This exercise looks simple, but it is much more challenging than a standard high plank because every rep tests your ability to stabilize against rotation. It is especially useful for improving trunk stiffness, shoulder positioning, and body awareness during bodyweight training. You should feel the core, serratus anterior, shoulders, glutes, and stabilizing muscles of the upper back working together to keep the torso steady.
Quick Overview
| Body Part | Back |
|---|---|
| Primary Muscle | Core (Transverse abdominis, obliques, rectus abdominis) |
| Secondary Muscle | Serratus anterior, anterior deltoids, triceps, glutes, upper back stabilizers |
| Equipment | None required; exercise mat optional |
| Difficulty | Intermediate |
Sets & Reps (By Goal)
- Core stability: 2–4 sets × 6–10 arm lifts per side
- Movement control / posture: 2–3 sets × 5–8 slow reps per side with brief pauses
- Warm-up activation: 1–2 sets × 4–6 reps per side
- Endurance: 2–3 sets × 20–40 seconds of alternating controlled arm lifts
Progression rule: Increase control before volume. First reduce trunk rotation, then add reps, longer pauses, or slower tempo. Do not progress by rushing the movement.
Setup / Starting Position
- Start in a high plank: Place your hands directly under your shoulders with elbows extended.
- Set your body line: Keep your head, upper back, hips, and heels aligned in a straight line.
- Brace the trunk: Tighten the core and glutes so the ribcage stays down and the lower back stays neutral.
- Widen the feet slightly: A slightly wider stance improves balance and helps reduce hip sway.
- Fix your gaze: Look slightly down toward the floor to keep the neck neutral.
Tip: If standard plank posture is already difficult, master the basic high plank first before adding the arm lift.
Execution (Step-by-Step)
- Lock in the plank: Push the floor away so the shoulders stay active and stable.
- Shift weight slightly: Transfer enough pressure into one hand to free the opposite hand without collapsing the torso.
- Lift one arm forward: Raise the free arm straight in front of you to about shoulder height.
- Resist rotation: Keep the hips square to the floor and avoid rocking side to side.
- Pause briefly: Hold the top position for 1–2 seconds while maintaining full-body tension.
- Lower with control: Return the hand to the floor smoothly.
- Repeat on the other side: Alternate arms while keeping each rep controlled and symmetrical.
Pro Tips & Common Mistakes
- Push through the support hand: Actively press the floor away to keep the shoulder packed and stable.
- Keep the hips level: Avoid opening the pelvis toward the lifted arm.
- Move slowly: Fast reps turn the exercise into balance chaos instead of stability training.
- Do not overreach: Lift the arm only to shoulder height; reaching too high usually causes trunk rotation.
- Squeeze the glutes: This helps lock the pelvis in place and reduces lower-back compensation.
- Breathe normally: Do not hold your breath during the lift or pause.
Common Mistakes
- Letting the lower back sag
- Shifting the body too far side to side
- Shrugging the support shoulder toward the ear
- Using momentum instead of controlled lifting
- Taking the feet too narrow too early
FAQ
What muscles does the Plank Arm Lift work most?
The main demand is on the core, especially the transverse abdominis and obliques, because they must resist rotation. The exercise also challenges the serratus anterior, shoulders, triceps, glutes, and upper-back stabilizers.
Is the Plank Arm Lift harder than a regular plank?
Yes. Removing one hand from the floor reduces your base of support, which makes the exercise much more demanding on balance, anti-rotation strength, and shoulder stability.
How do I make this exercise easier?
Widen your feet, shorten the hold, slow the reps down, or perform the arm lift from an elevated surface such as a bench or sturdy box. You can also practice shoulder taps or regular high planks first.
How do I make the Plank Arm Lift harder?
Slow the tempo, pause longer at the top, narrow the foot stance slightly, or increase total reps while keeping perfect alignment. Only progress if the trunk stays stable.
Is this a good exercise for beginners?
It can be introduced after a person can hold a solid high plank. True beginners often do better starting with a standard plank, incline plank, or shoulder-tap variation before using full arm lifts.
Recommended Equipment (Optional)
- Exercise Mat — adds comfort for wrists, hands, and floor-based core work
- Push-Up Bars / Handles — useful for reducing wrist extension and improving upper-body bodyweight training comfort
- Resistance Band Set — great for pairing with shoulder activation, serratus work, and upper-back stability drills
- Ab Roller / Ab Wheel — a strong progression tool for advanced anti-extension and core-strength work
- Interlocking Gym Floor Mats — useful for building a safer, more comfortable training space for planks and bodyweight exercises
Tip: For this exercise, a good mat and stable floor surface matter more than buying complicated equipment. Focus on control, alignment, and clean reps first.