Lever Seated Shoulder Press: Proper Form, Sets, Muscles Worked & FAQ
Learn how to do the Lever Seated Shoulder Press with proper form. Discover muscles worked, setup, step-by-step execution, sets and reps by goal, common mistakes, FAQs, and recommended equipment.
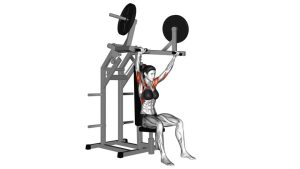
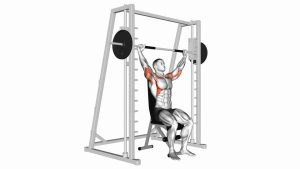
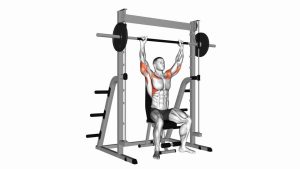
Lever Seated Shoulder Press
This exercise is an excellent option for building shoulder size and pressing strength without needing to manage a barbell or dumbbells in open space. The seated setup and back support make it easier to keep the torso stable, reduce excessive momentum, and direct more effort into the deltoids. It works well for beginners learning pressing mechanics, and it is also valuable for intermediate lifters who want reliable volume for shoulder hypertrophy.
Quick Overview
| Body Part | Front Shoulders |
|---|---|
| Primary Muscle | Anterior deltoid (front deltoid) |
| Secondary Muscle | Lateral deltoid, triceps brachii, upper chest assistance |
| Equipment | Lever shoulder press machine |
| Difficulty | Beginner to Intermediate |
Sets & Reps (By Goal)
- Muscle growth: 3–4 sets × 8–12 reps with 60–90 seconds rest
- Strength focus: 4–5 sets × 5–8 reps with 90–150 seconds rest
- Technique practice: 2–3 sets × 10–15 reps with a slow, controlled tempo
- Shoulder workout finisher: 2–3 sets × 12–15 reps with moderate weight and strict form
Progression rule: Add reps first, then increase load once you can complete all target reps with clean shoulder mechanics, controlled lowering, and no torso cheating.
Setup / Starting Position
- Adjust the seat: Set the machine so the handles are at about shoulder height when you sit down.
- Sit tall: Place your back firmly against the pad and keep both feet flat on the floor.
- Grip the handles: Hold the handles evenly with wrists straight and hands aligned with the pressing path.
- Set your shoulders: Keep the chest lifted, shoulder blades stable, and neck neutral.
- Start under control: Begin with elbows bent and slightly below or in line with shoulder level, depending on your comfort and machine design.
Tip: If the start position feels cramped or overly deep, adjust the seat height before adding more weight.
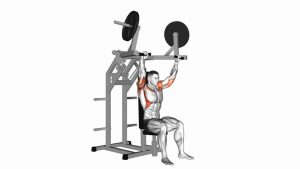
Execution (Step-by-Step)
- Brace and align: Sit firmly into the pad, tighten your midsection lightly, and keep your head neutral.
- Press upward: Drive the handles overhead in a smooth arc without bouncing or jerking.
- Extend with control: Continue pressing until your arms are nearly straight, but do not slam into a hard lockout.
- Pause briefly: Squeeze the shoulders at the top while keeping tension on the machine.
- Lower slowly: Bring the handles back down under control to the starting position, keeping the elbows and wrists aligned.
- Repeat evenly: Maintain the same tempo and range on every rep instead of speeding up as fatigue builds.
Pro Tips & Common Mistakes
- Match the seat to your structure: Proper seat height improves joint alignment and helps the delts do the work.
- Keep wrists stacked: Bent-back wrists can create unnecessary discomfort and reduce pressing efficiency.
- Do not overarch the back: Excessive lumbar extension usually means the weight is too heavy or the ribcage is flaring.
- Use the machine path well: Let the lever guide the movement, but still control both the press and the lowering phase.
- Do not rush the eccentric: Lowering the handles slowly improves tension and usually makes the set more effective.
- Avoid shallow reps: Use a pain-free but meaningful range of motion instead of doing partial presses with momentum.
- Keep shoulders down and stable: Do not turn the movement into a shrug at the top.
FAQ
What muscles does the Lever Seated Shoulder Press work?
It mainly targets the front deltoids. The side delts and triceps also contribute, especially as you press through the middle and top portion of the rep.
Is the machine shoulder press good for beginners?
Yes. The guided path makes it easier to learn overhead pressing mechanics because you do not have to stabilize the load as much as you would with dumbbells or a barbell.
Should I lock out my elbows at the top?
You can reach a near-full extension, but avoid violently snapping into lockout. Stay in control and keep tension on the shoulders throughout the rep.
What if I feel discomfort at the bottom?
First adjust the seat height and reduce the load. Then use a comfortable range of motion that does not create pinching or joint irritation.
Can I use this instead of free-weight overhead pressing?
Yes, especially if your goal is hypertrophy, controlled shoulder volume, or safer pressing with lower stability demands. Many lifters use both machine and free-weight presses in the same training plan.
Recommended Equipment (Optional)
- Weightlifting Wrist Wraps — useful for extra wrist support during heavier pressing sets
- Lifting Gloves — helpful for grip comfort and handle control on pressing machines
- Resistance Band Set — excellent for shoulder warm-ups, activation drills, and mobility work before pressing
- Foam Roller — useful for upper-back mobility and general recovery around shoulder training sessions
- Workout Log Book — helps track seat settings, load progression, reps, and shoulder training volume
Tip: Accessories should improve comfort, warm-up quality, and consistency. They should never replace proper seat setup, controlled reps, and sensible loading.